🧢 Beautiful ✨ Detailed πŸ’ Adorable

Baby Barefoot Sandals Pattern

Baby Barefoot Sandals Pattern
4.9β˜… Rating
2-3 Hours Time Needed
1.4K Made This
βœ‚οΈ

Beginner Friendly Level

Perfect for those just starting their crochet journey, with clear instructions and simple techniques

⏱️

Bite-Sized Project

Finishes in 2-4 hoursβ€”perfect for an afternoon of creative relaxation.

✨

Stylish Touch

An elegant detail to elevate any look, combining traditional techniques with contemporary design sensibilities.

About This Baby Barefoot Sandals Pattern

This pattern creates delicate baby barefoot sandals finished with a five-petal crocheted flower. It includes instructions for both baby and toddler sizes and uses simple rounds and basic stitch groupings. The sandals are made with fingering or worsted weight yarn and are a quick, pretty project.

Baby Barefoot Sandals Pattern crochet pattern - detailed view of completed project

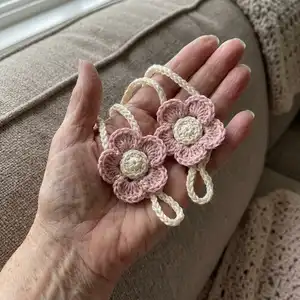
Perfect for baby photo shoots, gifts, or summer wear, the pattern is easy to adjust for size. You can make multiple color combinations for a personalized touch.

Why You'll Love This Baby Barefoot Sandals Pattern

I absolutely love this pattern because it turns simple stitches into a dainty accessory that photographs beautifully. I enjoy how quick the base comes together and how the flower adds an instant handmade charm. The pattern is versatile β€” you can make tiny versions for keychains or larger ones for toddlers. I also appreciate that it uses minimal yarn, making it perfect for using up scraps and trying color play.

Baby Barefoot Sandals Pattern step 1 - construction progress Baby Barefoot Sandals Pattern step 2 - assembly progress Baby Barefoot Sandals Pattern step 3 - details and accessories Baby Barefoot Sandals Pattern step 4 - final assembly and finishing

Switch Things Up

I love customizing these sandals by switching yarn weights and hook sizes to change the final size and texture.

I often use bright contrasting colors for the flower and base to make the petals pop and create a playful look.

For a softer, vintage feel I pick muted pastels and a fine crochet thread with the smaller C hook.

Want a chunkier sandal? Use worsted yarn with the D hook and the flower will become bolder and more durable for toddler wear.

I sometimes embroider a tiny center or sew a tiny button into the flower center for a decorative touch.

Try making the straps shorter and adding a small button loop instead of long ties to create slip-on sandals for quick dressing.

Mix fibers by using cotton for the base (better for warm weather) and acrylic for the flower for easy care and color variety.

I also like adding an extra round of petals for a fuller flower β€” simply repeat the petal round or add a second flower layer.

For gift sets I make matching headbands or hats using the same flower motif so the pieces coordinate perfectly.

Finally, experiment with beads, tiny bells, or ribbon threaded through the strap for a unique finishing detail that fits your style.

Common Mistakes & How to Fix Them

βœ— Not counting stitches after the join can throw off your shape; always check your stitch count after each round to stay on track. βœ— Working into the wrong loops for round 3 (not using the back loops only) will distort the base; be sure to work round 3 into the back loops only as instructed. βœ— Placing straps unevenly or with inconsistent chain lengths causes asymmetry; measure or count chains and position straps carefully before binding off. βœ— Forgetting to work all stitches inside brackets in the same stitch will flatten petals; when you see brackets, complete that whole group in the same stitch. βœ— Pulling the straps too tight when tying knots can pucker the sandal; tie gently and trim ends neatly or knot loosely for a neat finish.

Baby Barefoot Sandals Pattern

Make sweet, delicate baby barefoot sandals with a pretty flower motif. This pattern includes clear step-by-step rounds for both baby and toddler sizes so you can customize the fit. You'll love how quickly these come together using fingering or worsted yarn, perfect for gifts or photo props. The design is lightweight and comfortable for little feet and finishes beautifully with a stitched flower center.

Beginner Friendly 2-3 Hours

Materials Needed for Baby Barefoot Sandals Pattern

β€” Main Fabric

  • 01
    Fingering weight yarn (Color A) for sandal base or crochet thread/embroidery floss for delicate finish (Baby size)
  • 02
    Fingering weight yarn (Color B) for flower center and petals (Baby size)
  • 03
    Worsted weight yarn (Color A and Color B) recommended for toddler size
  • 04
    Featured yarns used: Knit Picks Comfy Fingering and Worsted weight yarns
  • 05
    No exact yardage provided; small amounts of each color are required (one small skein or scraps are sufficient)

β€” Tools Required

  • 01
    Crochet hook size C (2.75 mm) for delicate/fingering work
  • 02
    Crochet hook size D (3.25 mm) for toddler/worsted work
  • 03
    Scissors
  • 04
    Yarn needle for weaving in ends and sewing centers
  • 05
    Stitch markers (optional)
  • 06
    Embroidery floss or crochet thread (optional) for fine center finishing
  • 07
    Pins for holding pieces while finishing (optional)

Progress Tracker

0% Complete

β€” Materials :

Info :

Baby Size: 1.5 inches across flower. Sandal Base Color A - use C or 2.75 mm hook. Fingering weight yarn, crochet thread or embroidery floss. Flower Color B - fingering weight yarn, crochet thread or embroidery floss.

Info :

Toddler Size: 2 inches across flower. Use D or 3.25 mm hook. Color A and B are Worsted Weight yarn. Use the same pattern for both sizes. Featured Sandals are made with Knit Picks Comfy Fingering and Worsted weight yarns.

β€” Abbreviations :

Info :

Ch Chain. Sc Single crochet. Dc Double Crochet. Sl st Slip stitch. BLO means work in back loops only.

β€” Notes :

Infos :

1. Do not count the chain stitch as a stitch at the beginning of round. 2. When joining at end of round always join to the top of the chain stitch you began the round with. 3. I did not do an end of the round stitch count in this pattern because of all the chaining. I thought it might be confusing. All of our other patterns do have stitch count though. :o)

β€” How to read pattern :

Info :

A. When you see parenthesis () in the pattern they are either referring to the numbers for the larger sizes or will be around notations such as (See Picture A). B. When you see Brackets [] in the pattern that means that you work everything in them as a set or together. C. When I have a number followed by a st, that stitch needs to be worked over that number of stitches. Example: "10 sc" that is 1 sc in each of the next 10 stitches.

β€” Gauge :

Info :

?????? I wasn't sure what to put here! We normally have gauge I just wasn't sure how to measure it for this pattern. :o)

β€” Sandal Base :

Round 1 :

With color A ch 4, join with slip stitch to 4th chain from hook to form a small ring. (See Picture A)

Round 2 :

Chain 1 (does not count as stitch) place 9 sc in ring. Join with slip stitch to the chain 1 from the beginning of round. (See Picture B) Do not turn.

Info :

In this pattern when stitches are in brackets that means to put that group of stitches in the same stitch.

Round 3 :

This whole round will be worked in the back loops only of the previous round. Ch 3, starting in first stitch * [2 dc, chain 2, 2 dc], 1 dc in each of the next two stitches. Repeat from * 1 more time. [2 dc, chain 11, now working back down chain put 1 slip stitch in 10th chain from hook, ch 1, 2 dc back in same stitch], 1 dc in each of the next two stitches. Join with slip stitch to the top of the chain 3 that you started the round with. Do not turn.

β€” Straps :

First strap :

Slip stitch in next 3 stitches. This should bring you to the middle of the first chain 2 spot. (See pictures C and D) Ch 60, Bind off!

Second Strap :

Attach yarn to next chain three spot with a single crochet. (See Picture D on first page) Ch 60, Bind off!

Info :

Note: I tied the ends of my straps in a knot to kind of finish them off. You don't have to, I just thought it made them look better. :o)

β€” Flower :

Flower :

With color B attach yarn to any one of the exposed front loops that were not worked in round 3. (See Picture E). Starting in the stitch you attached to, remember to work all stitches between brackets in the same stitch. [Ch 2, 5 dc, ch 2, slip stitch back to same stitch], first petal made! :o) Now skip next stitch, *[slip stitch to next stitch, Ch 2, 5 dc, ch 2, slip stitch back to same stitch], skip next stitch, repeat from * all the way around and end round by joining with a slip stitch to base of first flower petal made. You should have 5 flower petals when complete. Bind off!

Info :

Around the center circle fill in the center by slip stitching across the flower's center in random stitches until the center is filled to your liking. :o) This may look ugly before it is finished but no worries! Just keep slip stitching away and fill in the holes until it is pretty. :o) (See Picture H) Bind Off!

Info :

Slip stitch across the center several times to fill in the center. Do this randomly like arrows show.

β€” Finishing :

Finishing :

Using color A again attach to center of flower by pulling a loop of yarn from back to front and top stitch by slip stitching all the way around the center of the flower at the base of the petals. (See arrows in picture G) After slip stitching around the center circle fill in the center by slip stitching across the flower's center in random stitches until the center is filled to your liking. Bind off and weave in ends.

Info :

Fold a corner of the sandal to the back to make it easier to get to the exposed front loops when making the flower petals (see Picture F). Place second strap where indicated in pictures. Weave in ends and you are done!

Assembly Instructions

  • Attach the first strap by slip stitching in the next 3 stitches after round 3 to bring you to the middle of the first chain-2 spot, then chain 60 and bind off to form the long tie.
  • Attach the second strap by joining yarn to the next chain-3 spot with a single crochet, chain 60 and bind off; knot or finish strap ends as preferred.
  • Sew the flower to the exposed front loops that were not worked in round 3 so the petals sit centered at the front of the sandal.
  • Finish the flower center by slip stitching across the center several times in random holes until it is filled to your liking, then bind off and weave in ends.
  • Fold the sandal corner back to access exposed front loops while making the petals, and pin pieces in place before final sewing to ensure symmetry.

Important Notes

  • πŸ’‘Do not count the initial chain as a stitch at the beginning of the round to avoid miscounting the foundation.
  • πŸ’‘When joining at the end of a round always join to the top of the chain stitch you began the round with for consistent joins.
  • πŸ’‘Work Round 3 in the back loops only (BLO) of the previous round to form the sandal shape correctly.
  • πŸ’‘Fold a corner of the sandal to the back to more easily reach the exposed front loops when making the flower petals.
  • πŸ’‘Tie strap ends or finish with a small knot for a neat look, and weave in all ends securely.

These Baby Barefoot Sandals are a quick, charming project you can complete in an afternoon. They make lovely photo props, thoughtful handmade gifts, or a small stash-busting project for colorful yarn scraps. Give them as a cheerful, handcrafted touch to little outfits β€” sweet, simple, and so pretty! 🧢🌸

You ask,

we answer.

FAQs

What size will the finished piece be?

The baby size flower measures approximately 1.5 inches across; the toddler flower measures roughly 2 inches across when using the recommended yarn and hooks.

Can I use different yarn weights for this pattern?

Yes, you can use different yarn weights, but changes will affect the final size; use smaller hooks for fingering yarn and larger hooks for worsted weight to maintain the proportions.

Do I need prior crochet experience for this pattern?

This pattern is beginner friendly and uses basic stitches like single crochet and double crochet, but familiarity with joining rounds and working in back loops will help.

How long does this project typically take to complete?

Most crocheters finish a pair of barefoot sandals in about 2-3 hours, though time may vary by experience level and customization.