Create Alice, a sweet handcrafted amigurumi doll with detailed hair, expressive features and removable clothes. This pattern guides you step-by-step through crocheting the head, hairstyle, ears and facial embroidery so you can build a charming collectible. Perfect for makers who enjoy thoughtful finishing and small assembled details. Follow the clear rounds and photo-based assembly notes to bring Alice to life.
Progress Tracker
0% Complete
— Head :
Info :
The main color - Alize Cotton gold beige 262.
Round 3 :
(1 sc, inc)*6 (18)
Round 4 :
1 sc, inc, (2 sc, inc)*5, 1 sc (24)
Round 5 :
(3 sc, inc)*6 (30)
Round 6 :
2 sc, inc, (4 sc, inc)*5, 2 sc (36)
Round 7 :
(5 sc, inc)*6 (42)
Round 8 :
3 sc, inc, (6 sc, inc)*5, 3 sc (48)
Round 9 :
(7 sc, inc)*6 (54)
Round 10 :
4 sc, inc, (8 sc, inc)*5, 4 sc (60)
Round 11-19 :
9 rnds of 60 sc
Round 20 :
30 sc, put the marker or the thread of contrast color, 30 sc (60)
Info :
Between 19th and 20th rnds count 6 sc from the marker in both directions. Insert the safety eyes and fix them.
Round 21 :
20 sc, inc, 2 sc, inc, 12 sc, inc, 2 sc, inc, 20 sc (64)
Round 22-25 :
4 rnds of 64 sc
Round 26 :
(14 sc, dec)*4 (60)
Round 27 :
4 sc, dec, (8 sc, dec)*5, 4 sc (54)
Round 28 :
(7 sc, dec)*6 (48)
Round 29 :
3 sc, dec, (6 sc, dec)*5, 3 sc (42)
Round 30 :
(5 sc, dec)*6 (36)
Round 31 :
2 sc, dec, (4 sc, dec)*5, 2 sc (30)
Round 32 :
(3 sc, dec)*6 (24)
Round 33 :
1 sc, dec, (2 sc, dec)*5, 1 sc (18)
Round 34 :
(4 sc, dec)*3 (15)
Info :
Cut off the thread, stuff the head tight with fiberfill.
— Hairstyle (2 pcs) :
Info :
Crochet with brown YarnArt Jeans 70.
Round 3 :
(1 sc, inc)*6 (18)
Round 4 :
1 sc, inc, (2 sc, inc)*5, 1 sc (24)
Round 5 :
(3 sc, inc)*6 (30)
Round 6 :
2 sc, inc, (4 sc, inc)*5, 2 sc (36)
Round 7 :
(5 sc, inc)*6 (42)
Round 8 :
3 sc, inc, (6 sc, inc)*5, 3 sc (48)
Round 9 :
(7 sc, inc)*6 (54)
Round 10 :
4 sc, inc, (8 sc, inc)*5, 4 sc (60)
Round 11-14 :
4 rnds of 60 sc
Info :
Cut off the thread, leaving a tip for sewing.
— Braids :
Info :
Crochet with the same brown color. All 3 strands will take 8 sc. Fix the thread, make a ch of 37 sts, from the 2nd st from the hook crochet 36 sc, 1 sc along the hairstyle, skip 1 sc)*3. After you skipped 1 sc, cut the thread and attach a new thread to the next sc, continue to make a ch of 37 sts for the 2nd strand. Repeat the same with the other hairstyle. Braid the strands and tie with the red thread.
— Forelock :
Info :
Crochet with the same brown color.
1st part :
5 ch, from the 2nd st from the hook crochet 4 sc. Cut the thread, leaving a tip for sewing.
2nd part :
7 ch, from the 2nd st from the hook crochet 6 sc. Cut the thread, leaving a tip for sewing.
— Back hairs :
Round 1 :
Make a ch of 4 sts, from the 2nd st from the hook crochet: 3 sc; 5 ch, from the 2nd st from the hook crochet: 4 sc; 3 ch, from the 2nd st from the hook crochet: 2 sc. Cut off the thread and sew off the hairs with a needle, as shown in the photo.
— Ears (2 pcs) :
Info :
The main color - Alize Cotton gold beige 262.
Info :
Cut off the thread, leaving a tip for sewing.
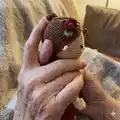
— Decoration :
Info :
Cut a long beige thread and make a tightening, as shown in the photo. Follow the points: 1-2-3. Cut a new thread and do the same on the other side: 4-5-6. Tie the threads together in a knot, pulling the eyes a little.
— Facial finishing and embroidery :
Info :
Embroider the nose between 21st and 22nd rnds. The width of the nose is 5 sc. Embroider as shown in the photo.
Info :
Take the white thread and embroider the whites of the eyes.
Info :
Take the brown thread and embroider the eyebrows.
Info :
Embroider the freckles with a thin Mouline thread of brown color. The photo shows where you need to embroider them.
— Assembly :
Info :
Sew on the ears between 20th and 21st rnds. Place the hairstyles as shown in the photo and sew them on. Sew the forelock in the middle, sew the short hairs on the back.
This Alice the Doll pattern is made with love and attention to tiny details to create a timeless little friend. Each finishing step — from embroidering freckles to sewing the hair — adds personality and charm you can be proud of. Make her for gifting, display, or to expand your amigurumi collection; she makes a perfect thoughtful handmade present. 🧵🧸