About This A Hairy Caterpillar Amigurumi Pattern
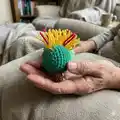
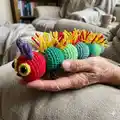
This pattern creates a colourful, hairy caterpillar amigurumi worked in joined rounds from the head down to the tail. It features separate pieces for eye rings, antennae and tiny feet plus a fun hairy spine made from yarn strands. The instructions include clear row counts, colour change notes and simple finishing tips so you can assemble a professional-looking toy.

Worked in DK (double knit) yarn with a 4mm hook, the finished caterpillar measures approximately 25cm long. The pattern is written in UK terminology and includes full assembly and trimming instructions for the hair spine.
Why You'll Love This A Hairy Caterpillar Amigurumi Pattern
I absolutely love this pattern because it celebrates colour and texture in such a playful way. I enjoy how each segment becomes a little project of its own, letting me experiment with colour placement and contrasts. The hairy spine is one of my favourite details — it adds movement and character with very little extra work. I also love that the finished piece is sturdy, cuddly and quick enough to make as a weekend project.
Switch Things Up
I love to change up the colours to create different personalities — try pastel shades for a soft baby-friendly version or bold neons for a playful, modern toy.
If you want a bigger caterpillar, I switch to a chunkier yarn and a larger hook; the same rounds make a chunkier, cuddlier toy.
I often substitute safety eyes for embroidered eyes for younger children or a more handmade look — just stitch the centres securely.
To make a mini keychain version, use finer yarn and a smaller hook and sew on a keyring loop to the tail.
For additional texture, try mixing yarn types for the spine — a fuzzy mohair strand mixed with DK adds a dramatic mane.
I sometimes braid three short strands of yarn for decorative antennae instead of the crocheted ones for a whimsical effect.
Try varying the spacing and length of the hair strands to create a punky, spiky or soft fluffy spine depending on the look you want.
I like to embroider little markings or stripes on individual segments for extra character — small surface stitches make a big difference.
If you prefer poseable legs, consider adding a short length of wire inside the feet before placing stuffing to help them bend slightly.
Make a whole family by mixing colour palettes and sizes — coordinating shades make a lovely set for gifting or display.
Common Mistakes & How to Fix Them
✗ Not leaving a small hole in the eye ring magic ring can make fitting the safety eye stem impossible; leave the centre slightly open so the eye stem fits through before attaching the back.
✗ Forgetting to stuff as you go will make shaping difficult and bulky; stuff each segment gradually to maintain smooth, even curves and proper shaping.
✗ Skipping colour change notes will cause jarring joins between segments; change yarn exactly where the pattern instructs and weave ends securely to hide joins.
✗ Attaching feet or antennae without pinning can lead to asymmetry; pin pieces in place first, check alignment, then sew securely so both sides match.