๐Ÿงถ Beautiful โœจ Detailed ๐Ÿ’ Adorable

Yumi the Dachshund Bicolor Amigurumi Pattern

Yumi the Dachshund Bicolor Amigurumi Pattern
4.8โ˜… Rating
5-7 Hours Time Needed
1.8K Made This
โœ‚๏ธ

Intermediate Level

Ideal for those with basic crochet experience, featuring slightly more advanced stitches and techniques to expand your skills.

โฑ๏ธ

Weekend Treat

Takes 5-7 hours, making it an enjoyable project to finish over a couple of days.

๐Ÿงธ

Cute Companion

An adorable friend to cherish, handcrafted with love to bring comfort and joy for years to come.

About This Yumi the Dachshund Bicolor Amigurumi Pattern

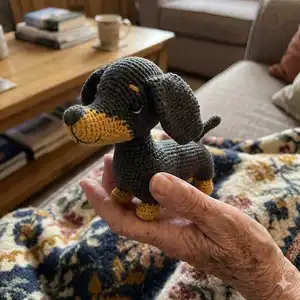
This add-on expands the original Yumi the Dachshund pattern to show how to make a bicolor dog with contrasting muzzle, paws and details. It includes the full head shaping with alternating color rounds, ear shaping and four leg variations. Clear step-by-step round instructions and photos guide you through color changes and finishing touches.

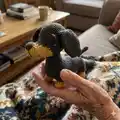
Yumi the Dachshund Bicolor Amigurumi Pattern crochet pattern - detailed view of completed project

Designed to work with the main Yumi pattern, this instruction covers only the parts that differ for a bicolor version. Use the colors you choose and follow the main pattern for body assembly.

Why You'll Love This Yumi the Dachshund Bicolor Amigurumi Pattern

I absolutely love this pattern because the bicolor details instantly bring personality and charm to the dachshund. I enjoy the process of alternating yarn colors to create a neat muzzle and paw contrast that looks handcrafted yet polished. The shaping is thoughtful so the head, ears and legs sit naturally once sewn in place. I find the embroidery steps (nose, smile, eyebrows) give the face so much character and are quick to add. This pattern is a rewarding mix of technique and quick wins that keeps me excited to finish each little dog.

Yumi the Dachshund Bicolor Amigurumi Pattern step 1 - construction progress Yumi the Dachshund Bicolor Amigurumi Pattern step 2 - assembly progress Yumi the Dachshund Bicolor Amigurumi Pattern step 3 - details and accessories Yumi the Dachshund Bicolor Amigurumi Pattern step 4 - final assembly and finishing

Switch Things Up

I love experimenting with colors on this pattern; try swapping the mustard for pastel pink or teal for a totally different vibe.

If you want a chunkier toy, use a bulkier cotton blend and a larger hook to make a cuddly version of Yumi.

To make a tiny keychain, use fingering weight yarn and a much smaller hookโ€”adjust the safety eyes to tiny beads or embroidered eyes.

I often add little crocheted accessories like a tiny scarf, bow or collar to give each dog a personality of its own.

Try embroidering different mouth shapes and eyebrow placements to change the expression from cheeky to shy.

For a posable effect, consider inserting thin wire into the limbs before stuffing and sewing them closed, being careful to secure wire ends safely.

I sometimes mix yarn texturesโ€”pair matte cotton with a slightly shiny cotton for subtle contrast on the muzzle or paws.

If you prefer sewn-on fabric eyes, cut small felt circles and stitch or glue them in place instead of safety eyes for a softer look.

Make a set of dachshunds in coordinated colors as a gift setโ€”vary collar colors or stripe patterns to tell them apart.

I recommend trying alternate stripe placements on the body using the same color sequence from the pattern to create unique sweaters or markings.

Common Mistakes & How to Fix Them

โœ— Changing color without securing the old yarn will cause loose loops and gaps; always carry the yarn neatly or weave tails in and secure the color change by pulling the new yarn through the two loops of the last stitch. โœ— Working too loosely makes stuffing show through and distorts the shape; maintain firm, consistent tension and use a smaller hook if needed to get a dense fabric. โœ— Forgetting to mark eye positions leads to misaligned features; follow the pattern and mark the points (rnd 19) with a contrast thread before inserting safety eyes. โœ— Not stuffing as you go can make shaping difficult and lumpy; start stuffing early (head rounds 32 onward) and continue stuffing gradually while crocheting to keep an even shape. โœ— Skipping stitch count checks during increases and decreases results in incorrect shaping; count stitches after each round, especially when instructions change across color segments. โœ— Sewing parts without pinning can cause asymmetry; pin parts in place (ears between rnds 22-31, legs per markers) and check alignment before sewing securely.

Yumi the Dachshund Bicolor Amigurumi Pattern

Make a charming bicolor dachshund amigurumi you will love to display or gift. This add-on pattern shows exactly how to crochet the two-color head, ears and all four legs with clear step-by-step rounds. You will learn alternate color changes, embroidery placement and finishing details to create a polished handmade toy. Follow the complete instructions and photos to get the adorable Yumi look.

Intermediate 5-7 Hours

Materials Needed for Yumi the Dachshund Bicolor Amigurumi Pattern

โ€” Main Fabric

  • 01
    YarnArt Jeans (semi cotton) - black #28 - 40g / 128m (140 yards)
  • 02
    YarnArt Jeans (semi cotton) - mustard #84 - 15g / 48m (54 yards)
  • 03
    Alize Cotton Gold (semi cotton) - white #55 - 5g / 16m (18 yards)
  • 04
    Sample also references Alize Cotton Gold grey #21 for alternate details

โ€” Tools Required

  • 01
    Crochet hook size 2.0mm (size C)
  • 02
    A pair of 10 mm (0.5") safety eyes
  • 03
    Polyfill to stuff
  • 04
    Tapestry needle
  • 05
    Stitch markers and pins
  • 06
    Scissors

Progress Tracker

0% Complete

โ€” Head :

Info :

All details are crocheted in continuous spirals, without joining the rounds. You can use a stitch marker to keep track of your rounds. Start with color B

Round 01 :

6 sc into the center of magic adjustable ring, pull tail to close the ring (6)

Round 02 :

(inc) 6x (12)

Round 03 :

(sc, inc) 6x (18)

Round 04 :

(2sc, inc) 6x (24)

Round 05 :

sc in each st around (24)

Info :

In next rnds the color of yarn will be changed alternately:

Info :

How to change the color yarn: with the two loops from the previous yarn on the hook, wrap new yarn over the hook (image 1.1) and pull it through the two loops of the stitch. (image 1.2) It is important to remember, that the color change must always be started one stitch earlier.(image 1.3)

Round 06 :

color B (next - B): 6sc, color A (next - A): 4sc, B: 14sc (24)

Round 07 :

B: 5sc, A: 6sc, B: 13sc (24)

Round 08 :

B: 4sc, A: (dec, sc) 2x, dec, B: 12sc (21)

Round 09 :

B: 3sc, A: 7sc, B: 4sc, (inc, 2sc) 2x, inc (24)

Round 10 :

B: 3sc, A: 7sc, B: 14sc (24)

Round 11 :

B: 2sc, A: 9sc, B: 13sc (24)

Round 12 :

B: 2sc, A: 5sc, inc, 3sc, B: 4sc, inc, 7sc, inc (27)

Round 13 :

B: 2sc, A: 10sc, B: 15sc (27)

Round 14 :

B: sc, A: 12sc, B: 14sc (27)

Round 15 :

B: sc, A: 7sc, inc, 5sc B: 3sc, inc, 8sc, inc (30)

Round 16 :

A: 16sc, B: 13sc, A: sc (image 1.4) (30)

Round 17 :

A: 4sc, (inc, sc) 4x, inc, 4sc, B: 11sc, A: 2sc (35)

Round 18 :

A: 5sc, (inc, 2sc) 4x, inc, 5sc, B: 9sc, A: 3sc (40)

Info :

In next rnd we should mark points for eyes:

Round 19 :

A: 4sc, with a contrast thread mark here a point for the first eye (image 1.5), 19sc, mark here a point for the second eye, 6sc, B: 7sc, A: 4sc (40)

Round 20 :

A: (inc, 3sc, inc, 7sc) 2x, inc, 3sc, inc, sc; B: 5sc, A: 5sc (46)

Round 21 :

A: 37sc, B: 3sc, A: 6sc (18)

Info :

For the next rnds use color A only:

Round 22 :

sc, (inc, 4sc, inc, 8sc) 2x, inc, 4sc, inc, 11sc (image 1.6) (52)

Round 23-29 :

sc in each st around (52)

Info :

If you use safety eyes, it is the best moment to place them. Place them in points we marked earlier in rnd 19. (image 1.7)

Round 30 :

(11sc, dec) 4x (48)

Round 31 :

3sc, (dec, 6sc) 5x, dec, 3sc (42)

Round 32 :

(5sc, dec) 6x (36)

Info :

Start stuffing the head with filling material. And continue stuffing it during crocheting.

Round 33 :

2sc, (dec, 4sc) 5x, dec, 2sc (30)

Round 34 :

(3sc, dec) 6x (24)

Round 35 :

sc, (dec, 2sc) 5x, dec, sc (18)

Round 36 :

(sc, dec) 6x (12)

Round 37 :

(dec) 6x (6)

Info :

Fasten off, leaving a long tail. Using tapestry needle, weave the yarn tail through the front loop of each remaining stitch and pull tight to close. Weave in the yarn end. (image 1.8)

โ€” EARS (make 2) :

Info :

Start with color A

Round 01 :

ch10, sc in 2nd ch from hook and remaining 7sc, inc in the last st, turn and continue on the other side of a chain 8sc, inc in the last st (image 2.1) (20)

Round 02-03 :

sc in each st around (20)

Round 04 :

(9sc, inc) 2x (22)

Round 05 :

(10sc, inc) 2x (24)

Round 06 :

(11sc, inc) 2x (26)

Round 07 :

(12sc, inc) 2x (28)

Round 08-13 :

sc in each st around (28)

Round 14 :

(12sc, dec) 2x (26)

Round 15 :

(11sc, dec) 2x (24)

Round 16 :

(10sc, dec) 2x (22)

Round 17 :

(9sc, dec) 2x (20)

Round 18 :

(8sc, dec) 2x (18)

Round 19 :

(7sc, dec) 2x (16)

Round 20 :

Crochet 3sc, then flatten an ear and line up stitches, 8sc through both sides to the end (image 2.2) (8)

Info :

Fasten off, cut the yarn, leaving a long tail for sewing. (image 2.3)

Info :

Sew ears to the both sides of a head between 22 and 31 rnds of a head. The distance between ears - 15sc along the 23rd rnd of a head. The distance between ear and eye - 3sc up from the eye. (image 2.4, 2.5, 2.6)

Info :

Take a piece of color A yarn and tapestry needle, insert needle from under the head (level of of 25th rnd) (image 2.7) and bring it out right next to the eye, and insert it back on the opposite side of an eye (image 2.8, 2.9), then bring it back down under the head, one stitch from the entry. Repeat with the second eye, inserting the needle in the same points from the bottom (image 2.10). Then properly pull all yarn ends and, keeping yarn tension, tie a knot of all yarn ends, hide an ends. (image 2.11, 2.12)

Info :

Take a piece of black yarn and embroider the nose between 1 and 7 rnds of a head's top part. The size of a nose - 5sc in height, 3sc - the bottom side, 7sc - the top side. (image 2.13, 2.14)

Info :

Embroider the line from the bottom of a nose to the 3 rnd of the head's bottom part.Then embroider a smile to the both sides from the line between 3 and 8 rnds of a head. (image 2.15, 2.16)

Info :

With the color B yarn embroider the eyebrows, placing them between 20 and 22 rnds over eyes (make 2 loops of yarn). The length of the eyebrow - 2sc, the height - 1sc. (image 2.17)

Info :

With the white yarn embroider lines under the eyes (image 2.17).

โ€” LEGS (make 4) :

Info :

Start with color B

Round 01 :

ch5, sc in 2ndch from hook and remaining 2sc, 3sc in the last st, turn and continue on the other side of a chain 3sc, 3sc in the last st (image 3.1) (12)

Round 02 :

(3sc, 3inc) 2x (18)

Round 03 :

This rnd work with back loops only (image 3.2) sc in each st around (18)

Round 04 :

sc in each st around (18)

Round 05 :

sc, 6dec, 5sc (12)

Round 06 :

sc in each st around (12)

Info :

Change yarn to color A

Round 07 :

2sc, 3inc, 7sc (15)

Info :

The next rnd will be different for each leg.

For a back right leg (Round 08) :

3sc, (inc, sc) 2x, inc, 7sc

Info :

Make slst. Fasten off, cut the yarn. Attach a pink marker on the 3rd st from the last slst. (image 3.3)

For a back left leg (Round 08) :

3sc, (inc, sc) 2x, inc

Info :

Make slst. Fasten off, cut the yarn. Attach a green marker on the 3rd st from the last slst.

For a front left leg (Round 08) :

3sc, (inc, sc) 2x, inc, sc

Info :

Make slst. Fasten off, cut the yarn. Attach a yellow marker on the 3rd st from the last slst.

For a front right leg (Round 08) :

3sc, (inc, sc) 2x, inc, 7sc

Info :

Make slst. Fasten off, cut the yarn. Attach a blue marker on the 3rd st from the last slst. (image 3.4)

Info :

The next process is the same, as in the main pattern, so next follow the main pattern since page 6 (body), but use colors you chose for your dog.

Assembly Instructions

  • Sew ears to both sides of the head between rounds 22 and 31; space ears 15sc apart along round 23 and place them 3sc up from each eye for correct alignment.
  • Insert safety eyes at the points marked in round 19 before continuing with round 23; secure according to the safety eye instructions and reinforce with washers if desired.
  • Attach the head to the body following the main pattern instructions; align the neck opening of the head with the body top and sew securely with a whipstitch using the long tail.
  • Position and sew legs using the colored markers placed at the third stitch from the last slip stitch; pin each leg in place and sew firmly so the toy stands evenly.
  • Embroider nose, mouth and eyebrow details after sewing parts: use black yarn for nose (between rounds 1 and 7 top), color B for eyebrows (between rounds 20 and 22), and white for lines under the eyes.

Important Notes

  • ๐Ÿ’กUse stitch markers to keep track of your rounds and the specific color-change points to avoid misplacement of patterns and features.
  • ๐Ÿ’กStuff gradually and evenlyโ€”start stuffing the head at round 32 and continue stuffing during crocheting for smooth shaping without lumps.
  • ๐Ÿ’กWhen changing colors, pull the new yarn through the two loops of the stitch and start the color change one stitch earlier to avoid gaps.
  • ๐Ÿ’กPin parts before sewing to check placement symmetry, especially ears and legs which reference exact round positions.
  • ๐Ÿ’กWeave in ends and hide yarn tails after final assembly to ensure a neat professional finish.

This bicolor Yumi dachshund add-on brings playful contrast to an already adorable amigurumi. Customize the colors to match your decor or make a tiny pack of pups for gifting. Follow the clear rounds, color-change tips and embroidery steps for a delightful finished companion. ๐Ÿงถ๐Ÿพ

You ask,

we answer.

FAQs

What size will the finished piece be?

The finished amigurumi measures approximately 7.5" (19 cm) in height and 7" (17 cm) wide using the recommended yarn and 2.0 mm hook.

Can I use different yarn weights for this pattern?

Yes, you can use different yarn weights, but your finished piece will change size; choose an appropriate hook for the yarn and expect the stitch counts to produce a different scale.

Do I need prior crochet experience for this pattern?

This pattern is rated intermediate because it includes alternating color changes, shaping with increases and decreases, and small-piece assembly; basic knowledge of single crochet, increases and decreases is recommended.

How long does this project typically take to complete?

Most crocheters complete this bicolor add-on plus the main pattern in about 5-7 hours, depending on experience and detail work such as embroidery and sewing.