🧢 Beautiful ✨ Detailed πŸ’ Adorable

Winter Is Coming Beanie Pattern

Winter Is Coming Beanie Pattern
4.3β˜… Rating
2-3 Hours Time Needed
3.7K Made This
βœ‚οΈ

Beginner Friendly Level

Perfect for those just starting their crochet journey, with clear instructions and simple techniques

⏱️

Bite-Sized Project

Finishes in 2-4 hoursβ€”perfect for an afternoon of creative relaxation.

🧣

Snug Essential

Everyday comfort with practical charm, designed for both functionality and style through changing seasons.

About This Winter Is Coming Beanie Pattern

This pattern creates the "Winter Is Coming" beanie β€” a flat-worked crochet cap that reproduces a fishermans rib look using HDC in the back loop. It is fully customisable to any head size and shows how to make a tubular hat by joining the short sides. The instructions use simple stitches and a large hook to create bold, chunky ribs.

Winter Is Coming Beanie Pattern crochet pattern - detailed view of completed project

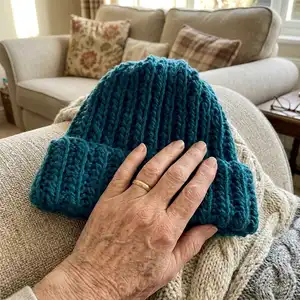
The beanie uses half double crochet through the back loop to create vertical ribs and finishes by closing the top with gathered stitches. Notes include a suggested gauge and final dimensions used so you can adapt measurements to your own head.

Why You'll Love This Winter Is Coming Beanie Pattern

I absolutely love this pattern because it takes a classic knitted fishermen's rib look and makes it accessible to crocheters using simple HDC techniques. I love how quickly the ribs appear when you work through the back loop with a large hook, giving a handmade, chunky texture. This pattern is highly adaptable β€” I often change chain starting length to fit different head sizes. I also enjoy how fast you can make a warm, finished beanie with only a few steps and minimal finishing work.

Winter Is Coming Beanie Pattern step 1 - construction progress Winter Is Coming Beanie Pattern step 2 - assembly progress Winter Is Coming Beanie Pattern step 3 - details and accessories Winter Is Coming Beanie Pattern step 4 - final assembly and finishing

Switch Things Up

I love changing up the yarn to change the look; try a bulky boucle for extra texture.

I sometimes switch to a smaller hook to make a tighter rib and a more fitted hat.

I like to add stripes every 8 rows by alternating colors for a playful banded beanie.

I also experiment with adding a folded cuff by increasing the chain length and folding up the bottom edge after seaming.

I often use a fuzzy mohair held with the main yarn for a soft halo effect that still shows ribs.

I sometimes embroider a small logo or initials on the brim for a personalized gift.

I like to make a mini version using fingering yarn and a smaller hook for keychain-sized beanies.

I occasionally add a pompom to the top β€” you can attach it after closing the top with the gathered stitches.

I sometimes block the beanie lightly to shape the crown and even out the ribs if the yarn allows.

I recommend trying different starting chain lengths and measuring on a head form as you go to get the perfect fit for any recipient.

Common Mistakes & How to Fix Them

βœ— Skipping the back loop technique; always work the HDC through the back loop only so ribs form correctly. βœ— Not measuring your starting chain length; measure head circumference and subtract 4 cm as advised to get a snug fit. βœ— Joining the two sides incorrectly; join with 40 slip stitches vertically to create an even tube before closing the top. βœ— Pulling the final yarn too tight too quickly; feed yarn through remaining stitches and tighten gradually to avoid puckering.

Winter Is Coming Beanie Pattern

Make a cozy, customizable beanie worked flat in crochet that mimics the fishermen's rib knit. This pattern is simple and beginner-friendly, letting you adapt size and height to your head. Follow clear row-by-row instructions to create a warm hat with pronounced ribs using HDC through the back loop.

Beginner Friendly 2-3 Hours

Materials Needed for Winter Is Coming Beanie Pattern

β€” Main Fabric

  • 01
    Morelfil BigBall yarn - 100 g (used in sample)
  • 02
    Wool yarn - approximately 100 g (alternative wording in materials)

β€” Tools Required

  • 01
    Crochet hook size 8 mm
  • 02
    Two knitting needles (referenced when describing fishermen's rib inspiration)
  • 03
    Scissors (for cutting yarn)

Progress Tracker

0% Complete

β€” Beanie :

Info :

Description: Winter is coming Beanie is a crocheted cap, worked in flat, completely customisable to any size, reproducing the fisherman's rib stitch knitted with two needles.

Info :

Gauge: No gauge required; you can work adapting the shape to the head dimension. In my case the gauge was 14 lines x 20 stitches for 10x10 cm

Info :

My final dimension was: 49 cm for the circumference and 32 cm for the height. Also in this case you can adapt your dimension to the shape of your head.

Info :

Yarn: I used 100 gr of Morelfil BigBall

Info :

Hook: 8 mm, I used this size, but you can use any size according to the yarn used, bigger is your hook, bigger will appear your ribs.

Info :

Techniques used: slip stitch, half double crochet.

Info :

Level: Beginner.

Infos :

Abbreviations: Chain: ch. Half Double Crochet: hdc. Slip Stitch: slt.

Info :

Materials: with a hook of 8 mm, I used 100 gr of wool.

Info :

Let's go!

Info :

Chain to reach about 35 cm, in my case 40 ch.

Info :

Let's crochet in rows, back and forth. All rows except for the last one will be made with HDC stitch made through the back loop.

Round 1 :

Row 1: 40 hdc

Round 2 :

Row 2: chain, 40 hdc though the back loop

Round 3 :

Row 3: chain, 40 hdc though the back loop

Round 4 :

Repeat *Row 2 and 3* until reach a width of 53 cm, in my case I worked 56 rows. You can adjust your width measuring the head less 4 cm.

Round 5 :

Last row: join the two sides in vertical with 40 slt. You will now have a tube. See pictures below.

Round 6 :

Cut the yarn and pull yarn through the remaining stitches, tighten together and fasten. Your beanie is ready!

Assembly Instructions

  • Join the two sides vertically with 40 slt (slip stitches) along the short edge as described in the 'Last row' instruction to form a tube.
  • After joining the sides, you will now have a tube; compare with the pattern pictures to ensure the seam and ribs align correctly.
  • Cut the yarn and pull the yarn through the remaining stitches at the top of the tube, then tighten together and fasten securely.
  • Final step: make any final adjustments to the brim and shape; your beanie is ready to wear.

Important Notes

  • πŸ’‘You can adapt the starting chain length to your head measurement; sample used 40 ch for about 35 cm before seaming.
  • πŸ’‘Measure head circumference and subtract about 4 cm to determine the width before seaming for a snug fit.
  • πŸ’‘Work HDC through the back loop on all body rows to create the fishermen's rib effect and consistent vertical ribs.

This cozy beanie pattern is perfect for quick handmade gifts and everyday wear. 🧢 The instructions are short, clear, and fully customizable to fit any head size or style. 🎯 Make one for yourself or as a thoughtful presentβ€”warmth and style combined!

You ask,

we answer.

FAQs

What size will the finished piece be?

The sample beanie measures approximately 49 cm circumference and 32 cm height, using the recommended yarn and 8 mm hook.

Can I use different yarn weights for this pattern?

Yes, you can use different yarn weights, but the final size and rib appearance will change; adjust your hook size accordingly for the desired ribs.

Do I need prior crochet experience for this pattern?

This pattern is beginner friendly, but you should be comfortable working half double crochet and working through the back loop consistently.

How long does this project typically take to complete?

Most crocheters complete this beanie in 2-3 hours depending on experience and whether you customise the size.