🧢 Beautiful ✨ Detailed πŸ’ Adorable

Vinyl Record Coasters Pattern

Vinyl Record Coasters Pattern
4.8β˜… Rating
2-3 Hours Time Needed
4.1K Made This
βœ‚οΈ

Beginner Friendly Level

Perfect for those just starting their crochet journey, with clear instructions and simple techniques

⏱️

Bite-Sized Project

Finishes in 2-4 hoursβ€”perfect for an afternoon of creative relaxation.

β˜•

Warm Welcome

A comforting piece for home or gifts that brings handmade warmth to everyday moments and special occasions.

About This Vinyl Record Coasters Pattern

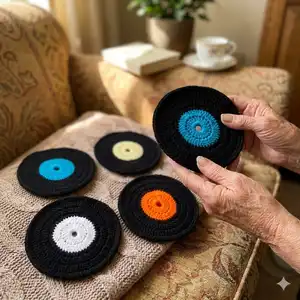
This pattern creates a set of crochet coasters that mimic the look of vinyl records with a colourful centre insert and a black outer ring. It features both UK and US term versions so you can follow the instructions you are most comfortable with. The pattern uses small amounts of yarn and a 3mm hook to keep the coasters compact and durable.

Vinyl Record Coasters Pattern crochet pattern - detailed view of completed project

A quick, satisfying make that finishes around 13cm / 5.5 inches across. Change the contrast centre to customise every coaster for a playful set.

Why You'll Love This Vinyl Record Coasters Pattern

I absolutely love this pattern because it turns a simple coaster into a fun, retro statement piece that is surprisingly quick to crochet. I enjoy how little yarn is needed for each coaster, letting me mix and match contrast centres without breaking the stash. The pattern is straightforward but yields a professional-looking finished piece that I am proud to give as gifts. I also love that I included both UK and US term instructions so crocheters everywhere can follow along easily.

Vinyl Record Coasters Pattern step 1 - construction progress Vinyl Record Coasters Pattern step 2 - assembly progress Vinyl Record Coasters Pattern step 3 - details and accessories Vinyl Record Coasters Pattern step 4 - final assembly and finishing

Switch Things Up

I love changing the contrast centre colour to create themed sets; try pastel centres for a soft look or neon for a bold retro vibe.

To make mini keychain versions, use a finer yarn and 2.5mm hook and reduce rounds to stop before the vinyl outer ring grows too large.

I often swap the black outer colour for navy or dark grey for a softer contrast that still resembles a record but looks gentler in some interiors.

If you want a sturdier coaster, consider lining the back with a thin felt circle glued and stitched in place after finishing to protect surfaces further.

I sometimes embroider tiny grooves into the black outer rounds to exaggerate the vinyl lookβ€”use a contrasting glossy thread for a subtle shine.

Try varying the number of increase rounds to make larger or smaller coasters; add one extra increase round for a larger drink coaster for mugs.

Mix stitch textures by substituting the final round with a small crab stitch or slip stitch border to change the edge finish.

I also like to make matching placemats by using thicker yarn and adding extra increase rounds following the same increase pattern.

For a gift set, package four coasters with four felt backing circles and a small crochet hook tied with a ribbon for a complete handmade bundle.

Don't be afraid to experiment with variegated yarn for the centre insert to add an unexpected pop of colour and movement to each coaster.

Common Mistakes & How to Fix Them

βœ— Not marking the last stitch of each round can cause you to lose track and miscount; always use a stitch marker to mark the end of the round before continuing. βœ— Cutting yarn too short when fastening off leaves you without enough tail to secure ends neatly; leave approximately a 10cm tail when fastening off and weave in carefully. βœ— Skipping the instruction to weave ends through the back of the nearest stitches can leave messy tails; secure ends with a couple of small stitches then weave through the back loops and trim flush. βœ— Rushing increases can cause the coaster to ripple or cup; work increases evenly and check stitch counts after each increase round to maintain a flat coaster shape.

Vinyl Record Coasters Pattern

Make retro-inspired vinyl record coasters to protect your surfaces and add a dash of vintage style to your home. This pattern walks you through a small contrast insert and a black vinyl-style outer round so you can personalise the centre colours. You'll enjoy quick rounds and clear instructions that are perfect for gifting or making a coordinated set for your kitchen or living room.

Beginner Friendly 2-3 Hours

Materials Needed for Vinyl Record Coasters Pattern

β€” Main Fabric

  • 01
    Hayfield Bonus Black 0965 - 15g
  • 02
    Hayfield Bonus Contrast - 2g (per centre insert colour)

β€” Tools Required

  • 01
    3mm Crochet Hook
  • 02
    Wool Needle (for sewing)
  • 03
    Stitch Marker (to mark last stitch of each round)
  • 04
    Scissors (for cutting yarn flush)

Progress Tracker

0% Complete

β€” UK Terms :

Info :

Materials: Hayfield Bonus Black 0965 15g. Hayfield Bonus Contrast 1g. 3mm Crochet Hook. Wool Needle (for sewing).

Info :

Abbreviations: ch 1 chain. htr 1 half treble crochet. tr 1 treble crochet. inc 1 2 stitches into next stitch. htrinc 1 2 half treble crochets into next stitch. trinc 1 2 treble crochets into next stitch. dec 1 decrease over next two stitches in front loops only. htrdec 1 half treble crochet decreased over next two stitches in front loops only. 3dec 1 decrease over next three stitches in front loops only. sl st 1 slip stitch. f/o 1 fasten off by slip stitch in next stitch. FP(htr) 1 work (half treble crochet) round front post of stitch inserting hook from in front of the stitch from right to left.

Info :

Note: Unless stated work in continuous rounds marking last stitch of each row with a stitch marker before proceeding with the next.

Info :

Measurements: Contrast Insert: 6cm/2.5inches. Final Coaster: 13cm/5.5inches.

β€” Contrast Insert :

Row 1 :

leaving a 10cm end, ch8, sl st to join (8)

Row 2 :

ch2, tr x21 into centre circle, sl st to join at top of ch2 (22, ch2 counts as 1st st)

Row 3 :

ch2, trinc into base of same st, trinc) x21, sl st to join at top of ch2 (44, ch2 counts as 1st st)

Info :

F/O leaving a 10cm end.

Info :

Secure ends with a couple of small sts before weaving through back of nearest tr sts and cutting flush to finish.

β€” Vinyl :

Row 4 :

leaving a 10cm end, FP(htr) into top of any of the tr sts in previous row, FP(htr) into next 43 sts, sl st to join at top of 1st FP(htr) (44)

Row 5 :

ch2, trinc into next st, (tr into next st, trinc) x21, sl st to join at top of ch2 (66, ch2 counts as 1st st)

Row 6 :

ch2, tr into next st, trinc, (tr into next 2sts, trinc) x21, sl st to join at top of ch2 (88, ch2 counts as 1st st)

Info :

THE COASTER WILL BE SLIGHTLY WAVY AT THIS STAGE BUT THE LAST ROW WILL FLATTEN IT BACK OUT.

Row 7 :

ch1, htr into next 87sts, sl st to join at top of ch1 (88, ch1 counts as 1st st)

Info :

F/O leaving a 10cm end.

Info :

Secure ends with a couple of small sts before weaving through back of nearest htr sts and cutting flush to finish.

Info :

Teri Hamilton 2021. This pattern is my original pattern. By purchasing this pattern, you agree to the terms of use: Please do not claim this pattern as your own. You may not sell or distribute the pattern, or any part thereof, without prior permission. It is for personal use only. It is permitted to make items from this pattern to sell for charitable purposes, provided they meet safety guidelines and Crochet at Teri's is accredited.

β€” US Terms :

Info :

Materials: Hayfield Bonus Black 0965 15g. Hayfield Bonus Contrast 1g. 3mm Crochet Hook. Wool Needle (for sewing).

Info :

Abbreviations: ch 1 chain. hdc 1 half double crochet. dc 1 double crochet. inc 1 2 stitches into next stitch. hdcinc 1 2 half double crochets into next stitch. dcinc 1 2 double crochets into next stitch. dec 1 decrease over next two stitches in front loops only. hdcdec 1 half double crochet decreased over next two stitches in front loops only. 3dec 1 decrease over next three stitches in front loops only. sl st 1 slip stitch. f/o 1 fasten off by slip stitch in next stitch. FP(hdc) 1 work (half double crochet) round front post of stitch inserting hook from in front of the stitch from right to left.

Info :

Note: Unless stated work in continuous rounds marking last stitch of each row with a stitch marker before proceeding with the next.

Info :

Measurements: Contrast Insert: 6cm/2.5inches. Final Coaster: 13cm/5.5inches.

β€” Contrast Insert :

Row 1 :

leaving a 10cm end, ch8, sl st to join (8)

Row 2 :

ch2, dc x21 into centre circle, sl st to join at top of ch2 (22, ch2 counts as 1st st)

Row 3 :

ch2, dcinc into base of same st, dcinc) x21, sl st to join at top of ch2 (44, ch2 counts as 1st st)

Info :

F/O leaving a 10cm end.

Info :

Secure ends with a couple of small sts before weaving through back of nearest dc sts and cutting flush to finish.

β€” Vinyl :

Row 4 :

leaving a 10cm end, FP(hdc) into top of any of the dc sts in previous row, FP(hdc) into next 43 sts, sl st to join at top of 1st FP(hdc) (44)

Row 5 :

ch2, dcinc into next st, (dc into next st, dcinc) x21, sl st to join at top of ch2 (66, ch2 counts as 1st st)

Row 6 :

ch2, dc into next st, dcinc, (dc into next 2sts, dcinc) x21, sl st to join at top of ch2 (88, ch2 counts as 1st st)

Info :

THE COASTER WILL BE SLIGHTLY WAVY AT THIS STAGE BUT THE LAST ROW WILL FLATTEN IT BACK OUT.

Row 7 :

ch1, hdc into next 87sts, sl st to join at top of ch1 (88, ch1 counts as 1st st)

Info :

F/O leaving a 10cm end.

Info :

Secure ends with a couple of small sts before weaving through back of nearest hdc sts and cutting flush to finish.

Info :

Teri Hamilton 2021. This pattern is my original pattern. By purchasing this pattern, you agree to the terms of use: Please do not claim this pattern as your own. You may not sell or distribute the pattern, or any part thereof, without prior permission. It is for personal use only. It is permitted to make items from this pattern to sell for charitable purposes, provided they meet safety guidelines and Crochet at Teri's is accredited.

Assembly Instructions

  • Secure the contrast insert to the centre by weaving the contrast tail through the back of the nearest stitches and trimming flush so the insert sits flat.
  • When joining vinyl rounds, ensure FP post stitches sit neatly over the contrast centre and work the required stitch counts exactly to maintain a flat circle.
  • Fasten off leaving a 10cm tail and use a wool needle to secure ends with a couple of small stitches before weaving through the back loops and cutting flush.
  • If the coaster becomes slightly wavy after increases, complete the final round as instructed which will flatten the coaster back out.
  • Use a stitch marker to mark the last stitch of each round so you can line up seams and keep stitch counts consistent while sewing in ends.

Important Notes

  • πŸ’‘Unless stated, work in continuous rounds and mark the last stitch of each round with a stitch marker before proceeding to the next round.
  • πŸ’‘Always leave approximately a 10cm tail when fastening off so you have enough yarn to secure and weave in ends neatly.
  • πŸ’‘The coaster may be slightly wavy after the increase rounds; the final row will flatten the piece back out, so complete the last row before finishing.

These vinyl record coasters are a playful, retro addition to any home and make lovely handmade gifts. Change the centre colours to match your decor or create a colourful set for a party. Small, quick and satisfying to make, they protect surfaces while starting conversations at every cup of tea. πŸ§Άβœ¨β˜•

You ask,

we answer.

FAQs

What size will the finished piece be?

The finished coaster measures approximately 13cm / 5.5 inches across when made with the recommended yarn and a 3mm hook.

Can I use different yarn weights for this pattern?

Yes. Using a thicker yarn and larger hook will make a bigger, chunkier coaster while thinner yarn and a smaller hook will produce a smaller, finer coaster; adjust stitch counts if necessary to keep it flat.

Do I need prior crochet experience for this pattern?

This pattern is beginner friendly but assumes you know basic stitches like chain, half treble / half double crochet and treble / double crochet; practise front post stitches if new to them.

How long does this project typically take to complete?

Most crocheters finish a single coaster in 20-40 minutes; a set of four may take around 2-3 hours depending on experience and speed.