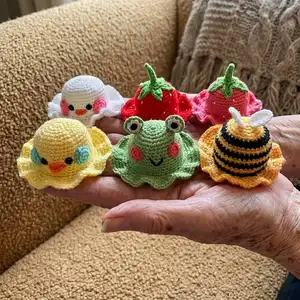
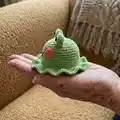
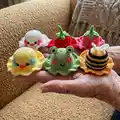
Make an adorable set of summertime bucket hats—frog, bee, chick and strawberry—designed in three sizes for newborns to adults. The pattern uses simple round shaping and easy embellishments so you can customize colors and details. Perfect for gift-making or creating a themed set for photo props, these cute hats are fun and rewarding to crochet.
Progress Tracker
0% Complete
— Hat Bases :
Info :
Grab the color needed for your desired hat! I will let you know throughout the rows which size stops where! ch2 does not count as a stitch at any point in this pattern. See below for row variations regarding bee sizes and stripe rows.
Round 1 :
To set up the hat we will be using a magic ring OR a ch 3 and slst into the first ch made. You will be working into the center of this ring. FOR LARGE: If you have a smaller head to make for (my head is small), only add 12 dc and remove 1 repeat from each row. This will change your total stitch count.
Round 1 :
ch 2, 13 dc into the ring (Pull yarn tail tight if magic ring was used). slst into the first dc made. -13dc Total
Round 2 :
ch2, dc inc into each stitch around and join. -26dc Total
Round 3 :
ch2, [*dc inc, dc*] 13x, join. -39dc Total
Round 4 :
ch2, dc1, [*dc inc, dc 2*] 12x. dc inc, dc in last stitch and join. -52dc
Info :
Total Your increase rows end here if you are making a small/newborn size.
Round 5 :
ch2, [*dc inc, dc 3*] 13x, join. -65dc Total
Info :
Your increase rows end here if you are making a medium size
Round 6 :
ch2, dc 2, [*dc inc, dc 4*] 12x. dc inc, dc 2 and join. -78dc Total
Info :
This is the end of increase rows for the adult size!
Round 1 :
Crown Rows: ch2, dc 1 in each stitch around. join
Round 2-7 :
Small: Repeat 6 times -52dc Total. Medium: Repeat 7 times -65dc Total. Large: Repeat 7 times -78dc Total
Info :
Now that the crown row is worked, choose your stop row based on desired size (small/medium/large) and proceed to edging.
Round 1 :
Edging: ch2, [* In flo, dc inc, dc 2*]
Round 2 :
ch2, [*dc inc, dc 2*] until all stitches are filled. Join.
Round 3 :
ch2, [*dc, dc inc*] until all stitches are filled. Join and tie off.
Info :
Now is the time to weave in any ends from your hat. You could always finish your hat here if you want a solid color or to decorate on your own, but the main part of this pattern is in the decorating I have done!
— Chicks :
Beak (Small) (P1) :
With Orange you will make a slip knot and chain 4. We will be working in the round. Do not join rows. Round 1: sc inc in second chain from the hook. Sc, sc 3 in the last chain. Continuing down the other side of the chain for row 1: sc 1, sc into the same space as the first sc inc, pm -8sc Total
Round 2 :
sc inc, sc 3, sc inc, sc 3, pm -10sc Total
Round 3 :
sc inc, sc 5, sc inc, sc 3, pm -12sc Total
Round 4 :
sc, slst and tie off leaving a long end to sew the beak on. Squish it in half to flatten it out, as this is how it will be sewn on!
Beak (Medium) (P1) :
With orange you will make a slip knot and chain 6. We will be working in the round. Do not join rows. Round 1: sc inc into second chain from the hook, sc 3, sc 3 into the last chain. Continuing down the other side of the chain for round 1: sc 3, sc into the same space as the first sc inc, pm -12sc Total
Round 2 :
sc inc, sc 5, sc inc, sc 5, pm -14sc Total
Round 3 :
sc inc, sc 7, sc inc, sc 5, pm -16sc Total
Round 4 :
sc inc, sc 8, sc inc, sc 6, pm -18sc Total
Round 5 :
sc, slst and tie off leaving a long end to sew. Squish it in half as this is how it will be sewn on!
Beak (Large) (P1) :
With orange you will make a slip knot and chain 8. We will be working in the round, do not join rows. Round 1: sc inc into second chain from hook, sc 5, sc 3 into last chain. Continuing down the other side of the chain for round 1: sc 5, sc into the same space as the first sc inc, pm -16sc Total
Round 2 :
sc inc, sc 7, sc inc, sc 7, pm -18sc Total
Round 3 :
sc inc, sc 9, sc inc, sc 7, pm -20sc Total
Round 4 :
sc 2, sc inc, sc 9, sc inc, sc 7, pm -22sc Total
Round 5 :
sc 2, slst and tie off leaving a long end to sew. Squish it in half as this is how it will be sewn on!
Eyes (Make 2) - Small :
Round 1: Make a magic ring, ch 1 and sc 8 into the magic ring. Join and tie off leaving a long end to sew. Tighten the tail and weave it in.
Round 2 :
Working in the round now! [*sc inc, sc*] 4x, pm -12sc Total
Round 3 :
[*sc inc, sc*] 6x, pm -18sc Total
Round 4 :
[*sc 2, sc inc*] 6x -24sc Total
Info :
Tie off leaving a long end to sew. Tighten the tail and weave it in.
Cheeks (Make 2) - Small :
Round 1: Make a magic ring, ch1, sc 8 into the ring and pm -8sc Total
Round 2 :
Working in the round now! [*sc inc, sc*] 4x, pm -12sc Total
Round 3 :
[*sc inc, sc*] 6x, pm -18sc Total
Round 4 :
[*sc 2, sc inc*] 6x -24sc Total. Tie off leaving a long end to sew. Tighten the tail and weave it in.
— Eyes, Cheeks and Parts (Medium) :
Eyes (Make 2) - Medium :
Round 1: Make a magic ring, ch 1, sc 8 into the ring and pm -8sc Total
Round 2 :
[sc inc] 8x -16sc Total. Join and leave a long end for sewing. Tighten the tail and weave it in.
Round 3 :
[*sc inc, sc*] 8x, -24sc Total
Round 4 :
[*sc 2, sc inc*] 6x, pm -24sc Total
Round 5 :
sc 24 -24sc Total. Tie off leaving a long end to sew. Tighten the tail and weave it in.
Cheeks (Make 2) - Medium :
Round 1: Make a magic ring, ch1, sc 8 into the ring and pm -8sc Total
Round 2 :
Working in the round now! [*sc inc, sc*] 4x, pm -12sc Total
Round 3 :
[*sc inc, sc*] 6x, pm -18sc Total
Round 4 :
[*sc 2, sc inc*] 6x, pm -24sc Total. Tie off leaving a long end to sew. Tighten the tail and weave it in.
— Eyes, Cheeks and Parts (Large) :
Eyes (Make 2) - Large :
Round 1: Make a magic ring, ch1, sc 8 into the ring and pm -8sc Total
Round 2 :
[sc inc] 8x, pm -16sc Total
Round 3 :
[*sc inc, sc*] 8x -24sc Total. Join and leave a long end for sewing. Tighten the tail and weave it in.
Round 4 :
[*sc 2, sc inc*]6x, pm -24sc Total
Round 5 :
sc 24 -24sc Total
Round 6 :
[*sc inc, sc*] 12x -38sc Total. Tie off leaving a long end to sew. Tighten the tail and weave it in. I like to stretch the large cheeks out a bit to flatten them a little more!
— Frog-Bee-Strawberry Parts :
Strawberry Stem - Leaf Round :
Round 1: ch 10 and slst into the first chain made to form a ring, being sure not to twist it (we will be working in the backside of this chain later).
Round 1 :
[*ch 8, sc in second chain from the hook, sc, hdc, dc 2, sc, slst into the first stitch from the ch 8. slst into the following two stitches on the very first chain*] 5x, pm -75sc Total. This should have made 5 leaf starts working into the individual stitches of the chain 10 and not into the circle itself.
Round 2 :
The side of each leaf should have 7 stitches. Starting in the first stitch on the right side of the leaf [*slst, sc, hdc 3, sc, slst into the last chain at the top of the leaf and the unworked chain at the tip from the ch 8, ch 3, slst into the third ch from the hook. slst into the other top side of the leaf (working down those other 7 stitches) sc, hdc 3, sc, slst into the last of the 7 on the left side of the leaf. 2 slst into the slsts from the previous round*] 5x and tie off leaving a long end to sew on.
Stem :
Join into the other side of our first ch 10 in the center of the 5 leaf points. We work in the round.
Round 1 :
ch 1, sc 10, pm -10sc Total
Round 2 :
sc 10, pm -10sc Total
Round 3 :
sc dec, sc 3, sc dec, sc 3 -8sc Total
Round 5 :
sc dec, sc 2, sc dec, sc 2 -6sc Total
Round 6-8 :
sc 6 -6sc Total
Round 9 :
sc dec, sc, sc dec, sc -4sc Total
Round 10 :
sc dec, ch 3, skp first ch from hook and slst down the last 2. slst dec the remaining two stitches on stem and tie off.
Info :
Make a magic ring and ch 1 for all small round parts. Tie off and leave a long end for sewing on all parts.
Round 1 :
sc 8 into the magic ring, pm -8sc Total. Tie off here for the size small frog pupil.
Round 2 :
sc inc in each stitch around, pm -16sc Total. Tie off here for the small frog iris, medium frog pupil and small frog cheeks.
Round 3 :
[*sc inc, sc*] 8x, pm -24sc Total. Tie off here for small frog eye back, medium frog iris, medium and large frog cheeks and large frog pupil.
Round 4 :
[*sc inc, sc 2*] 8x pm -32sc Total. Tie off here for small bee wings, medium frog eye back, and large frog iris.
Round 5 :
[*sc inc, sc 3*] 8x -40sc Total. Tie off here for large frog eye back, medium and large bee wings.
Round 6 :
[*sc inc, sc 4*] 8x -48sc Total. Tie off here for larger accent round bits when needed.
— Assembly & Finishing :
Info :
All of the sewing is down to preference, besides how the eyes are sewn together that is! Stuff the stem with leftover yarn or fiber fill before sewing it on. I tend to sew in and out of the stitches rather than out and around them, just to keep it clean.
Info :
For the strawberry hat seeds I just use matching thread doubled and sew them on wherever I think looks good. I tie each one individually and don't weave in the thread. After trying to use yarn for the seeds, using thread is easier and looks neater.
Info :
Stuff the cheeks lightly but do not stuff the beaks. Pin all parts into position before sewing to ensure symmetry and correct placement.
Info :
Weave in ends and block gently if desired. Use photos for reference on placement and expression for each character.
This sweet Summertime Cuties collection brings playful hats to life in frog, bee, chick and strawberry themes. Each hat is designed to be quick to make and delightful to gift. Mix and match colors and details to create your own charming set—perfect for photos, parties, or everyday smiles. 🧶✨