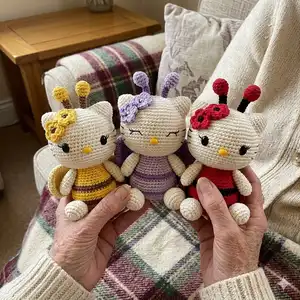
Make three adorable Spring Kitty amigurumi friends — butterfly, bee and ladybug — with this detailed crochet pattern. You will enjoy clear step-by-step rounds, helpful photos, and full assembly instructions so your Kitty sits and looks perfect. Choose your favorite outfit colors to create a unique little companion for gifts or decor.
Progress Tracker
0% Complete
— Arms (x2) :
Round 4 :
6 sc, 1 ps, 5 sc (12)
Info :
Stuff the arms, less firmly at the end.
Info :
Pull and cut the thread leaving a small tail. With a needle close the hole through the front loops only, fasten off and hide the tail into the detail.
— Legs (x2) :
Round 3 :
(1 sc, inc) * 8 (24)
Info :
Pull and cut the thread leaving a long tail for sewing. Stuff the detail.
Round 7 :
8 sc, 4 dec, 8 sc (20)
Round 8 :
8 sc, 2 dec, 8 sc (18)
— Ears (triangular) (x2) :
Round 2 :
(1 sc, inc) * 3 (9)
Round 3 :
(2 sc, inc) * 3 (12)
Round 4 :
(3 sc, inc) * 3 (15)
Info :
Pull and cut the thread leaving a long tail for sewing. Stuff the ears.
Round 5 :
(4 sc, inc) * 3 (18)
Round 6 :
(5 sc, inc) * 3 (21)
Round 7 :
3 sc, inc, (6 sc, inc) * 2, 3 sc (24)
— Tail :
Info :
Pull and cut the thread leaving a tail for sewing.
— Flowers (x2) :
Info :
Change color to contrast and cut the previous thread.
Round 2 :
(sl st, hdc, 3 dc, hd) * 5 (30)
Info :
Pull and cut the thread leaving a tail for sewing.
— Antennae / Decorative ear stalk (x2) :
Info :
Pull and cut the thread leaving a long tail for sewing. Insert a small piece of wire into antennae to make it steady.
Info :
Stuff the detail. Change color to contrast.
— Head :
Info :
Make ch of 14, begin crocheting from the 2nd loops of the hook:
Round 1 :
inc, 11 sc, 2 inc in the last loop, then crochet along other side of the chain: 11 sc, inc (30)
Round 2 :
2 inc, 11 sc, 3 inc, 13 sc, inc (36)
Round 3 :
inc, 1 sc, inc, 13 sc, inc, 1 sc, inc, 1 sc, inc, 13 sc, inc, 1 sc (42)
Round 5 :
1 sc, inc, 2 sc, inc, 14 sc, inc, 2 sc, inc, 2 sc, inc, 14 sc, inc, 1 sc (48)
Round 7 :
(7 sc, inc) * 6 (54)
Round 9 :
(8 sc, inc) * 6 (60)
Round 11 :
(9 sc, inc) * 6 (66)
Round 12 - 20 :
66 sc (66)
Round 21 :
(9 sc, dec) * 6 (60)
Round 22 :
1 sc, dec, (8 sc, dec) * 5, 7 sc (54)
Round 23 :
(7 sc, dec) * 6 (48)
Round 24 :
1 sc, dec, (6 sc, dec) * 5, 5 sc (42)
Round 25 :
(5 sc, dec) * 6 (36)
Round 26 :
1 sc, dec, (4 sc, dec) * 5, 3 sc (30)
Info :
Add stuffing, space it evenly inside the detail. Pull and cut the thread leaving a long tail for sewing. Close the hole with a needle. Pull the thread to the beginning of 27th round where we placed a marker.
Info :
Start to stuff the detail.
Round 27 :
(3 sc, dec) * 6 (24)
Info :
Mark the beginning of 27th round!
Round 28 :
1 sc, dec, (2 sc, dec) * 5, 1 sc (18)
Round 29 :
(1 sc, dec) * 6 (12)
— Body :
Info :
Make ch of 15, begin crocheting from the 2nd loops of the hook:
Round 1 :
inc, 12 sc, 2 inc in the last loop, then crochet along other side of the chain: 12 sc, inc (32)
Round 2 :
2 inc, 12 sc, 4 inc, 12 sc, 2 inc (40)
Round 3 :
(inc, 1 sc) * 2, 12 sc, (inc, 1 sc) * 4, 12 sc, (inc, 1 sc) * 2 (48)
Info :
Attach the thread of contrast color and crochet next 2 rounds in it. Do not cut the main thread.
Info :
Next 4 rounds in the main color.
Info :
Next 2 rounds in contrast color.
Round 14 :
(6 sc, dec) * 6 (42)
Info :
Cut the thread of additional color, now crochet only with main one.
Round 15 - 16 :
42 sc (42)
Round 17 :
(5 sc, dec) * 6 (36)
Round 19 :
(4 sc, dec) * 6 (30)
Round 20 - 21 :
30 sc (30)
Info :
Crochet additional 2 sc to make the round finish at the side of the body. Pull and cut the thread, hide a tail inside the detail and stuff the detail firmly.
— Wings for bee and ladybug (x2) :
Round 3 :
(1 sc, inc) * 6 (18)
Round 4 :
(2 sc, inc) * 6 (24)
Round 5 :
(3 sc, inc) * 6 (30)
Round 10 :
(13 sc, dec) * 2 (28)
Round 11 :
(12 sc, dec) * 2 (26)
Round 12 :
(11 sc, dec) * 2 (24)
Round 13 :
(10 sc, dec) * 2 (22)
Round 14 :
(9 sc, dec) * 2 (20)
Round 15 :
(8 sc, dec) * 2 (18)
Round 16 :
(7 sc, dec) * 2 (16)
Round 17 :
(6 sc, dec) * 2 (14)
Info :
Crochet 2 additional sc to even the round, fold the piece edges in half and crochet 7 sc through both sides. Pull and cut the thread leaving a long tail for sewing. Do not stuff the detail.
— Spots for ladybug (x4) :
Round 1 :
6 sc in MR, sl st (6)
Info :
Pull and cut the thread leaving a long tail for sewing. Place the spots symmetrically on both wings and sew on.
— Wings for butterfly (x2) :
Info :
Butterfly wing consists of upper and lower part which are united in one.
— Lower wing part (detail №1) :
1 round: 6 sc in MR (6). 2 round: 6 inc (12). 3 round: (1 sc, inc) * 6 (18). 4 - 7 round: 18 sc (18). 8 round: (7 sc, dec) * 2 (16). Pull and cut the thread leaving a small tail.
— Upper wing part (detail №2) :
1 round: 6 sc in MR (6). 2 round: 6 inc (12). 3 round: (1 sc, inc) * 6 (18). 4 round: (2 sc, inc) * 6 (24). 5 round: (3 sc, inc) * 6 (30). 6 - 9 round: 30 sc (30). 10 round: (13 sc, dec) * 2 (28). 11 round: (12 sc, dec) * 2 (26). 12 round: (11 sc, dec) * 2 (24). 13 round: (10 sc, dec) * 2 (22). 14 round: (9 sc, dec) * 2 (20). 15 round: (8 sc, dec) * 2 (18).
Info :
In the next round we will connect both details. Do not cut the working thread.
Round 16 :
holding the detail №2 on the hook, insert it into 1st sc of the last round of the detail №1 and crochet sc. Then crochet along the detail №1: 5 sc, dec, 8 sc, then crochet along the №2: 7 sc, dec, 9 sc (32)
Info :
Thus, we connected the parts of wing and continue crochet in spiral. In case there is a space in the corner between details sew it with a tail we leaved with detail №1.
Round 17 :
5 sc, dec, 14 sc, dec, 9 sc (30)
Round 18 :
4 sc, dec, 13 sc, dec, 9 sc (28)
Info :
Crochet additional 6 sc to make the round finish at the bottom of the wing. Fold the piece edges in half and crochet 14 sc through both sides. Pull and cut the thread leaving a long tail for sewing.
— Assembly :
Item Name (P1) :
1. Attach the head to the body. Match the last round of the body with the 27th round of the head (which we previously marked), fix the details with pins. Make sure that the position of the head is straight (orient along the chain with which we started crocheting the head, it should be parallel to the body). Start sewing on the details hooking single crochets of each piece. Add stuffing between the neck and the head while sewing.
Item Name (P1) :
2. Fix the ears of the level of 2-10 round of the head and sew on.
Item Name (P1) :
3. Glue or embroider a nose in the center of a face between 9 and 10 round counting from the bottom of a head. Then embroider or glue eyes (it is more convenient to embroider lashes before eyes are glued). After that embroider whiskers with black thread — 3 stripes on each side. For placing of all the elements of the face be guided by the diagrams. You can correct the position according to your crochet density.
Item Name (P1) :
4. Attach the arms to the body using the thread fastening. We will need a long needle and strong cotton thread folded in double (white color is better, dark thread is used for clarity). Insert a needle in any point on a back and pull it out on the side of the body between the 17th and 18th rounds, leave a tail of medium length on a back. Then pull a needle from inner side of the arm to outer (1). Next insert a needle in the same point from where the thread comes (2), and pull out from the inner side of the arm but at the distance of 2 sc from the first hole (3). After that insert a needle in the same point at the side of the body from where the thread comes (4), and pull out symmetrically on the other side of the body (5). Fasten the second arm in the same way. For reliable fastening, you can repeat the actions. After the both arms are fixed, pull the thread into a back, tie the ends tightly in a knot and hide them inside the detail.
Item Name (P1) :
5. Sew the antennae to the top of the head.
Item Name (P1) :
6. Sew the flowers under one of the ears, leave the petals free. You can additionally decorate the middles with beads.
Item Name (P1) :
7. Fix the legs at the level of 3-7 rounds of the body with a distance of 9 stitches apart. The position of the legs may vary slightly, choose it so that the toy sits confidently. Sew on the legs, try to keep their round outline.
Item Name (P1) :
8. Sew the wings to the back of the toy. They can be positioned raised or folded. If the wings dangle a lot, fix them with additional stitches.
Item Name (P1) :
9. Fix the tail at the level of 5-8 rounds of the body and sew on. The tail will also be an additional support for toy while sitting.
This Spring Kitty brings three playful outfits — butterfly, bee and ladybug — to brighten your handmade collection. Create delightful gifts and charming shelf pals with fun color choices and simple accessories. Share your finished kitties and spread the crochet joy! 🧶💖