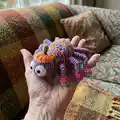
🧢 Beautiful ✨ Detailed πŸ’ Adorable

Spinderella the Spider Amigurumi Pattern

Spinderella the Spider Amigurumi Pattern
4.0β˜… Rating
5-7 Hours Time Needed
4.2K Made This
βœ‚οΈ

Intermediate Level

Ideal for those with basic crochet experience, featuring slightly more advanced stitches and techniques to expand your skills.

⏱️

Weekend Treat

Takes 5-7 hours, making it an enjoyable project to finish over a couple of days.

🧸

Cute Companion

An adorable friend to cherish, handcrafted with love to bring comfort and joy for years to come.

About This Spinderella the Spider Amigurumi Pattern

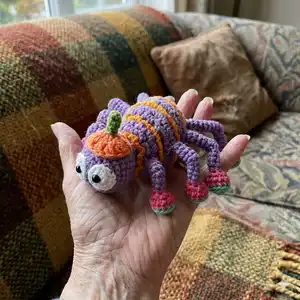
This pattern creates Spinderella, a cheerful amigurumi spider with striped body, fun legs and a tiny pumpkin hat. It includes full instructions for crocheting eyes, head, body, legs and hat, plus assembly tips to make finishing easy. The design uses simple shaping and color striping to give lots of texture and character.

Spinderella the Spider Amigurumi Pattern crochet pattern - detailed view of completed project

You will work in continuous rounds and use back-loop only (BLO) stitches on the body for the stripe effect. Clear step-by-step round counts and photos guide placement and assembly for a polished final toy.

Why You'll Love This Spinderella the Spider Amigurumi Pattern

I absolutely love this pattern because it balances playful details with straightforward amigurumi technique. I enjoy the color stripe effect achieved by crocheting in the back loops β€” it gives the body a lovely ribbed texture that really pops. The tiny pumpkin hat and colorful feet are such fun finishing touches that let you personalize each spider. I also appreciate that the pattern is structured in clear rounds so I can easily track progress as I crochet.

Spinderella the Spider Amigurumi Pattern step 1 - construction progress Spinderella the Spider Amigurumi Pattern step 2 - assembly progress Spinderella the Spider Amigurumi Pattern step 3 - details and accessories Spinderella the Spider Amigurumi Pattern step 4 - final assembly and finishing

Switch Things Up

I love how easily you can customize Spinderella by changing the color paletteβ€”try pastels for a sweet nursery version or bright neons for a playful toy.

If you prefer a chunkier spider, use a bulky yarn and a larger hook to create a cuddlier, larger version that makes a great pillow friend.

For a miniature keychain, use DK yarn with a 2.0mm hook and small safety eyes to scale the design down to palm-sized cuteness.

Swap the pumpkin hat for a tiny bow, crown, or little wizard hat to give your spider a different personality and seasonal theme.

I often embroider facial expressions to change moodβ€”move the eye placement slightly or stitch a small smile to create sleepy, surprised, or cheeky faces.

Add beads or metallic thread for a subtle shimmer along the stripes if you want a decorative, sparkly version to display.

Experiment with textured stitches on the legs or add a small wire inside each leg for poseability and display options.

Try crocheting the eyes in different sizes or using felt eyelids for a softer lookβ€”this small change completely alters the character.

Combine Spinderella with other mini amigurumi from the book to create a spooky or seasonal setβ€”they make a thoughtful handmade gift collection.

Don't be afraid to mix yarn brands and weights; just adjust hook size and check proportions as you go to keep the shape balanced.

Common Mistakes & How to Fix Them

βœ— Skipping the BLO instruction on the Body will prevent the ribbed stripe texture from forming correctly; always work the Body rounds in BLO as noted to get the intended effect. βœ— Forgetting to change color every two lines will give uneven stripes; plan your color changes and carry or fasten off the yarn cleanly every two rows. βœ— Not stuffing gradually causes lumps and uneven shaping; stuff a little at a time as you work to maintain a smooth shape and even firmness. βœ— Failing to place markers or count stitches during increases and decreases leads to incorrect stitch counts; use stitch markers and count each round to ensure correct shaping. βœ— Sewing legs without pinning first can result in crooked placement; pin or mark leg positions before sewing to match the photos and spacing guidance.

Spinderella the Spider Amigurumi Pattern

Make a playful, colorful spider amigurumi that is perfect for gifts and seasonal decor. This pattern guides you step-by-step through crocheting the body, head, legs, eyes and a tiny pumpkin hat so your creation has lots of personality. You will learn simple shaping, color striping and assembly techniques to bring Spinderella to life. Grab your hook and yarn and enjoy stitching this charming companion.

Intermediate 5-7 Hours

Materials Needed for Spinderella the Spider Amigurumi Pattern

β€” Main Fabric

  • 01
    Color A: purple YarnArt Jeans 72 (50g, 160m)
  • 02
    Color B: yellow YarnArt Jeans 35 (50g, 160m)
  • 03
    Color C: white YarnArt Jeans 01 (50g, 160m)
  • 04
    Color D: coral YarnArt Jeans 61 (50g, 160m)
  • 05
    Color E: green YarnArt Jeans 69 (50g, 160m)
  • 06
    Color F: turquoise YarnArt Jeans 79 (50g, 160m)
  • 07
    Color G: fuchsia YarnArt Jeans 59 (50g, 160m)

β€” Tools Required

  • 01
    Crochet hook size 2.5mm
  • 02
    1 pair of safety eyes size 6mm
  • 03
    Tapestry needles
  • 04
    Pins for assembly
  • 05
    Stitch markers
  • 06
    Scissors
  • 07
    Polyester stuffing (fiberfill)

Progress Tracker

0% Complete

β€” Eyes (yarn C, X2) :

Round 1 :

sc 6 into a magic loop (6)

Round 2 :

inc 6, slst (12)

Info :

Break the yarn, leave a long thread to sew later.

β€” Body (yarn A) :

Info :

Note: Crochet BLO on all the rnds on the Body. And we will change the color each 2 lines, the color will change as the word colors: Yarn A: Black, Yarn B: Red

Round 1 :

sc 6 into a magic loop (6)

Round 2 :

(blo) inc 6 (12)

Round 3 :

(blo) [sc 1, inc] 6x (18)

Round 4 :

(blo) [sc 2, inc] 6x (24)

Round 5 :

(blo) [sc 3, inc] 6x (30)

Round 6 :

(blo) [sc 4, inc] 6x (36)

Round 7-8 :

(blo) sc 36 (2 rnds) (36)

Round 9 :

(blo) sc 36 (36)

Round 10-11 :

(blo) sc 36 (2 rnds) (36)

Round 12 :

(blo) sc 12, dec 6, sc 12 (30)

Round 13 :

(blo) sc 30 (30)

Round 14 :

(blo) sc 9, dec 6, sc 9 (24)

Round 15 :

(blo) sc 24 (24)

Round 16 :

(blo) sc 6, dec 6, sc 6 (18)

Round 17 :

(blo) sc 18, start stuffing (18)

Info :

Do not break the yarn, move to crochet the Head.

β€” Head (yarn A) :

Round 18 :

[sc 2, inc] 6x (24)

Round 19 :

[sc 3, inc] 6x (30)

Round 20-24 :

sc 30 (5 rnds) (30)

Round 25 :

[sc 3, dec] 6x (24)

Info :

Break the yarn, weave in the last 6 sts, hide the remaining yarn.

β€” Pumpkin's Hat (yarn D) :

Round 1 :

MR, ch 2 (do not count as a hdc), dc 9, slst on the ch 2 (9)

Round 2 :

ch 2 (do not count as a hdc), (dc 1, FPDC 1 on the same stitch) 9x, slst in the ch 2 (18)

Info :

Break the yarn, leave a long thread to sew later. Continue to crochet the Stem.

β€” Stem (yarn E) :

Round 1 :

sc 5 into a magic loop (5)

Round 2-4 :

sc 5 (3 rnds) (5)

Info :

Break the yarn, leave a long thread to sew later.

β€” Leg 1 (yarn F, X2) :

Round 1 :

sc 6 into a magic loop (6)

Round 2 :

inc 6, change to yarn G (12)

Round 3 :

sc 12 blo (12)

Round 4 :

sc 12 (12)

Round 5 :

dec 6, change to yarn A (6)

Round 6 :

sc 6 blo, stuff slightly (6)

Round 7-8 :

sc 6 (2 rnds) (6)

Round 9 :

sc 3 blo, sc 3 (6)

Round 10 :

sc 6, (stuff the shoes only - pic 2) (6)

Round 11 :

sc 3 in the flo of the 3sts on rnd 9, sc 3 on the last 3sts of rnd 10 (pic 3&4) (6)

Round 12-13 :

sc 6 (2 rnds) (6)

Info :

Break the yarn, leave a long thread to sew later.

β€” Leg 2 (yarn F, X2) :

Round 1-6 :

Repeat 1-6 of the Leg 1 (6)

Round 7-9 :

sc 6 (3 rnds) (6)

Round 10 :

sc 3 blo, sc 3 (6)

Round 11 :

sc 6 (6)

Round 12 :

sc 3 in the flo of the 3sts on rnd 10, sc 3 on the last 3sts of rnd 11 (6)

Round 13-15 :

sc 6 (3 rnds) (6)

Info :

Break the yarn, leave a long thread to sew later.

β€” Leg 3 (yarn F, X2) :

Round 1-6 :

Repeat 1-6 of the Leg 1 (6)

Round 7-10 :

sc 6 (4 rnds) (6)

Info :

Break the yarn, leave a long thread to sew later.

β€” Leg 4 (yarn F, X2) :

Round 1-6 :

Repeat 1-6 of the Leg 1 (6)

Round 7-11 :

sc 6 (5 rnds) (6)

Round 12 :

sc 3 blo, sc 3 (6)

Round 13 :

sc 6 (6)

Round 14 :

sc 3 in the flo of the 3sts on rnd 12, sc 3 on the last 3sts of rnd 13 (6)

Round 15-19 :

sc 6 (5 rnds) (6)

Info :

Break the yarn, leave a long thread to sew later.

β€” Assembling :

Info :

Crochet the body & head as instructed.

Info :

Stuff gradually while crocheting.

Info :

Stop when you finish crochet rnd 27 of the Head.

Info :

Crochet 2 eyes as instructed and insert black safety eye 6mm into the eye before sewing.

Info :

Insert the eyes between rnd 26 & 27 of the head; put the eye lids on and crochet the last rnd of the head.

Info :

Use the tapestry needle to weave in the last 6 sts and hide the remaining yarn.

Info :

Join yarn A on the 1st of the 2nd rnd of the Body and continue crocheting *ch 3, slst 1 on the next st* on the remaining loop of rnd 2-17 to create stripes; remember to change colors every two lines to form stripe pattern.

Info :

Crochet the pumpkin's hat and stem as instructed and sew the hat on the head.

Info :

Attach the 1st legs as shown in the photos; attach the other 3 legs spaced one rnd and one stitch higher than the previous leg for a natural staggered look.

Info :

Hide remaining yarn ends and sew all parts securely; pin parts before sewing for correct placement.

Assembly Instructions

  • Stuff the body gradually while crocheting and stop when you finish crochet rnd 27 of the Head, leaving an opening to insert eyes and finish stuffing.
  • Insert the safety eyes into the crocheted eye pieces, then insert the assembled eyes between rounds 26 and 27 of the head and sew lids in place.
  • Join yarn A on the 1st stitch of the 2nd round of the body and crochet *ch 3, slst 1 on the next st* on the remaining loop of rounds 2-17 to create the raised stripe loops, changing color every two lines.
  • Sew the pumpkin hat onto the top of the head and attach the stem; use a tapestry needle to weave in and hide all remaining yarn ends.
  • Pin and sew each leg in position β€” attach the first pair where indicated by the photo, then attach the remaining legs spaced one round and one stitch higher than the previous leg for a staggered look.
  • Weave in and hide the last 6 stitches at the end of the head and body joins, and secure all seams for durability.

Important Notes

  • πŸ’‘Use stitch markers to mark the beginning of each round and to mark leg positions before sewing to ensure symmetrical placement.
  • πŸ’‘Stuff gradually and evenly while crocheting to avoid lumps; add small amounts of fiberfill as you shape the body and head.
  • πŸ’‘Work the Body rounds in BLO (back loop only) to create the striped rib texture; do not skip this instruction or the stripe effect will not appear.
  • πŸ’‘Change color every two lines for the stripes and carry or fasten off yarn neatly to avoid bulky joins.
  • πŸ’‘Weave in ends and hide remaining yarn as you go to keep your finishing tidy and reduce the amount of sewing needed at the end.

This delightful Spinderella pattern brings playful color and texture to your amigurumi collection, from her ribbed striped body to the tiny pumpkin hat on her head. Make one in bright candy colors for a cheerful toy, or in Halloween hues for seasonal charm. Perfect for gifting, decorating or keeping on your shelf as a handcrafted friend. πŸ§ΆπŸŽƒ

You ask,

we answer.

FAQs

What size will the finished piece be?

The finished Spinderella measures approximately 12-15 cm long when using the recommended yarn and a 2.5mm hook; exact size varies slightly with tension and yarn brand.

Can I use different yarn weights for this pattern?

Yes, you can use different yarn weights but this will change the final size and may require a different hook size; choose an appropriate hook and test a gauge swatch to maintain proportions.

Do I need prior crochet experience for this pattern?

This pattern is rated intermediate and assumes you are comfortable with basic amigurumi techniques such as magic ring, increases/decreases, working in BLO, and sewing pieces together.

How long does this project typically take to complete?

Most crocheters complete this project in 5-7 hours depending on experience level, color changes and the time spent on assembly and finishing.