๐Ÿงถ Beautiful โœจ Detailed ๐Ÿ’ Adorable

Mini Crossbody Bag Pattern

Mini Crossbody Bag Pattern
4.8โ˜… Rating
5-7 Hours Time Needed
1.2K Made This
โœ‚๏ธ

Intermediate Level

Ideal for those with basic crochet experience, featuring slightly more advanced stitches and techniques to expand your skills.

โฑ๏ธ

Weekend Treat

Takes 5-7 hours, making it an enjoyable project to finish over a couple of days.

โœจ

Stylish Touch

An elegant detail to elevate any look, combining traditional techniques with contemporary design sensibilities.

About This Mini Crossbody Bag Pattern

This pattern creates a compact, structured mini crossbody bag crocheted in macrame cord for a polished, textured finish. You will work a rectangular main panel, two side pieces and a removable handle, then join and finish with bag hardware. The technique uses single crochet worked into back loops to achieve the distinctive fabric.

Mini Crossbody Bag Pattern crochet pattern - detailed view of completed project

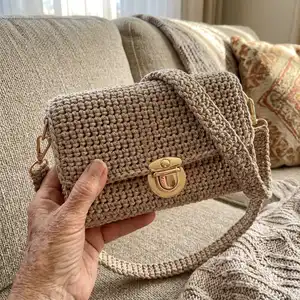
Clear step-by-step photos and measurements are provided so you can replicate the bag exactly. The pattern includes assembly and hardware placement tips to make finishing easy and professional.

Why You'll Love This Mini Crossbody Bag Pattern

I absolutely love this pattern because it produces a small but highly functional bag with beautiful texture that still looks refined. I enjoy how the back-loop technique gives the fabric a clean, modern surface that holds shape well. Sewing the hardware and joining the pieces creates a satisfying finish that makes the bag look handmade and high-quality. I am proud of how adaptable this design is โ€” you can change colors, hardware or strap length and it still reads as the same elegant accessory.

Mini Crossbody Bag Pattern step 1 - construction progress Mini Crossbody Bag Pattern step 2 - assembly progress Mini Crossbody Bag Pattern step 3 - details and accessories Mini Crossbody Bag Pattern step 4 - final assembly and finishing

Switch Things Up

I love personalizing this bag by changing the color of the cord; try deep navy for a sophisticated look or pastel shades for spring vibes.

I often use a chunkier macrame cord and a larger hook to make a chunkier, more structured version that works well as a shoulder bag.

To make a mini version perfect for a keychain or phone pouch, use thinner cord and reduce the number of foundation chains while keeping proportions.

I sometimes add a fabric lining with a hidden pocket for cards, which increases durability and gives a neat interior finish.

Try swapping the metal clasp for a magnetic snap for an easier, sleeker closure that still looks polished.

I like to experiment with braided or leather straps instead of a crocheted handle for a mixed-material, upscale feel.

For a boho look, add fringe to the bottom edges or a beaded strap for extra personality and texture.

If you want extra structure, insert a lightweight interfacing or cut a piece of thin plastic board into the base and slip it inside before finishing.

Try decorative surface embroidery or a small crocheted applique9 on the flap to personalize it as a gift.

I also recommend testing different hardware colors (antique brass, matte black, silver) to match your outfit or wardrobe style.

Common Mistakes & How to Fix Them

โœ— Starting with the wrong hook size leads to an incorrect gauge and ill-fitting parts; always check the gauge (17 sc * 13 rows = 4"/10cm) and switch hook sizes if needed. โœ— Counting chains incorrectly when making the foundation will change bag width; make the recommended 31 chains or adjust consciously and recount before proceeding. โœ— Not inserting the hook into the specified back loops will alter texture and stretch; insert the hook into the back loop of the current row and the back loop of the previous row as instructed. โœ— Cutting the working yarn too early during assembly can interrupt the joining process; do not cut the working yarn until you have reached the middle of the closing flap as described. โœ— Skipping steaming and shaping the fabric causes uneven panels; straighten, steam and shape the fabric into a clear rectangular form before marking and joining pieces.

Mini Crossbody Bag Pattern

Make a stylish mini crossbody bag using macrame cord and simple crochet techniques. This pattern guides you step-by-step through the main panel, side pieces, assembly and a removable handle. You will learn a compact back-loop textured stitch to create a durable bag with a neat finish. Perfect for gifting or a practical everyday accessory you will proudly wear.

Intermediate 5-7 Hours

Materials Needed for Mini Crossbody Bag Pattern

โ€” Main Fabric

  • 01
    Sensy 2 mm (100% polypropylene macrame cord), 230 m / 251 yards per 200 g / 7 oz skein, approx. 251 yards total
  • 02
    Substitute yarn: macrame cord 2 mm (similar thickness and composition)
  • 03
    Color pictured: Latte (use desired color; approx quantities above)

โ€” Tools Required

  • 01
    Crochet hook size 3.50 mm (E/4)
  • 02
    Measuring tape
  • 03
    Scissors
  • 04
    Stitch markers
  • 05
    Tapestry needle
  • 06
    Bag accessories: 16mm (5/8") inner metal D-rings (2), 25mm (1") inner metal swivel clasps (2) or carabiners, 46mm x 44mm bag lock (1)
  • 07
    2.5 cm / 1-inch wide carabiner for handle attachment (optional)
  • 08
    Pins for assembly (optional)

Progress Tracker

0% Complete

โ€” Materials and Tools :

Info :

Original yarn: Sensy 2 mm (100% polypropylene macrame cord, 230 m/251 yards 200g / 7 oz per skein) approx. 251 yards total. Substitute yarn: macrame cord 2 mm. Hook: 3.50 mm (E/4). Notions: measuring tape, scissors, stitch markers, tapestry needle, bag accessories (D-rings, swivel clasps, bag lock).

Info :

Gauge: 17 sc * 13 rows = 4" (10 cm). Always use a crochet hook size that will result in the correct gauge after blocking.

โ€” Size :

Info :

When using similar materials, the bag will be width = 18.5 cm / 7.3"; height = 11 cm / 4.5"; depth = 4 cm / 1.5"; handle length = 70 cm / 27.5".

โ€” Main Part :

Info :

Leave a long tail of yarn approximately 25 cm / 10 inches and make a chain of foundation chain stitches.

Info :

Note: You can make more or fewer stitches depending on the desired width of the bag.

Round 1 :

I made 31 chains. Row 1: 30 sc, 1 ch, turn.

Info :

Next, lay the long tail of yarn on top, and will crochet it into the second row. Work single crochet stitches, inserting the hook into the back loop of the current row and the loop of the foundation chain.

Round 2 :

30 sc, 1 ch, turn.

Info :

Straighten the beginning of the crocheted fabric and use the long tail to adjust so that the first rows are not overstretched.

Info :

MAIN PATTERN: Work single crochet stitches, inserting the hook into the back loop of the current row and the back loop of the previous row. Detailed instructions for crocheting this pattern are shown in the video.

Round 3 :

30 sc, 1 ch, turn.

Round 4 :

Repeat Row 3 until the desired length is reached, 35-36 cm / 13.8 - 14 inches.

Info :

I ended up with 90 rows. Straighten the fabric, steam it, and shape it into a clear rectangular form. Measure the length and width. Mark the bottom and sides of the bag with stitch markers.

โ€” Bag Sides (Make 2) :

Info :

Make a chain of 5 foundation chain stitches.

Round 1 :

4 sc, 1 ch, turn. Continue with the main pattern.

Round 2 :

4 sc, 1 ch, turn.

Rounds 3-25 :

4 sc, 1 ch, turn.

Round 26 :

4 sl-sts.

Info :

Cut the working yarn. Straighten and steam the side piece. Make two side pieces identical in size (10 cm / 4" tall, 3 cm / 1.1" wide).

โ€” Assembly :

Info :

Attach the side pieces to the main part using sl-sts. Start with the left side piece. Place the side piece onto the main part and connect the corner parts.

Info :

Insert the hook into the back loop of the main part and the front loop of the side piece (3 loops on the hook) and pull the working yarn through all 3 loops. In this way, work slip stitches along the three sides of the bag side piece. A video of the joining process can be found online.

Info :

Do not cut the working yarn! Continue to crochet slip stitches along the main part to the corner and then to the middle of the closing flap. Cut the yarn when you have reached the middle of the flap.

Info :

Attach the right bag side in the same way. Weave in the ends of the working yarn into the fabric. Mark the center of the flap.

Info :

Attach the clasp to the flap. First, attach the lock to the upper flap, and then the corresponding part of the lock to the main part of the bag.

Info :

Sew D-rings to the bag side for attaching the handle.

โ€” Handle :

Info :

You can use a ready-made handle or crochet one. For easy attachment of the handle to the bag, use a 2.5 cm / 1-inch wide carabiner.

Info :

Leave a long tail of yarn approximately 15 cm / 6 inches. Make a chain of 4 foundation chain stitches.

Round 1 :

3 sc, 1 ch, turn. Continue with the main pattern of the bag.

Round 2 :

3 sc, 1 ch, turn.

Round 3 :

3 sc, 1 ch, turn.

Info :

Crochet rows until the desired length of the handle is reached.

Info :

I made a medium-length handle, 67 cm / 26 inches long. I ended up with 146 rows. Attach the handle to the carabiners and weave in the yarn ends.

Info :

Attach the handle, and the bag is ready!

Assembly Instructions

  • Attach the left side piece to the main panel using slip stitches: insert the hook into the back loop of the main part and the front loop of the side piece (3 loops on the hook), pull yarn through all loops and continue slip stitching along the three sides of the side piece.
  • Do not cut the working yarn after joining the first side; continue slip stitching along the main panel to the corner and then to the middle of the closing flap before cutting the yarn.
  • Attach the right side piece in the same way, matching corners and ensuring the bag shape is even and symmetrical before weaving in ends.
  • Attach the bag lock: sew the lock plate to the upper flap first, then attach the corresponding lock piece to the main part of the bag aligned with the flap center mark.
  • Sew D-rings securely to both side panels near the top edge for attaching the strap carabiners, reinforcing stitches through the fabric for strength.
  • Attach handle carabiners to the D-rings and clip the crocheted or ready-made handle in place; weave in and trim yarn ends neatly after final placement.

Important Notes

  • ๐Ÿ’กUse stitch markers to mark the bottom and sides of the bag and to keep track of placement when joining side pieces.
  • ๐Ÿ’กSteam and shape the crocheted fabric into a rectangular form before marking and joining to ensure even edges and correct measurements.
  • ๐Ÿ’กCheck gauge before starting and adjust hook size if necessary so the final bag matches the given dimensions and proportions.
  • ๐Ÿ’กDo not cut the working yarn during the joining process until you reach the instructed stopping point on the flap to avoid interruptions.
  • ๐Ÿ’กWeave in ends securely after assembly to keep the finished bag tidy and durable.

This mini crossbody bag pattern creates a timeless, compact accessory that you can make in an afternoon. ๐Ÿงถ It combines an elegant textured stitch with practical hardware for a polished finish. Perfect for gifts or a chic everyday bag you will love to wear. โœจ

You ask,

we answer.

FAQs

What size will the finished piece be?

The finished bag measures approximately 18.5 cm (7.3") wide, 11 cm (4.5") high and 4 cm (1.5") deep when using the recommended cord and hook size.

Can I use different yarn weights for this pattern?

Yes, but the final size and gauge will change; if you use thicker or thinner cord, adjust the hook size and expect different dimensions.

Do I need prior crochet experience for this pattern?

This pattern is rated intermediate, so basic knowledge of single crochet, working into back loops, and slip stitch joining is recommended.

How long does this project typically take to complete?

Most crocheters complete this project in 5-7 hours, though time may vary based on experience level and pace.