Make a spooky-chic macrame bat wall hanging with clear step-by-step instructions and photo guidance. This pattern walks you through essential macrame knots and assembly so you can create a dramatic wall piece with textured wings and a decorative tassel. Perfect for seasonal decor or year-round style, you will learn lark's head, square knot, double half hitch, gathering and more.
Progress Tracker
0% Complete
— Dimension and Materials :
Info :
- Expected dimensions of the finished item: 11.2"W x 18"H ~ 28cmW x 45cmH. This dimension is based on the sample Bat Hanger made by our shop. The actual dimension can be changed due to your desired size and length of fringe.
Infos :
- Materials + 3mm macrame cord is recommended for the similar result: • 72" charcoal cord x 17 • 20" charcoal cord x 2 • 8" red cord x 2 • 10"L wooden dowel x 1
— Basic Knots Used :
Lark's Head Knot :
1.Fold your cord in half, and place the looped in over your dowel. 2. Bring the ends of the cord through the loop and tighten it up to secure.
Reserve Lark's Head Knot :
1.Fold your cord in half, and place the looped in over your dowel 2.Bring the ends of the cord through the loop. Pull the ends to tighten the loop.
Square Knot :
1.Cross the left cord across the center cords and behind the right cord. 2.Bring the right cord behind the center cords and pull the end through the loop on the far left. 3.Pull the ends to tighten. This is half of the square knot. 4.Bring the right cord in front of the center cords. 5.Bring the left cord behind the center cords and pull the end through the loop on the far right. 6.Tighten and the square knot is complete.
Double Half Hitch Knot :
1.Hold the left cord in front of the other cords in an L shape. This will be the filler cord. 2.Bring the next cord over up and around the filler cord to make a half hitch knot. 3.Pull the end of the cord to tighten. 4.Repeat that again with the same cord. 5.Tighten up the knot. 6.Repeat across the row with each cord.
Gathering Knot :
1.Fold the right end of the separated working cord (pine green) to create a facing down loop on top of the filler cords (baby blue). 2.Use the left end of the working cord (pine) to wrap the filler cords (blue) and the loop. 3.Pass the end of the working cord (pine) used for wrapping through the small loop at the bottom. 4.Continue wrapping the working cord (pine) 5-7 times. Leave a smaller loop at the bottom. 5.Pull the top end of the working cord (pine) to bring the loop inside the wrap. Then, pull both ends to secure and tighten the knot. 6.Trim both ends of the working cord (pine) and tuck them inside the knot for a clean look.
— Instructions :
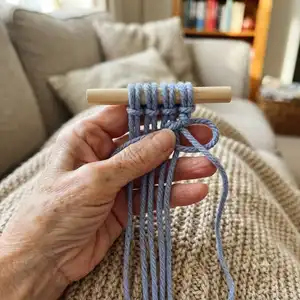
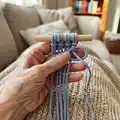
Step 1 :
Hang the wooden dowel on 2 S hooks. And start with Lark's Head knot:
Step 2 :
Fold 72" cord in half, and place the looped in over the dowel.
Step 3 :
Bring the ends of the cord through the loop and tighten it up to secure.
Step 4 :
Repeat again with second 72" cord.
Step 5 :
Add 72" cord to the right cord by Reverse Lark's Head knot. And follow the pictures below to tie Extended Reverse Lark's Head knot.
Step 6 :
After you attach the cord to your dowel with a lark's head knot, take the right cord and bring it behind and over the dowel.
Step 7 :
Bring the end of the cord down through the loop and tighten.
Step 8 :
Do the same thing on the left side.
Step 9 :
Push the knot next to the first knot.
Step 10 :
Repeat with 1 72" cord.
Step 11 :
Do the same with the second middle cord by tying 2 72" cords.
Step 12 :
Cross the two middle cord, use 72" cord and tie Extended Reverse Lark's Head knot.
Step 13 :
Now, you will take the left outermost cord as the filler cord, and hold it at a diagonal angle tie Double Half Hitch knots. Follow the steps below:
Step 14 :
Hold the left cord in front of the other cords in an L shape. This will be the filler cord.
Step 15 :
Bring the next cord over up and around the filler cord to make a half hitch knot.
Step 16 :
Pull the end of the cord to tighten.
Step 17 :
Repeat that again with the same cord.
Step 18 :
Tighten up the knot.
Step 19 :
Repeat across the row with each cord.
Step 20 :
It's the same process with right side, just reversed. The result will be a symmetric set of diagonal DHH rows forming the wing shapes.
Step 21 :
Use 5 left cords as working cords, use the 6th cord as filler cord. Tie Double Half Hitch knots for 2 sides.
Step 22 :
Now you will create the bat's eyes by 8" red cords. Fold the 8" red cord in half and add to charcoal cord by Reverse Lark's Head knot.
Step 23 :
You will make Square knot with 4 middle cords. Follow the steps below: Make the “number 4” shape with the left cord over 2 middle filler cords and behind the right. Then bring the right cord behind 2 middle and up through the loop made in the left, tighten it. Make the reserved “number 4” with the right cord over 2 middles and under the left. Bring the left cord behind 2 middles and up through the right loop. Tighten and the square knot is complete.
Step 24 :
Use the 6th left cord as filler cord, the next 2 cord as working cords. Tie 2 Double Half Hitch knots. Make the same with the right side, tie 3 knots. The first V shape is created.
Step 25 :
Repeat steps to create extra 3 V shapes to form the layered body and wing center sections.
Step 26 :
Now you will make Bat's Wing, start with the left side. Fold the 72" cord in half. Add to the wooden dowel by Reverse Lark's Head knot. Then add 4 72" cords to the right cord by Extended Reverse Lark's Head knot.
Step 27 :
Use the left outermost as filler cord. Tie Double Half Hitch knots from the left to the right. And then use the right outermost as filler cord. Tie 4 rows with Double Half Hitch knots to shape the wings.
Step 28 :
Repeat steps to create the right wing. You also need the left 5 72" cords to make. The result will be symmetric wings flaring from the center body.
Step 29 :
Use the outermost cords as filler cords. Continue tying Double Half Hitch knots to build wing texture and edge shaping.
Step 30 :
Use 20" charcoal cord to tie Gathering knot at the bottom center of the bat to create the hanging tassel attachment. Follow the gathering knot steps: hold 20" cord in a U shape with the short side on the left; start wrapping with the long end until desired length; bring the wrapped end through the small loop; pull the short cord to bring the loop halfway up the wrapped section; cut the two ends close to the wraps and tuck under the wraps for a clean look.
Step 31 :
Use Overhand knot to tie the end of the cords and cut the left-over cords to create the tassel. Final trimming and combing will finish the fringe.
Info :
Finally, you have a Macrame Bat Wall Hanging done! Now you have your own wall hanging <3 <3 Hope you'll enjoy it!
Create this moody macrame bat wall hanging to add handmade charm and a little attitude to your space. The pattern is photo-guided and knot-focused, perfect for makers who love texture and structure. Make one in charcoal for classic style or swap colors for seasonal fun! 🧶🦇