🧢 Beautiful ✨ Detailed πŸ’ Adorable

Lucky Cat Amigurumi Pattern

Lucky Cat Amigurumi Pattern
4.7β˜… Rating
5-7 Hours Time Needed
1.2K Made This
βœ‚οΈ

Intermediate Level

Ideal for those with basic crochet experience, featuring slightly more advanced stitches and techniques to expand your skills.

⏱️

Weekend Treat

Takes 5-7 hours, making it an enjoyable project to finish over a couple of days.

🧸

Cute Companion

An adorable friend to cherish, handcrafted with love to bring comfort and joy for years to come.

About This Lucky Cat Amigurumi Pattern

This pattern creates a sweet Lucky Cat amigurumi (version 3) with a little pillow, collar and tassels. It uses Yarnart Jeans yarn and works in continuous spirals for smooth shaping. The pattern includes photo references, stitch counts and step-by-step construction tips for accurate assembly.

Lucky Cat Amigurumi Pattern crochet pattern - detailed view of completed project

Youll make head, body, arms, legs, ears, tail and accessories and then sew them together. Perfect for gifting or as a festive decoration.

Why You'll Love This Lucky Cat Amigurumi Pattern

I absolutely love this pattern because it combines simple amigurumi construction with charming details like stripes, a tiny pillow and a bell collar. I enjoy the shaping that gives the cat a rounded, friendly look and the small elements that make each piece unique. I appreciate how the step-by-step photos make assembly easier and more satisfying as you see it come together. I also love that you can easily customize colors and accents to create your own special version.

Lucky Cat Amigurumi Pattern step 1 - construction progress Lucky Cat Amigurumi Pattern step 2 - assembly progress Lucky Cat Amigurumi Pattern step 3 - details and accessories Lucky Cat Amigurumi Pattern step 4 - final assembly and finishing

Switch Things Up

I love how easy it is to customize this Lucky Cat by changing yarn colors; try pastel shades for a softer look or bold contrasts for a playful result.

You can make the cat larger or smaller by changing yarn weight and hook sizeβ€”bulky yarn will make a cuddly version and finer yarn makes a tiny charm.

I often swap the collar color and use a tiny glass bead instead of a bell to create a different aesthetic.

Try embroidering different facial expressions: a smiling mouth or closed eyes will give your cat more personality.

For a festive look, add tiny felt accessories like a paper coin or a ribbon bow to the collar.

I sometimes add wire inside the arms for a posable version that can hold small props like a coin or mini fish.

Make a set of three cats with matching pillows in complementary colors to create a decorative trio for a shelf or gift set.

You can adapt the pillow size and stitch type to make a larger cushion or switch to all double crochet for a faster pillow version.

If you want a softer texture, try substituting a cotton blend for a plush toy with slightly different drape.

Experiment with placing stripes in different positions or adding spotsβ€”each variation changes the character of the cat in a fun way.

Common Mistakes & How to Fix Them

βœ— Skipping stitch markers during shaping will make it hard to find the start of rounds; place a marker at the first stitch of each round to keep your rows aligned. βœ— Not inserting safety eyes at the right round will change facial placement; insert safety eyes between round 16-17 with 7 sts apart as instructed for correct positioning. βœ— Overstuffing the head or body can distort the shape and make sewing difficult; stuff gradually and evenly, using small amounts to achieve a smooth finish. βœ— Failing to separate yarn for small embroidered details can make lines bulky and uneven; separate yarn into small strands for whiskers and mouth embroidery for a neater appearance.

Lucky Cat Amigurumi Pattern

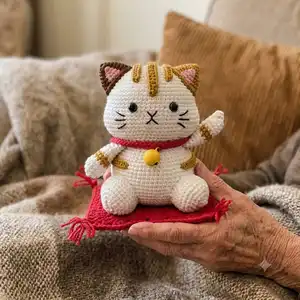
Make a charming Lucky Cat amigurumi with this clear, photo-supported pattern. You will crochet a playful kitty with a tiny pillow, collar and tassels using Yarnart Jeans yarn. The pattern includes full round-by-round instructions, materials, and helpful assembly notes so you can finish a cuddly handmade gift. Perfect for gifting or decorating your home with a handcrafted touch.

Intermediate 5-7 Hours

Materials Needed for Lucky Cat Amigurumi Pattern

β€” Main Fabric

  • 01
    Yarnart Jeans cotton yarn (160m/50g) - White (01) - approx 50g for main body and head
  • 02
    Yarnart Jeans cotton yarn (160m/50g) - Black (53) - small amount for whiskers and details
  • 03
    Yarnart Jeans cotton yarn (160m/50g) - Red (51) - approx 25-50g for collar and pillow
  • 04
    Yarnart Jeans cotton yarn (160m/50g) - Pink (36) - small amount for nose and cheek details
  • 05
    Yarnart Jeans cotton yarn (160m/50g) - Honey (84) - small amount for stripes and accents
  • 06
    Yarnart Jeans cotton yarn (160m/50g) - Brown (40) - small amount for ear details
  • 07
    Fiberfill stuffing - small bag for filling head, body, pillow and limbs
  • 08
    One bell 12mm for collar
  • 09
    One pair of safety ocean blue eyes 7mm
  • 10
    One wooden button 10mm

β€” Tools Required

  • 01
    Crochet hook size 2.3mm
  • 02
    Tapestry/yarn needle for sewing and weaving ends
  • 03
    Scissors
  • 04
    Stitch markers (recommended)
  • 05
    Polyester fiberfill stuffing
  • 06
    Safety eyes 7mm (pair)
  • 07
    12mm bell
  • 08
    10mm wooden button
  • 09
    Pins for assembly (optional)

Progress Tracker

0% Complete

β€” Head :

Round 1 :

8sc into magic ring (8)

Round 2 :

8inc (16)

Round 3 :

(sc, inc)*8 (24)

Round 4 :

(2sc, inc)*8 (32)

Round 5 :

(3sc, inc)*8 (40)

Round 6 :

(4sc, inc)*8 (48)

Round 7 :

(5sc, inc)*8 (56)

Round 8 :

56sc (56)

Round 9 :

(6sc, inc)*8 (64)

Round 10-16 :

64sc (64)

Round 17 :

9sc, (sc, inc)*8, 3sc, mark the point, 9sc, mark the point, 2sc, (sc, inc)*8, 9sc (80)

Round 18-22 :

80sc (80)

Round 23 :

(8sc, dec)*8 (72)

Round 24 :

(7sc, dec)*8 (64)

Round 25 :

(6sc, dec)*8 (56)

Round 26 :

BLO (2sc, dec)*14 (42)

Infos :

Fasten off, leave a long tail for sewing. Insert safety eyes between round 16-17 with 7 sts apart. Stuff the head. Tip: separate the yarn into small yarns to have better result. Use black yarn to sew mouth between round 18-20 and sew whiskers between round 18-21. Use pink yarn to sew nose.

β€” Body :

Info :

Make a chain of 11ch. Start in the second chain from hook.

Round 1 :

9sc, 3sc into the last stitch, work on a long the other side: 8sc, inc (22)

Round 2 :

inc, 8sc, 3inc, 8sc, 2inc (28)

Round 3 :

sc, inc, 8sc, (inc, sc)*3, 8sc, (inc, sc)*2 (34)

Round 4 :

inc, 10sc, (2sc, inc)*3, 8sc, (2sc, inc)*2 (40)

Round 5 :

(4sc, inc)*8 (48)

Round 6 :

48sc (48)

Round 7 :

(5sc, inc)*8 (56)

Round 8 :

56sc (56)

Round 9 :

(13sc, inc)*4 (60)

Round 10-18 :

60sc (60)

Round 19 :

(13sc, dec)*4 (56)

Round 20 :

56sc (56)

Round 21 :

(12sc, dec)*4 (52)

Round 22 :

(11sc, dec)*4 (48)

Round 23 :

(6sc, dec)*6 (42)

Info :

Fasten off, leaving a long tail for sewing. Stuff the body.

β€” Arms :

Info :

ARMS (2) - (white and honey yarn) - use the white yarn to make MAGIC RING, work in a continuous spiral.

Round 1 :

8sc into magic ring (8)

Round 2 :

8inc (16)

Round 3-4 :

16sc (16)

Round 5 :

(6sc, dec)*2 (14)

Round 6-7 :

3sc, 8sc, 3sc (14)

Round 8 :

(5sc, dec)*2 (12)

Round 9-12 :

12sc (12)

Info :

Stuff the arms. Flatten and fold the top of the arm, join and sc together the 2 opposing stitches (6sc). Leave a long tail for sewing.

β€” Ears :

Info :

EARS (2) - (honey, light pink and brown yarn) - use the honey (brown) yarn to make MAGIC RING, work in a continuous spiral.

Round 1 :

4sc into magic ring (4)

Round 2 :

4inc (8)

Round 3 :

(sc, inc)*4 (12)

Round 4 :

2sc, inc, 2sc, inc, (2sc, inc)*2 (16)

Round 5 :

3sc, inc, 2sc, sc, inc, (3sc, inc)*2 (20)

Round 6 :

4sc, inc, 2sc, 2sc, inc, (4sc, inc)*2 (24)

Round 7 :

5sc, inc, 2sc, 3sc, inc, (5sc, inc)*2 (28)

Round 8 :

28sc (28)

Info :

Stuff the ears. Fasten off, leave a long tail for sewing.

β€” Legs :

Info :

LEGS (2) - use the white yarn to make MAGIC RING, work in a continuous spiral.

Round 1 :

6sc into magic ring (6)

Round 2 :

6inc (12)

Round 3 :

(sc, inc)*6 (18)

Round 4 :

(2sc, inc)*6 (24)

Round 5 :

(3sc, inc)*6 (30)

Round 6-8 :

30sc (30)

Round 9 :

(3sc, dec)*6 (24)

Info :

Stuff the legs. Leave a long tail for sewing.

β€” Big Stripe :

Round 1 :

Ch20, start in the 2nd chain from hook: sc, 17hdc, sc (19)

Info :

Fasten off. Leave a long tail for sewing.

β€” Small Stripes :

Round 1 :

Ch16, start in the 2nd chain from hook: 15sc (15)

Info :

Fasten off. Leave a long tail for sewing.

β€” Collar :

Round 1 :

Make a chain of 62ch. Start in the 7th chain from hook 55sc (55)

Info :

Fasten off, weave in the yarn end. Sew the button and the bell through the collar. Wear collar for the cat.

β€” Tail :

Round 1 :

6sc into magic ring (6)

Round 2 :

6inc (12)

Round 3-9 :

12sc (12)

Info :

Don't stuff the tail. Flatten and fold the top of the tail, join and sc together the 2 opposing stitches (6sc). Leave a long tail for sewing. Sew tail to body on round 6.

β€” Pillow :

Round 1 :

Make a chain of 40ch. Start in the 3rd chain from hook 38dc, turn (38)

Round 2-13 :

Ch2, 38dc, turn (38)

Round 14 :

Ch2, 38dc (38)

Info :

Fasten off, leave a long tail about 40cm for sewing. Stuff some fiberfill in the pillow.

Item Name (Tassels P1) :

Cut 20 equal yarns about 10cm. Take 5 yarns and thread needle. Thread the needle through one corner of the pillow. Knot. Separate the yarns into small yarns. Repeat the same steps for the remaining 3 corners.

β€” Assembly :

Info :

Sew head to body. Sew ears to head between round 4-11. Use pins to fix stripes to head and body and sew them in place. Sew legs to body between round 6-13, 2 legs apart 10sts. Sew arms to body. Use pink yarn to sew lines in legs.

Assembly Instructions

  • Sew head to body using the long tail from head and the opening at the top of the body, joining securely with whipstitch.
  • Sew ears to head between rounds 4-11, spacing them symmetrically and using the long tails for hidden sewing.
  • Position and sew legs to the bottom of the body between rounds 6-13, spacing the two legs 10 stitches apart for stability.
  • Attach arms to the sides of the body at the desired height and sew securely through the top opening, reinforcing with extra stitches if needed.
  • Pin stripes and the big stripe onto head and body, then sew in place so they align with the photographed placement.
  • Sew the tail to the body on round 6 using the long tail and secure tightly to prevent detachment.

Important Notes

  • πŸ’‘Work in a continuous spiral (no joining) for head, body and limbs for smooth amigurumi shaping.
  • πŸ’‘Use stitch markers to mark the start of each round and the two points marked on round 17 of the head for face placement.
  • πŸ’‘Insert safety eyes before heavy stuffing as instructed, and secure backs firmly to avoid loosening.
  • πŸ’‘Weave in ends and hide tails as you go to keep the finish neat and reduce bulk during assembly.

This Lucky Cat amigurumi pattern brings joyful charm to your handmade gifts and home decor. Create a small, huggable kitty with sweet details like a bell collar and tasselled pillow. Make one for a friend or craft a trio in different colors for a festive display. 🧢😺

You ask,

we answer.

FAQs

What size will the finished piece be?

The finished amigurumi measures approximately 4 inches tall when using the recommended Yarnart Jeans yarn and a 2.3mm hook.

Can I use different yarn weights for this pattern?

Yes, you can use different yarn weights, but this will affect the final size. Adjust your hook accordingly and expect proportion changes if you use thicker or thinner yarn.

Do I need prior crochet experience for this pattern?

This pattern is rated intermediate, so familiarity with single crochet, increases, decreases and working in continuous spirals is recommended for best results.

How long does this project typically take to complete?

Most crocheters complete this project in about 5-7 hours, though time may vary based on experience level, customization and assembly time.