🧢 Beautiful ✨ Detailed πŸ’ Adorable

Lemon Gnome Amigurumi Pattern

Lemon Gnome Amigurumi Pattern
4.1β˜… Rating
5-7 Hours Time Needed
2.9K Made This
βœ‚οΈ

Intermediate Level

Ideal for those with basic crochet experience, featuring slightly more advanced stitches and techniques to expand your skills.

⏱️

Weekend Treat

Takes 5-7 hours, making it an enjoyable project to finish over a couple of days.

🧸

Cute Companion

An adorable friend to cherish, handcrafted with love to bring comfort and joy for years to come.

About This Lemon Gnome Amigurumi Pattern

This pattern teaches you how to crochet a lemon-themed gnome complete with hat decorations, beard, nose and tiny lemon slices. The design uses YarnArt Begonia cotton yarn and small hooks to achieve neat, detailed stitches. Full round-by-round instructions and photos guide you through shaping and assembly for a polished finished toy.

Lemon Gnome Amigurumi Pattern crochet pattern - detailed view of completed project

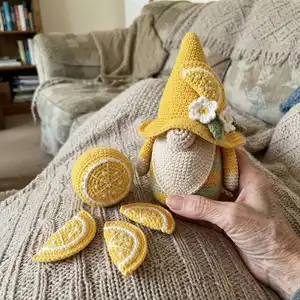
You will make separate pieces (body, hat, hands, beard, nose, leaves and flowers) and sew them together for the final gnome. The PDF pattern includes clear abbreviations, notes and helpful photos to support your work.

Why You'll Love This Lemon Gnome Amigurumi Pattern

I absolutely love this pattern because it blends a charming amigurumi character with pretty lemon-themed details that brighten any shelf. I enjoy the mix of simple rounds and small decorative pieces β€” they keep the project interesting without being overwhelming. The pattern is written with clear, step-by-step rounds so I can relax into my crocheting and watch the gnome take shape. Sewing the slices and flowers onto the hat is one of my favorite finishing touches and always makes each gnome feel unique.

Lemon Gnome Amigurumi Pattern step 1 - construction progress Lemon Gnome Amigurumi Pattern step 2 - assembly progress Lemon Gnome Amigurumi Pattern step 3 - details and accessories Lemon Gnome Amigurumi Pattern step 4 - final assembly and finishing

Switch Things Up

I love customizing this gnome by changing the color palette β€” try pastel yellows and mint greens for a softer look.

I often swap the cotton for a slightly thicker cotton blend and use a larger hook to create a chunkier, cuddlier gnome.

I sometimes make mini versions for keychains by using thinner yarn and an appropriately small hook.

I like to experiment with different leaf shapes and sizes; making larger leaves or extra flowers gives the hat a different personality.

I like to embroider tiny patterns onto the lemon slices instead of the white rind stitches for a subtle textured look.

I sometimes add a tiny bell or bead inside the hat top for a soft jingle when the gnome is moved.

I recommend trying metallic thread for the lemon seeds for a delicate shimmer on special gift versions.

I also change the beard color to gray or brown to make a family of gnomes with different ages and styles.

I occasionally add a small loop to the hat tip so the gnome can be hung as an ornament during the holidays.

I enjoy creating matching accessories β€” a tiny scarf, a basket or a second lemon prop β€” to turn one gnome into a themed set.

Common Mistakes & How to Fix Them

βœ— Skipping the recommended stitch marker when working in continuous rounds can cause you to lose track of the start of the round; use a marker or a small piece of scrap yarn at the beginning of every round. βœ— Forgetting to crochet the specified back-loop row will change the texture and could shift stripes on the body; be sure to follow the note on R10 and work the row in the back loop when indicated. βœ— Overstuffing the body or hat causes distortion and bubbling of stitches; stuff gradually, checking shape as you go to keep smooth curves. βœ— Not changing yarn colors at the correct rounds will misalign stripes and change measurements; follow the color change notes exactly and carry or weave in ends neatly. βœ— Failing to place the plastic or paper circle on the bottom will make the toy unstable; insert a circle of matching diameter before finishing and then finish stuffing.

Lemon Gnome Amigurumi Pattern

Create a sweet lemon-themed gnome with this complete crochet pattern. You will follow clear, photo-supported steps to make the body, hat, beard, nose, hands and decorative lemon slices and flowers. Perfect for gifting or adding a bright handmade accent to your home, this pattern uses cotton yarn and small hook for crisp details. Follow the full instructions to assemble and embellish your adorable gnome.

Intermediate 5-7 Hours

Materials Needed for Lemon Gnome Amigurumi Pattern

β€” Main Fabric

  • 01
    YarnArt Begonia (100% cotton), 169 m / 50 g (185 yds / 1.76 oz)
  • 02
    Yellow yarn (main color) - approximately 50 g (use to crochet body, hat, lemon slices and stripes as shown)
  • 03
    Green yarn (darker green) - approximately 25 g for leaves and stripes
  • 04
    Light green yarn - approximately 25 g for body stripes
  • 05
    Beige yarn - approximately 25 g for nose and hand tips
  • 06
    Light beige yarn - approximately 25 g for beard and inner details
  • 07
    White yarn - small amount (approx. 10 g) for lemon slice rind and flower petals

β€” Tools Required

  • 01
    Crochet hook size 1.75 mm (US 4) as stated in pattern
  • 02
    Sewing needle for joining parts and embroidery
  • 03
    Scissors
  • 04
    Stitch marker or a piece of scrap yarn
  • 05
    Polyester stuffing (holofiber) for body, nose and hat filling
  • 06
    Plastic or paper circle to insert into bottom of body
  • 07
    Pins for positioning pieces during assembly

Progress Tracker

0% Complete

β€” Body :

Round 1 :

6 sc in MR (6)

Round 2 :

( inc ) x 6 (12)

Round 3 :

( 1 sc, inc) x 6 (18)

Round 4 :

( 2 sc, inc) x 6 (24)

Round 5 :

( 3 sc, inc) x 6 (30)

Round 6 :

( 4 sc, inc) x 6 (36)

Round 7 :

(5 sc, inc) x 6 (42)

Round 8 :

(6 sc, inc) x 6 (48)

Round 9 :

(7 sc, inc) x 6 (54)

Round 10 :

54 sc ( 1 row) - crochet this row for the back wall of the loops !!!!!

Round 11 :

54 sc ( 1 row)

Round 12 :

(8 sc, inc) x 6 (60)

Round 13 :

60 sc ( 1 row)

Round 14 :

(9 sc, inc) x 6 (66)

Info :

Change to green yarn !!!!!

Round 15-19 :

66 sc ( 5 rows)

Info :

Change to yellow yarn !!!!!

Round 20-24 :

66 sc ( 12 rows)

Info :

Change to green yarn !!!!!

Round 25-26 :

66 sc ( 12 rows)

Round 27 :

( 20 sc, dec) x 3 (63)

Round 28-29 :

63 sc ( 2 rows)

Info :

Change to yellow yarn !!!!!

Round 30 :

( 19 sc, dec) x 3 (60)

Round 31-32 :

60 sc ( 2 rows)

Round 33 :

( 18 sc, dec) x 3 (57)

Round 34-35 :

57 sc ( 2 rows)

Round 36 :

( 17 sc, dec) x 3 (54)

Round 37 :

54 sc ( 1 row)

Round 38 :

( 7 sc, dec) x 6 (48)

Round 39 :

48 sc ( 1 row)

Round 40 :

( 6 sc, dec) x 6 (42)

Round 41 :

42 sc ( 1 row)

Round 42 :

(5 sc, dec) x 6 (36)

Round 43 :

36 sc ( 1 row)

Round 44 :

(7 sc, dec) x 4 (32)

Round 45 :

(6 sc, dec) x 4 (28)

Round 46 :

(5 sc, dec) x 4 (24)

Round 47 :

24 sc ( 1 row)

Round 48 :

(4 sc, dec) x 4 (20)

Round 49 :

20 sc ( 1 row)

Round 50 :

(3 sc, dec) x 4 (16)

Round 51 :

(2 sc, dec) x 4 (12)

Round 52 :

(1 sc, dec) x 4 (8)

Round 53 :

( dec) x 4 (4)

Info :

!!!!!!!!! Do not forget to put a plastic or paper circle on the bottom of the gnome's body (the diameter of the circle should correspond to the diameter of the bottom of the body). After that, we fill the body with holofiber.

β€” Nose :

Round 1 :

7 sc in MR (7)

Round 2 :

( inc ) x 7 (14)

Round 3 :

( 1 sc, inc) x 7 (21)

Round 4-5 :

21 sc ( 2 rows)

Round 6 :

( 1 sc, dec) x 7 (14)

Round 7 :

( dec) x 7 (7)

Info :

Fill the nose with holofiber. F.o. and leave a long tail for sewing

β€” Beard :

Round 1 :

6 sc in MR (6)

Round 2 :

6 sc ( 1 row)

Round 3 :

( 1 sc, inc) x 3 (9)

Round 4 :

( 2 sc, inc) x 3 (12)

Round 5 :

( 2 sc, inc) x 4 (16)

Round 6 :

( 3 sc, inc) x 4 (20)

Round 7 :

( 4 sc, inc) x 4 (24)

Round 8 :

24 sc ( 1 row)

Round 9 :

( 5 sc, inc) x 4 (28)

Round 10 :

( 6 sc, inc) x 4 (32)

Round 11 :

( 7 sc, inc) x 4 (36)

Round 12 :

( 8 sc, inc) x 4 (40)

Round 13-19 :

40 sc ( 7 rows)

Round 20 :

( 8 sc, dec) x 4 (36)

Round 21 :

( 7 sc, dec) x 4 (32)

Round 22-23 :

32 sc ( 2 rows)

Info :

Don't stuff with fiberfill. We fold the part in half and knit 1 row, tying both halves together. F.o. and leave a long tail for sewing

β€” Hands (make 2) :

Round 1 :

6 sc in MR (6)

Round 2 :

( inc ) x 6 (12)

Round 3 :

( 2 sc, inc) x 4 (16)

Round 4-7 :

16 sc ( 4 rows)

Info :

Change to yellow yarn !!!!!

Round 8-11 :

16 sc ( 4 rows)

Round 12 :

( 6 sc, dec) x 2 (14)

Round 13-20 :

14 sc ( 8 rows)

Info :

Don't stuff with fiberfill. We fold the part in half and knit 1 row, tying both halves together. F.o. and leave a long tail for sewing

β€” Gnome hat (make 1) :

Round 1 :

8 sc in MR (8)

Round 2 :

8 sc ( 1 row)

Round 3 :

( 1 sc, inc) x 4 ( 12 )

Round 4 :

12 sc ( 1 row)

Round 5 :

( 2 sc, inc) x 4 (16 )

Round 6 :

16 sc ( 1 row)

Round 7 :

( 3 sc, inc) x 4 (20 )

Round 8 :

20 sc ( 1 row)

Round 9 :

( 4 sc, inc) x 4 (24 )

Round 10 :

24 sc ( 1 row)

Round 11 :

( 5 sc, inc) x 4 (28 )

Round 12 :

28 sc ( 1 row)

Round 13 :

( 6 sc, inc) x 4 (32 )

Round 14 :

32 sc ( 1 row)

Round 15 :

( 7 sc, inc) x 4 (36 )

Round 16 :

36 sc ( 1 row)

Round 17 :

( 5 sc, inc) x 6 (42 )

Round 18 :

42 sc ( 1 row)

Round 19 :

( 6 sc, inc) x 6 (48 )

Round 20 :

48 sc ( 1 row)

Round 21 :

( 7 sc, inc) x 6 (54 )

Round 22 :

54 sc ( 1 row)

Round 23 :

( 8 sc, inc) x 6 (60 )

Round 24 :

60 sc ( 1 row)

Round 25 :

( 9 sc, inc) x 6 (66 )

Round 26 :

66 sc ( 1 row)

Round 27 :

( 10 sc, inc) x 6 (72 )

Round 28 :

72 sc ( 1 row)

Round 29 :

( 8 sc, inc) x 8 ( 80 )

Round 30 :

80 sc ( 1 row)

Round 31 :

( 9 sc, inc) x 8 ( 88 )

Round 32 :

( 10 sc, inc) x 8 ( 96 )

Round 33 :

96 sc ( 1 row)

Round 34 :

( 11 sc, inc) x 8 (104 )

Round 35-36 :

104 sc ( 2 rows)

Info :

F.o. and leave a long tail for sewing

β€” Slice of lemon (make 1) :

Round 1 :

6 sc in MR (6)

Round 2 :

( inc ) x 6 (12)

Round 3 :

( 1 sc, inc) x 6 (18)

Round 4 :

( 2 sc, inc) x 6 (24)

Round 5 :

( 3 sc, inc) x 6 (30)

Info :

Change to white yarn !!!!!

Round 6 :

( 4 sc, inc) x 6 (36)

Info :

Change to yellow yarn !!!!!

Round 7 :

( 5 sc, inc) x 6 (42)

Info :

Don't stuff with fiberfill. We fold the part in half and knit 1 row, tying both halves together. F.o. and leave a long tail for sewing

β€” Flowers (make 3) :

Round 1 :

6 sc in MR (6)

Info :

Change to white yarn !!!!!

Info :

Next, we crochet 6 flower petals. Crochet 1 petal in each of the 6 loops. Petal: 1 sl st ,2 ch, 2 dc , 2 ch, 1 sl st in the same loop (in the one in which we knit the petal)

β€” Small leaf (make 1) :

Info :

Make 12 ch. From the 2nd ch from hook: 1 sl st, 1 sc, 1 HDC, 2 dc, 2 tr, 2 dc, 1 HDC, 1 sl st

β€” Big leaf (make 1) :

Info :

Make 12 ch. From the 2nd ch from hook: 1 sl st, 1 sc, 1 HDC, 2 dc, 2 tr, 2 dc, 1 HDC, 3 sc in 1 loop ; further crochet the second half of the braid 1 HDC, 2 dc, 2 tr, 2 dc, 1 HDC, 1 sc, 1 sl st

β€” Assembly :

Infos :

Sew the beard and nose. Sew the hands to the body. Sew a hat. Gradually fill the hat with holofiber during sewing. Make the design of the hat - sew a slice of lemon, leaves and flowers (see photo).

Assembly Instructions

  • Sew the beard to the front of the body, aligning the top edge of the beard with the round indicated in photos to create the correct face placement.
  • Sew the nose centered above the beard and secure tightly; embroider or position as in the pictures to create the gnome's face.
  • Attach each hand to the sides of the body between the striped rounds, sewing firmly and hiding ends inside the body.
  • Sew the hat onto the top of the body and gradually stuff the hat with holofiber as you stitch to keep the pointed shape.
  • Decorate the hat by sewing on the lemon slice, small leaves and three flowers positioned as shown in the photo for the final design.

Important Notes

  • πŸ’‘Use a stitch marker to mark the beginning of each round when working in continuous spirals to avoid losing count.
  • πŸ’‘Fasten off using a needle join to create a neat finish and hide yarn tails inside the piece while sewing.
  • πŸ’‘Insert a plastic or paper circle into the bottom of the body before finishing stuffing so the gnome sits stable and flat.
  • πŸ’‘Stuff the body and hat gradually to keep consistent shape and avoid lumps; do not overstuff decorative pieces like slices or leaves.

This lemon gnome is a bright, handmade companion that brings a touch of summer to any shelf. The pattern combines simple amigurumi shaping with small, charming details like lemon slices and flowers. Create one as a gift or collectible and enjoy customizing colors and decorations. πŸ§ΆπŸ‹βœ¨

You ask,

we answer.

FAQs

What size will the finished piece be?

If you use the same yarn and hook recommended in the pattern, the toy will be about 13 cm (5.1 inches) tall.

Can I use different yarn weights for this pattern?

Yes, you can use different yarn weights but this will change the final size; adjust your hook size accordingly to maintain the look and proportions.

Do I need prior crochet experience for this pattern?

This pattern is rated intermediate, so basic knowledge of magic ring, increases, decreases and reading rounds is recommended for best results.

How long does this project typically take to complete?

Most crocheters finish this gnome in about 5-7 hours depending on experience level and how many decorations you sew on.