🧢 Beautiful ✨ Detailed πŸ’ Adorable

Lavender Pattern

Lavender Pattern
4.3β˜… Rating
2-4 Hours Time Needed
2.9K Made This
βœ‚οΈ

Beginner Friendly Level

Perfect for those just starting their crochet journey, with clear instructions and simple techniques

⏱️

Bite-Sized Project

Finishes in 2-4 hoursβ€”perfect for an afternoon of creative relaxation.

🏑

Cozy Accent

A warm touch for your space that transforms ordinary corners into inviting nooks filled with handmade charm.

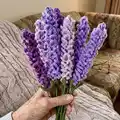
About This Lavender Pattern

This pattern shows you how to crochet delicate lavender spikes and optional leaves, then assemble them into stems for bouquets or decor. It uses weight 4 yarn and basic stitches with clear step-by-step instructions. You will learn a simple repeat that creates the textured lavender look and how to attach blooms to floral wire for a finished stem.

Lavender Pattern crochet pattern - detailed view of completed project

Includes instructions for the lavender spike, an optional leaf, and a full assembly guide. Perfect for beginners with basic crochet knowledge who want pretty handmade floral accents.

Why You'll Love This Lavender Pattern

I absolutely love this pattern because it turns simple chains and treble stitches into realistic, textured lavender blooms that feel magical to make. I enjoy how quickly each lavender spike works up β€” you can make a bouquet in just a few afternoons. The optional leaf and assembly steps let me customize stems for different displays and gifts. It brings a handmade, lasting floral touch to any room without needing real flowers, and I find that very satisfying.

Lavender Pattern step 1 - construction progress Lavender Pattern step 2 - assembly progress Lavender Pattern step 3 - details and accessories Lavender Pattern step 4 - final assembly and finishing

Switch Things Up

I love customizing this pattern by changing yarn colors to create different moods; try pastel purples, deep violets, or even pinks for playful bouquets.

You can alter the size by changing your yarn weight and hook size; a thicker yarn and larger hook will give you chunkier stems, while a smaller gauge makes delicate mini lavender.

I often vary chain lengths for a more realistic bouquet with short and long stems mixed together.

Try substituting wooden skewers for floral wire if you want a rustic, inexpensive stem base.

For posable stems, use thicker gauge floral wire and wrap tightly with green yarn for extra stiffness.

Add beads or tiny embroidered buds to create a decorative accent among the lavender spikes.

Make miniature versions by halving the chain count and using DK or sport weight yarn for keychains or ornaments.

I sometimes bundle multiple spikes and bind them with floral tape before wrapping with decorative paper for a polished gift presentation.

Experiment with adding a little fabric or felt leaf for a softer look if you prefer not to crochet leaves.

Swap ribbon styles and wrapping materials to match seasonal themesβ€”burlap for rustic, satin for elegant, or kraft paper for a farmhouse look.

Common Mistakes & How to Fix Them

βœ— Choosing the wrong yarn weight can make your lavender too chunky or too flimsy; use a Weight 4 yarn as recommended to keep the texture and detail intact. βœ— Not counting your chains precisely will change the length of your lavender spikes; measure your chain and use the suggested 63 chains or fewer for shorter spikes. βœ— Pulling the magic ring too tight can close the center hole and prevent the floral wire from fitting; leave the center hole large enough for the wire to pass through. βœ— Applying too much hot glue can create lumps or visible glue spots; use small amounts and press pieces into place quickly to keep a tidy finish. βœ— Wrapping the green yarn unevenly around the floral wire makes stems look messy; twist and wind the yarn evenly along the entire length for a professional appearance.

Lavender Pattern

Create a beautiful bouquet of crocheted lavender stems with this easy, floral pattern. You will make textured lavender spikes and optional leaves, then attach them to wire stems for a long-lasting arrangement. The pattern is clear and friendly, perfect for gifting or decorating your home with handmade blooms.

Beginner Friendly 2-4 Hours

Materials Needed for Lavender Pattern

β€” Main Fabric

  • 01
    Weight 4 acrylic yarn - Purple (amount varies by number of stems)
  • 02
    Weight 4 acrylic yarn - Green (small amount for stems and leaves)

β€” Tools Required

  • 01
    Crochet hook size 4.0mm
  • 02
    Darning needle
  • 03
    Scissors
  • 04
    Hot glue and hot glue gun
  • 05
    Floral wire stems (2mm, 15" long) OR wooden skewers if you don't have wire stems
  • 06
    Ribbon
  • 07
    Decorative paper and mesh for wrapping bouquets

Progress Tracker

0% Complete

β€” Lavender Pattern :

Step 1 :

Ch 63*

Step 2 :

In the fourth chain from the hook, place 4 TR, ch 3, sl st to the same ch you started with.

Step 3 :

Sl st to the next ch. [Ch 7. Sl st back to the same ch you started with. Sl st to the next stitch.] Repeat [_] down the entire length of your chain.

Step 4 :

FO once you reach the last ch. Leave a 6" tail. Using a darning needle, weave in the end.

Info :

* The length of your chain will alter the length of your lavender. If you want a shorter lavender, chain fewer stitches.

β€” Lavender Leaf :

Info :

**OPTIONAL** In green:

Step 1 :

Place 5 HDC in a MR. After the fifth HDC, sl st to the top of your first HDC to form a ring. Pull the end of the MR tail tightly to close the circle. Make sure to leave the center hole large enough for your floral wire to fit through.

Step 2 :

Ch 6. Working down the chain, 4 sl st, 1 sc in the last chain. Sl st to the next stitch from the MR. Repeat this process until you have 5 leaves. FO and leave a tail of a few inches. Using a darning needle, weave in the ends.

Info :

Working down the chain: 4 sl st, 1 sc, sl st to the next st of the MR. Create 5 leaves.

β€” Lavender Assembly :

Step 1 :

Cut your floral wire to your desired length.

Step 2 :

Put a small amount of hot glue on one end of the floral wire. Before the glue dries, place your green yarn on the glue to attach it.

Step 3 :

Twist the floral wire to wind the green yarn around the entire length of the wire.

Step 4 :

Place a small amount of hot glue on the other end of the wire, cut your green yarn, and glue it down.

Step 5 :

Place a small amount of hot glue on the end of the lavender where you made the 4 treble crochet stitches. Attach the lavender to the end of the floral wire.

Step 6 :

Wind the lavender around the floral wire. Make sure the chain loops face outwards. Once you reach the end of the lavender, glue the end down to the floral to secure it.

Step 7 :

**OPTIONAL:** With the correct side of your work facing upwards, insert the stem through the center of the magic ring. Make sure the correct side faces upwards so the leaves curl upwards and inwards.

Step 8 :

**OPTIONAL:** Place a small amount of hot glue in a circle around the MR. Slide the leaf upwards to the bottom of the lavender stalk to glue it in place.

β€” Photo Gallery :

Info :

See page images for finished lavender bouquets, styling ideas, and example stem groupings.

Assembly Instructions

  • Cut floral wire to desired stem length and secure green yarn to one end with a small amount of hot glue.
  • Twist the floral wire while winding the green yarn around the entire length to create a neat stem covering.
  • Glue the lavender spike to the end of the floral wire where the 4 treble stitches are, then wind the lavender around the wire with chain loops facing outwards.
  • If using the optional leaf, slide the leaf up to the base of the lavender spike and glue in a circle around the magic ring to secure it.

Important Notes

  • πŸ’‘Use Weight 4 yarn (worsted) for best texture; heavier yarn will obscure the stitch detail and lighter yarn will be less full.
  • πŸ’‘Leave the center hole of the magic ring large enough so the floral wire can be inserted comfortably during assembly.
  • πŸ’‘Work with small amounts of hot glue and press pieces into place quickly to avoid visible glue spots or lumps.

This Lavender Pattern gives you everything you need to make charming, everlasting bouquets for your home or to gift to loved ones. The easy-to-follow steps turn simple stitches into beautiful textured spikes you can arrange and style. Create a whole bouquet, wrap it in decorative paper, and enjoy the handmade beauty every day. 🧢🌿

You ask,

we answer.

FAQs

What size will the finished lavender be?

The finished lavender length depends on your chain length; the pattern uses Ch 63 as a guideline but you can chain fewer stitches for a shorter spike.

Can I use a different yarn weight?

You can use a different yarn weight, but the pattern is written for Weight 4; a thicker yarn will make chunkier lavender and a thinner yarn will make finer, smaller spikes.

Do I need prior crochet experience?

This pattern is beginner friendly, but familiarity with basic stitches like chain, slipping, single crochet, half double crochet, and treble is helpful.

How do I attach the lavender to the stem?

Attach the lavender by placing a small amount of hot glue on the end of the lavender where the 4 treble stitches are, press onto the floral wire, then wind the lavender around the wire and secure the end with glue.