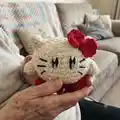
About This Kirby Hello Kitty Amigurumi Pattern
This pattern creates a tiny Kirby-style Hello Kitty mashup amigurumi that stands about 2 inches (5 cm) tall. You will crochet the body, ears, arms, legs and a little bow, then embroider the face for personality. The design uses simple rounds and basic increases/decreases to shape the character.

Suitable for a quick afternoon project, the pattern includes clear rounds and assembly notes. Materials are minimal — just DK yarn, stuffing, and a few embroidery threads.
Why You'll Love This Kirby Hello Kitty Amigurumi Pattern
I absolutely love this pattern because it combines two beloved characters into a tiny, squeezable form that is so satisfying to finish. I enjoy how quickly a full toy comes together using only a few grams of yarn. The embroidered face options let me personalize each kitty, giving each one its own expression. I also love that it is perfect for using up small yarn scraps and makes a wonderful handmade gift.
Switch Things Up
I love how easily you can customize this tiny kitty by changing yarn colors — try pastel shades for a soft look or bright primaries for bold charm.
I often make a mini series by using variegated yarn so each kitty has a unique body color and texture.
You can change the bow color, size, or even add a tiny crocheted hat for seasonal variations.
I like to switch to a thinner thread and smaller hook to create a mini keychain version that fits on a bag or zipper pull.
If I want a chunkier toy, I use a bulkier yarn and a larger hook which makes an adorable, squishier friend.
I sometimes embroider different expressions — try sleepy eyes, winking eyes, or a smiling mouth — to give each kitty personality.
For more stability I add a small felt disc inside the bottom of the body when the legs are soft to help it stand a little firmer.
I recommend experimenting with surface crochet or small sewn-on accessories like tiny flowers, scarves, or glasses to create characters.
When gifting, I like to sew a small loop or attach a keyring through a hidden tail so the recipient can hang it as a charm.
I also enjoy making matching sets in different sizes by changing yarn weight — a trio of tiny, small and medium kitties makes a sweet display.
Common Mistakes & How to Fix Them
✗ Forgetting to use a stitch marker makes it easy to lose the start of the round; place a marker at the first stitch of every round to maintain correct stitch counts.
✗ Stuffing too early or unevenly leads to lumps and a misshapen body; stuff gradually while you close, adding small amounts and smoothing as you go.
✗ Skipping counting after increases and decreases causes wrong stitch totals and distorted shaping; count stitches after each shaping round to verify accuracy.
✗ Pulling your yarn too tightly when closing can warp the shape and create a visible hole; pull evenly and fasten off neatly, then hide the tail inside the piece.
✗ Embroidering the face without planning placement may result in uneven features; mark eye positions at rounds 6-7 and test temporary placement before stitching.