🧢 Beautiful ✨ Detailed πŸ’ Adorable

Hoppy Spring Wreath Crochet Pattern

Hoppy Spring Wreath Crochet Pattern
4.6β˜… Rating
5-7 Hours Time Needed
4.0K Made This
βœ‚οΈ

Intermediate Level

Ideal for those with basic crochet experience, featuring slightly more advanced stitches and techniques to expand your skills.

⏱️

Weekend Treat

Takes 5-7 hours, making it an enjoyable project to finish over a couple of days.

🏑

Cozy Accent

A warm touch for your space that transforms ordinary corners into inviting nooks filled with handmade charm.

About This Hoppy Spring Wreath Crochet Pattern

This pattern teaches you how to crochet a minty green wrap to cover an 11.75" foam wreath, plus flowers and leaves to decorate it. The pattern also references a scrappy bunny pattern (attached separately) so you can add a sweet focal character. Clear stitch notes, helpful tips for color changes, and step-by-step assembly instructions make the project approachable and fun.

Hoppy Spring Wreath Crochet Pattern crochet pattern - detailed view of completed project

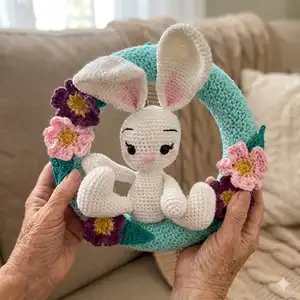
Includes complete instructions for the wreath wrap, five flowers, and five leaves, plus finishing and placement guidance. Perfect for gifting or to brighten your entryway with handmade spring charm.

Why You'll Love This Hoppy Spring Wreath Crochet Pattern

I absolutely love this pattern because it combines simple stitches into a bold, cheerful home accent that brightens any door or wall. I adore how the minty wrap creates a soft, textured base and how small flowers and leaves add charming pops of color. The project is very satisfying β€” you can see progress quickly as you build rows and then arrange your blooms. I also enjoy the flexibility: you can change colors, yarn types, or flower placement to make each wreath uniquely yours.

Hoppy Spring Wreath Crochet Pattern step 1 - construction progress Hoppy Spring Wreath Crochet Pattern step 2 - assembly progress Hoppy Spring Wreath Crochet Pattern step 3 - details and accessories Hoppy Spring Wreath Crochet Pattern step 4 - final assembly and finishing

Switch Things Up

I love how easy it is to personalize this wreath by swapping colors β€” try a pastel palette for a soft nursery look or bright, vibrant hues for a modern front door.

I sometimes knit the wrap instead of crocheting it, then sew it around the foam for a different texture and drape.

For a smaller or larger wreath, change the foam wreath size and adjust the starting chain and row count so the wrap fits snugly.

I often make mini versions of the flowers for a more delicate finish β€” use thinner yarn and a smaller hook for tiny blooms.

You can add ribbon loops or a bow at the top for hanging or seasonal flair, or attach a small name plaque for a personalized welcome sign.

I also like to add beaded details or tiny crocheted eggs in the flower clusters for an Easter-themed wreath.

If you want a rustic look, try a natural jute or linen-blend yarn for the wrap and muted florals for a farmhouse aesthetic.

I sometimes omit the bunny and cluster more flowers for a purely floral statement piece β€” it changes the focal point entirely.

Another idea is to make interchangeable decorations (Velcro or stitched loops) so you can swap flowers or a seasonal centerpiece throughout the year.

I recommend testing different yarns and hook sizes on a small swatch first so you can see how the texture and wrap fit before making the full piece.

Common Mistakes & How to Fix Them

βœ— Not measuring the wrap length before starting; measure around your foam wreath and adjust chain length so the strip wraps snugly without gaps. βœ— Skipping the note about finishing stitches when changing colors; always finish the stitch with the new color to make smoother color joins and reduce weaving at the end. βœ— Joining the short ends carelessly and misaligned rows; bring ends right sides together and SL ST across joining rows to match up stitches evenly before sewing. βœ— Using inconsistent tension causes uneven rows and puckering; maintain even tension and count stitches each row to ensure 22 stitches are kept for a smooth wrap.

Hoppy Spring Wreath Crochet Pattern

Bring spring into your home with this cheerful Hoppy Spring Wreath crochet pattern. You will create a minty green wrapped foam wreath decorated with sweet crocheted flowers and leaves, and a scrappy bunny (bunny pattern attached separately). The instructions are friendly and clear, guiding you step-by-step so you can make a bright, handmade wreath perfect for gifts or seasonal decor.

Intermediate 5-7 Hours

Materials Needed for Hoppy Spring Wreath Crochet Pattern

β€” Main Fabric

  • 01
    Size 4 worsted weight yarn (#4) in light green (main wrap)
  • 02
    Worsted weight yarn in bright yellow (flower centers)
  • 03
    Worsted weight yarn in light yellow (flower pedals)
  • 04
    Worsted weight yarn in light pink (flower pedals)
  • 05
    Worsted weight yarn in purple (flower accents)
  • 06
    Worsted weight yarn in teal green (leaves)
  • 07
    Red Heart Minty (used for main color example) and Big Twist for other colors
  • 08
    Fiber fill stuffing (for bunny - bunny materials from additional pattern)
  • 09
    Foam wreath 11.75" (base)

β€” Tools Required

  • 01
    Crochet hook size 4.0 mm (G/6)
  • 02
    Needle and scissors
  • 03
    Yarn needle for sewing and weaving ends
  • 04
    Pink acrylic paint and dry brush (for ears and cheeks, optional)
  • 05
    Foam 11.75" wreath

Progress Tracker

0% Complete

β€” Materials :

Info :

Size 4 worsted weight yarn in light green, bright yellow, light yellow, light pink, purple and teal green. I used Red Heart Minty, and big twist in the other colors. Fiber fill Stuffing. 4.0 mm hook. Needle/Scissors. Foam 11.75” wreath. *Bunny Materials seen on combined additional pattern. Pink Acrylic Paint and dry brush.

β€” Terms :

Infos :

Yarn Over – YO. Stitch – ST. Chain - CH. Single Crochet – SC. Double Crochet - DC. Slip Stitch – SL ST. Half Double Crochet – HDC. Triple Crochet - TR. Magic Circle – MC. Great tutorial for MC: https://www.youtube.com/watch?v=p298HxgsO1s. Half Double Crochet Foundation Stitch - HDCFS. Great Tutorial if this is unfamiliar: https://www.youtube.com/watch?v=I9Og5cd2L0o. Bubble Stitch – BS (explained in beard section). Between * * repeat this many additional times β€œx”. End of row (Parenthesis) total number of stitches in row. Note: when changing colors work ends into stitches as you go along. This allows for less end weaving at the end of project. Also, when changing colors, always finish previous stitch with new color this makes for a smoother color change. Big Note: I’m left-handed; all pictures are shown with left handed progress unless otherwise stated. Pattern works for both left and right-handed crafters.

β€” Minty Green Wreath :

Round 1 :

With Color A - Chain 23, sc into 2nd chain from the hook and dc in next *sc, dc* repeated until the end. Ch 1, Turn (22)

Round 2 :

*sc, dc* repeat to the end, ch 1, turn (22)

Info :

This is a good time to wrap this piece around your wreath, it should wrap just right around. If not, start over and add 2 stitches, if it’s too loose, do 2 less. (Pattern made in multiples of 2)

Info :

Every row is crochet exactly as row 2. 22 stitches in each row.

Info :

This pattern is repeated in every row 97 more rows. (99 total rows)

Info :

Bring ends right sides together. Put hook into each 1st st, in row 99 and row 1. Sl ST across joining ends together and making a circle. Tie off. Leave long length (45ish inches for sewing together.)

Info :

Slide onto foam wreath right side out. Sew sides together around the wreath. Be sure to match up rows as you sew along. Weave end ends.

β€” Flower :

Info :

Make 5. With Bright Yellow 4mm hook.

Round 1 :

Sc 10 in MC, Pull tight, sl st in first sc. (10)

Round 2 :

Change color to light yellow. *Sc, ch 1* repeat 9x, sl st in first st (10)

Round 3 :

Change color to pedal color. *Sl St in first sc, ch 3, Tr in same st, Tr in same st, DC in ch 1 space, Tr next st, Tr same st, ch 3, sl st in same st* repeat around making 5 pedals total. Tie off, leave length for sewing to wreath. Weave in ends.

β€” Leaf :

Info :

Make 5. With teal green, 4mm hook.

Round 1 :

Ch 9, sl st 2nd chain from the hook, sc, sc, hdc, dc, dc, tr, tr last, ch 3, sl st in same st.

Info :

Rotate now working on the other side. Ch 3, Tr in same st, tr, dc, dc, hdc, sc, sc, sl st. tie off. Weave in ends.

Finishing (P1) :

HDCFS 20, fold in half and sew ends to back/top of wreath. (Hook) Sew flowers on either side of wreath. And one on the bottom. Sew leaves to either side of flower bunches. Use Scrappy bunny pattern (attached) to make Bunny. Sew Bunny at his bum to the bottom edge of the wreath. It helps to omit the tail. Sew an ear to top of wreath. Hand paint ears and cheeks with dry brush and pink acrylic paint (optional). Hang and Celebrate.

Info :

Hoppy Spring PDF Crochet Pattern is great for gifts and is an easy project for beginner to intermediate crocheter.

Assembly Instructions

  • Slide the crocheted wreath wrap onto the foam wreath right side out, then sew the two long edges together around the foam, matching rows as you go to keep the texture even.
  • Bring the short ends (row 99 and row 1) right sides together and SL ST across joining ends to make a circle before sliding onto the foam; leave a long tail (about 45 inches) for final sewing.
  • Sew five flowers onto the wreath: place two on one side, two on the opposite side, and one at the bottom, spacing evenly and stitching through the wrap to secure.
  • Sew the leaves in pairs beside the flower bunches, tucking and stitching leaves under petals so the flowers sit naturally on the wreath surface.
  • Attach the scrappy bunny (from the attached bunny pattern) by sewing at the bunny's bum to the bottom edge of the wreath; optionally omit the tail and sew one bunny ear to the top of the wreath for extra charm.

Important Notes

  • πŸ’‘Measure your wrap piece around the foam wreath before finishing to ensure it fits snugly; adjust the starting chain if needed.
  • πŸ’‘When changing colors, finish the stitch with the new color to reduce ends and create smoother joins across rows.
  • πŸ’‘Match up rows exactly when sewing the wrap around the wreath to avoid visible seams and uneven texture.
  • πŸ’‘Weave in ends as you go to keep the finishing neat and manageable once the wreath is assembled.

This Hoppy Spring Wreath pattern brings a bright, handmade touch to your spring decor and makes a lovely gift. 🧢 The pattern includes clear step-by-step instructions for the wreath wrap, flowers, and leaves so you can create a polished finished piece. πŸŽ€ Hang your wreath with pride and celebrate the season with cheerful handmade charm! 🌸

You ask,

we answer.

FAQs

What size will the finished wreath be?

The finished wreath uses an 11.75" foam wreath as the base; the wrapped wreath will measure about the same external diameter as the foam and depends slightly on yarn thickness.

Can I use a different yarn weight for the wrap?

Yes, you can use different yarn weights but the final fit will change; adjust your starting chain and row count so the strip wraps snugly around your specific foam wreath.

Do I need the scrappy bunny pattern to complete the wreath?

No β€” the wreath can be completed with just flowers and leaves, but the scrappy bunny (attached as an additional pattern) adds a charming focal point if you choose to include it.

How long does this project typically take to complete?

Most crocheters complete this project in 5-7 hours, though time may vary based on experience level and how many embellishments you add.