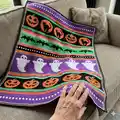
Make a festive Halloween blanket full of pumpkins, ghosts, bats and stripes. This pattern uses simple stitches, tapestry crochet charts and bobbles to create playful motifs. You will enjoy colour changes and clear charted sections that produce a striking finished throw. Perfect for seasonal decor or a fun challenging project to enjoy over several sessions.
Progress Tracker
0% Complete
— Stripes and bobbles :
Foundation Chain :
Using purple and a 4mm hook, 152ch.
Row 1 :
1dc in 4th ch from hook. 1dc in each ch across. 2ch, turn. From now on, the count for every row is 150 stitches.
Rows 2 & 3 :
(The 2ch counts as the first stitch). Sk the first st and 1dc in each stitch across. 2ch, turn. Repeat for row 3.
Row 4 :
(The 2ch counts as the first stitch). Sk the first st and 1dc in each stitch across. 1ch, turn.
Row 5 (bobble row) :
(The 1ch does not count as a stitch). 1sc in first 3 sts. Join white in the last pull through of 3rd sc, make bobble. [3sc in purple, make bobble in white ] until 2 sts remain. 1sc in each of the last 2 sts. 2ch, turn. Cut white. You will have 37 bobbles.
Info :
How to make a bobble. Bringing the purple yarn forward before you make each bobble will ensure that your yarns do not become twisted together.
Info :
The 1ch does not count as a stitch so place your first sc where the needle is pointing.
Info :
When working the 3rd sc, stop while you still have two loops on the hook. Complete the stitch by pulling through a loop of white. Bring purple and the tail of the white towards you.
Info :
Yo, insert hook into next st and pull up a loop, yo pull through 2 loops. You should have 2 loops on your hook. In the same st, yo, pull up a loop, yo and pull through 2 loops, 4 more times. You should have 6 loops on your hook. Using purple, yo and pull through all loops on your hook to complete the bobble.
Info :
Repeat the steps above, working 3sc in purple followed by a bobble in white until 2 sts remain. 1 sc in each st. Work all your purple dc over the white so that it is hidden.
Row 6 :
1dc in each stitch across, 2ch, turn.
Rows 7 & 8 :
Sk the first st and 1dc in each st across. 2ch, turn. Repeat for row 8.
Row 9 :
Sk the first st and 1dc in each st across. Change to orange, 2ch, turn.
Row 10 :
Sk the first st and 1dc in each st across. 2ch, turn.
Row 11 :
Sk the first st and 1dc in each st across. Change to purple, 2ch, turn.
Row 12 :
Sk the first st and 1dc in each st across. Change to green, 2ch, turn.
Info :
There is a Humbug stripe section of three rows which appears several times throughout the blanket. It is worked the same way each time. Sometimes it will be worked with the right side facing and sometimes with the wrong side facing; it looks virtually identical on both sides.
— Humbug Stripe :
Row 13 :
Sk the first st and 1hdc in each st across. Change to white, 3ch, turn.
Row 14 :
(3ch counts as 1hdc and 1 ch). Sk 2 sts and 1 hdc in the next st, 1ch. [sk 1 st, 1hdc in next st, 1ch] until 1 st remains. Fasten off white. Join green in last stitch, 2ch (counts as first dc), turn.
Row 15 :
[1htr, 1tr in row below] until 1 st remains. 1htr in last st and fasten off.
Info :
When changing colours at the beginning of a row, simply pull through a loop of the new colour through the loop of the last stitch. Leave tails of about 4" to sew in later. If the pattern says change to a new colour, you can cut the previous yarn.
— Pumpkins (charted section) :
Info :
In this section of the blanket you will be working the pumpkins in tapestry crochet by following a chart. The chart makes up rows 16-40 of the blanket. To avoid confusion the chart rows are referred to as chart row 1, chart row 2 etc. Use a 4.5mm hook for tapestry crochet sections. Working in two colours can make stitches tighter; the larger hook will help keep tension even and sides straight.
Reading charts :
You read the chart starting in the bottom right corner at no. 1. Each box represents one single crochet. Odd numbered rows are the front of your blanket and are worked from right to left. Even numbered rows are the back and are worked from left to right. Work the chart multiple times across the width as directed—this blanket uses 5 repeats of the chart to make 150 stitches.
Chart row 1 :
With the RIGHT SIDE facing you (Bobbles sticking out), using a 4.5mm hook, join black in the first stitch and 1 ch. Work row 1 of the chart 5 times. 1ch, turn. 150 sts.
Chart row 2 :
Work row 2 of the chart 5 times. 1 ch, turn. So, you will work 30 black sc 5 times, making 150 sc in total.
Chart row 3 :
Using black and orange, work row 3 of the chart 5 times. 1 ch, turn.
Chart rows 5 - 20 :
Continue following the chart, changing colours as required. Carry the orange yarn along to the end of the row. Cut the orange yarn at the end of row 20. Join green in row 21. Cut green at the end of row 23. That completes rows 16 - 40 (pumpkin chart area).
— Back to regular rows :
Row 41 :
Using a 4mm hook, change to green and 2ch. Sk the first st and 1hdc in each st across. Change to white, 3ch, turn.
Row 42 :
Sk 2 sts and 1hdc in the next st. 1 ch. [Sk 1 st, 1hdc in next st, 1ch] until 1 st remains. Join green in last st, 2 ch, turn.
Row 43 :
[1hdc, 1dc in row below] until 1 st remains. 1hdc in last st. Change to purple, 2ch, turn.
Row 44 :
Sk the first stitch and 1dc in each st across. Change to orange, 2ch, turn.
Row 45 :
Sk the first stitch and 1dc in each st across. 2ch, turn.
Row 46 :
Sk the first st and 1dc in each st across. Change to white, 2ch, turn.
— Ghosts (charted section) :
Info :
The next section is the ghosts and is worked from the chart. The chart has 40 rows and makes up rows 50 - 89 of the blanket. Use a 4.5mm hook and the purple and white yarn. All stitches in the chart are sc. When changing colours, keep the purple yarn to the front and the white yarn to the back to prevent twisting. Work five repeats of the pattern; check stitch count is 150 at the end of the first row.
Rows 47 - 49 :
Rows 47 - 49 are Humbug Stripe.
Row 47 :
Sk the first st and 1hdc in each st across. Change to black, 3ch, turn.
Row 48 :
(3ch counts as a 1hdc and 1ch). Sk 2 sts and 1hdc in the next st. 1 ch. [Sk 1 st, 1hdc in next st, 1ch] until 1 st remains. Join white in last st and 2ch, turn.
Row 49 :
[1hdc, 1dc in row below] until 1 st remains. 1hdc in last st. Change to purple, 1ch, turn.
Rows 50 - 89 :
The ghost chart has 40 rows that make up rows 50 - 89 of the blanket. Follow the chart, changing colours as required, and work five repeats of the chart across the width to maintain 150 stitches per row.
— Humbug and bobbles continued :
Rows 90 - 92 :
Rows 90 - 92 are Humbug Stripe.
Row 90 :
Using 4mm hook, change to white and 2ch. Sk the first st and 1hdc in each st across. Change to black, 3 ch, turn.
Row 91 :
(3ch counts as a 1hdc and 1ch). Sk 2 sts and 1hdc in the next st. 1ch. [Sk 1 st, 1hdc in next st, 1ch] until 1 st remains. Join white in last st and 2 ch, turn.
Row 92 :
[1hdc, 1dc in row below] until 1 st remains. 1hdc in last st. Change to orange, 2ch, turn.
Row 93 :
Sk the first st and 1dc in each st across. 2ch, turn.
Row 94 :
Sk the first st and 1dc in each st across. 2ch, turn. Change to black, 2ch, turn.
Row 95 :
Sk the first st and 1dc in each st across. 2ch, turn.
Row 96 :
Sk the first st and 1dc in each st across. 1ch, turn.
Row 97 (Bobble Row) :
Bobble Row. (The 1ch does not count as a stitch). 1sc in first 3 sts. Join white in the last pull through of 3rd sc, make bobble. [3sc in black, make bobble in white] until 2 sts remain. 1sc in each of the last 2 sts. 2ch, turn. Cut white. You will have 37 bobbles.
Row 98 :
Sk the first st and 1dc in each st across. 2ch, turn.
Row 99 :
Sk the first st and 1dc in each st across. Change to orange, 2ch, turn.
Row 100 :
Sk the first st and 1dc in each st across. 2ch, turn.
Row 101 :
Sk the first st and 1dc in each st across. Change to white, 2ch, turn.
Rows 102 - 104 :
Rows 102 - 104 are Humbug stripe.
Row 102 :
Sk the first st and 1hdc in each st across. Change to purple, 3ch, turn.
Row 103 :
(3ch counts a 1hdc and 1ch). Sk 2 sts and 1hdc in the next st. 1ch. [Sk 1 st, 1hdc in next st, 1ch] until 1 st remains. Join white in last st and 2ch, turn.
Row 104 :
[1hdc, 1dc in row below] until 1 st remains. 1hdc in last st. Do not turn. Join green yarn with right side facing you, 1ch.
— Bats (charted section) :
Info :
The bats chart has 17 rows and makes up rows 105 - 121 of the blanket. Use a 4.5mm hook and the green and black yarn. All stitches in the chart are sc. Do not turn at the end of row 104; join green yarn and begin working the bats with the right side facing you. Keep the green yarn to the front and the black yarn to the back when changing colours to prevent twisting. Work five repeats of the pattern; check stitch count is 150 at the end of the first row.
Rows 122 - 124 :
Rows 122 - 124 are Humbug stripe.
Row 122 :
Using a 4mm hook, change to white and 2ch. Sk the first st and 1hdc in each st across. Change to purple, 3ch, turn.
Row 123 :
(3ch counts as 1hdc and 1ch). Sk 2 sts and 1hdc in the next st. 1ch. [Sk 1 st, 1hdc in next st, 1ch] until 1 st remains. Join white in last st and 2ch, turn.
Row 124 :
[1hdc, 1dc in row below] until 1 st remains. 1hdc in last st. Change to orange, 2 ch, turn.
— Cats (charted section) :
Info :
Rows 131 - 160 are black cats and are worked from the cat chart. Start with RIGHT SIDE FACING and work 5 repeats of the chart. Use a 4.5mm hook and the black and orange yarn. All stitches in the chart are sc. When changing colours, keep the black yarn to the front and the orange yarn to the back. Check your stitch count is 150 at the end of the first row of the chart before moving on.
Row 129 :
(3ch counts a 1hdc and 1ch). Sk 2 sts and 1hdc in the next st. 1ch. [Sk 1 st, 1hdc in next st, 1ch] until 1 st remains. Join green in last st, 2ch, turn.
Row 130 :
[1hdc, 1dc in row below] until 1 st remains. 1hdc in last st. Change to black, 1ch, turn.
— Final Humbug and finishing rows :
Rows 161 - 163 :
Rows 161 - 163 are Humbug stripe.
Row 161 :
Join green, 2ch, sk the first st and 1hdc in each st across. Change to white, 3ch, turn.
Row 162 :
(3ch counts a 1hdc and 1ch). Sk 2 sts and 1hdc in the next st. 1ch. [Sk 1 st, 1hdc in next st, 1ch] until 1 st remains. Join green in last st and 2ch, turn.
Row 163 :
[1hdc, 1dc in row below] until 1 st remains. 1hdc in last st. Change to purple, 2ch, turn.
Row 164 :
Sk the first st and 1dc in each st across. Change to orange, 2ch, turn.
Row 165 :
Sk the first st and 1dc in each st across. 2ch, turn.
Row 166 :
Sk the first st and 1dc in each st across. Do not turn.
Rows 167 - 169 :
Join purple with wrong side facing you, 2ch. Sk the first st and 1dc in each st across. 2ch, turn.
Row 170 :
Sk the first st and 1dc in each st across. 1ch, turn.
Row 171 (Bobble Row) :
Bobble Row. 1ch, 1 sc in each of the first 3 sts. Join white to make bobble. [3sc, make bobble] until 2 sts remain. 1sc in each of the last 2 sts. 2ch, turn. Cut white.
Rows 172 - 174 :
Sk the first st and 1dc in each st across. 2ch, turn.
Row 175 :
Sk the first st and 1dc in each st across. Fasten off. Sew in all remaining tails.
— Eyes and finishing touches :
Info :
The last stage of the blanket is to bring the characters to life and add the border. You can see this in the accompanying video. I have used simple cross stitches and leftover orange yarn to make the eyes on the bats and passed the yarn under the stitch between the eyes to give a neat finish. For the ghost's eyes I used horizontal stitches between two double crochet; make 8 stitches between each of the two dots on the picture above. Don't pull them too tightly to keep a rounded eye shape. You can add a mouth if you want to.
— Border :
Round 1 :
Using a 4mm hook, join white in the first stitch in the top right hand corner of the blanket. 1ch (does not count as a stitch). 1sc, 2ch, 1sc in the same stitch to form corner, 1sc in each stitch along top edge. 1 sc, 2 ch,1sc in the same stitch to turn the corner.
Info :
At the end of every double crochet row, make 2 single crochets. If it's a half double row or a single crochet row, just make 1 single crochet. This ensures perfect spacing so the border lays flat.
Round 2 :
1ch (does not count as a stitch), 1dc in the same stitch to start the round. Continue to work round in white, making 1 sc in each stitch and 1sc, 2ch, 1sc in the corner spaces. Fasten off.
Round 3 :
Join black in any corner space. 1ch (does not count as a stitch). 1sc, 2ch, 1sc to form corner, 1sc in each stitch around. 1 sc, 2 ch, 1 sc in the same stitch in each corner space.
Round 4 :
Repeat round 3 in white.
Round 5 :
Repeat round 3 in black.
This Halloween Dreams blanket pattern mixes playful charted motifs with textured bobbles to create a cozy seasonal showstopper. It includes clear chart instructions, helpful photos, and color palette suggestions to guide you every step of the way. Whether gifting or decorating your home, this blanket brings handmade charm and spooky fun to chilly evenings. 🎃🧶