🧢 Beautiful ✨ Detailed πŸ’ Adorable

Half Lemon and Lemon Slices Amigurumi Pattern

Half Lemon and Lemon Slices Amigurumi Pattern
4.1β˜… Rating
2-3 Hours Time Needed
3.9K Made This
βœ‚οΈ

Beginner Friendly Level

Perfect for those just starting their crochet journey, with clear instructions and simple techniques

⏱️

Bite-Sized Project

Finishes in 2-4 hoursβ€”perfect for an afternoon of creative relaxation.

🧸

Cute Companion

An adorable friend to cherish, handcrafted with love to bring comfort and joy for years to come.

About This Half Lemon and Lemon Slices Amigurumi Pattern

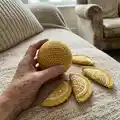
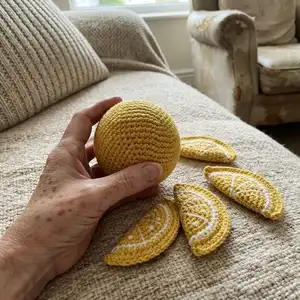
This pattern teaches you how to crochet a half lemon and several lemon slices using simple amigurumi techniques and color changes. It includes full round-by-round instructions, advice for assembly, and photos to guide placement. You will create a small, tactile fruit set perfect for play or display.

Half Lemon and Lemon Slices Amigurumi Pattern crochet pattern - detailed view of completed project

Worked in single crochet rounds with a few color changes, the pattern is quick and satisfying. Ideal for using scrap yarn and practicing consistent tension.

Why You'll Love This Half Lemon and Lemon Slices Amigurumi Pattern

I absolutely love this pattern because it turns basic crochet stitches into a delightful little fruit set that brightens any space. I enjoy how quickly the pieces come together, giving a fast, rewarding finish. The color changes and simple embroidery let me add tiny details that make each slice feel handmade and special. Sewing the slice to the half lemon and adding the cardboard circle gives a professional touch I am proud to show off.

Half Lemon and Lemon Slices Amigurumi Pattern step 1 - construction progress Half Lemon and Lemon Slices Amigurumi Pattern step 2 - assembly progress Half Lemon and Lemon Slices Amigurumi Pattern step 3 - details and accessories Half Lemon and Lemon Slices Amigurumi Pattern step 4 - final assembly and finishing

Switch Things Up

I love customizing this pattern by changing colors; try pastel shades for a soft, nursery-friendly fruit set or bright citrus colors for a bold display.

I often make mini versions by using thinner yarn and a smaller hook to create tiny keychain slices that are adorable and portable.

I also experiment with different fillings: a slightly firmer stuffing gives a solid decorative piece, while a softer fill makes it more squishable for play.

For a sturdier slice, I glue a thin cardboard circle instead of paper and cover its edge with a small running stitch to hide it.

I sometimes embroider seeds or use small beads for extra texture and visual interest on the lemon face.

Want a magnet? Add a small magnet inside the fold of a slice and glue it shut for fridge decor.

I like to change the white detail to a cream or pale yellow for a vintage look that still reads as citrus but softer.

Try assembling multiple halves and slices into a fruit bowl display or a mobile for a kitchen or playroom.

I often make matching sets in lime or orange to create variety and practice slight pattern adjustments for shape consistency.

Don't be afraid to add tiny crocheted leaves or a cream-colored blossom on the top to create a seasonal variation or a gift-ready ornament.

Common Mistakes & How to Fix Them

βœ— Skipping the stitch marker can make you lose the start of the round quickly; place a marker at the beginning of every round to maintain accurate stitch counts. βœ— Changing color without securing the ends causes loose loops later; carry or secure the yarn tails and weave them in as you go to keep the work tidy. βœ— Overstuffing the half lemon will distort its shape and make assembly difficult; stuff gradually and only enough to hold a rounded form before sewing. βœ— Not placing the plastic/paper circle inside the slice results in a floppy slice edge; be sure to insert the circle before finishing and align it with the diameter of the circle. βœ— Forgetting to fasten off with a needle join can leave visible seams; use the needle join method at color changes and when finishing for the neatest result.

Half Lemon and Lemon Slices Amigurumi Pattern

Make a cute half lemon toy and matching lemon slices with this easy crochet pattern. You will work simple rounds, color changes and basic assembly to create a decorative amigurumi fruit set. Perfect for gifting, play kitchens, or as a cheerful decor accent. Clear step-by-step rounds and a short assembly guide help you finish with a neat result.

Beginner Friendly 2-3 Hours

Materials Needed for Half Lemon and Lemon Slices Amigurumi Pattern

β€” Main Fabric

  • 01
    ALIZE Bella (100% cotton), 180 m/50 g = 197 yds / 1.76 oz (main yarn used)
  • 02
    Yellow yarn - main color for lemon halves and slices (small amount)
  • 03
    White yarn - detail color for slice edging and embroidery (small amount)
  • 04
    Green yarn - small amount for the stem

β€” Tools Required

  • 01
    Crochet hook size 1.75 mm ( US 4 )
  • 02
    Sewing needle and scissors
  • 03
    Stitch marker
  • 04
    Poly fiber fill (holofiber)
  • 05
    Plastic or paper circle (for lemon slice support)

Progress Tracker

0% Complete

β€” Materials :

Info :

Yarn: ALIZE Bella (100% cotton, 180 m/50 g = 197 yds /1.76 oz). Hook size: 1.75 mm ( US 4 ). Sewing needle and scissors. Stitch marker. Poly fiber fill. Plastic or paper circle.

β€” Size & Notes :

Info :

Difficulty level: easy. If you use the same yarn and hook the half lemon will be about 5 cm = 1.96 inches in length, 4 cm = 1.57 inches in diameter; lemon slices 5 cm = 1.96 inches in length. Fasten off your work always with needle join and you will get a neat result. Stuff your amigurumi as you go. Use a stitch marker or a piece of yarn to mark the beginning of a round.

β€” Abbreviations :

Infos :

R = row. MR = magic ring. ch = chain. sc = single crochet. sl st = slip stitch. dc = double crochet. Inc = increase (2 sc into one loop). HDC = half double crochet. tr, trc = treble crochet. Dec = decrease (2 sc together). (12) = number of stitches you should have at the end of the round/row. (...) x 6 = repeat whatever is between the brackets the number of times stated.

β€” Half lemon (make 1) :

Info :

green yarn

Round 1 :

R 1: 6 sc in MR (6)

Round 2-3 :

R 2-3: 6 sc ( 2 rows)

Info :

Change to yellow yarn !!!!!

Round 4 :

R 4: ( 1 sc, inc) x 3 (9)

Round 5 :

R5: ( 2 sc, inc) x 3 (12)

Round 6 :

R 6: ( 1 sc, inc) x 6 (18)

Round 7 :

R 7: ( 2 sc, inc) x 6 (24)

Round 8 :

R 8: ( 3 sc, inc) x 6 (30)

Round 9 :

R 9: ( 4 sc, inc) x 6 (36)

Round 10 :

R 10: (5 sc, inc) x 6 (42)

Round 11 :

R 11: 42 sc ( 1 row)

Round 12 :

R 12: (6 sc, inc) x 6 (48)

Round 13-22 :

R 13-22: 48 sc ( 10 rows)

Info :

F.o. and leave a long tail for sewing

β€” Circle (slice lemon) (make 1) :

Info :

yellow yarn

Round 1 :

R 1: 6 sc in MR (6)

Round 2 :

R 2: ( inc) x 6 (12)

Round 3 :

R 3: ( 1 sc, inc) x 6 (18)

Round 4 :

R 4: ( 2 sc, inc) x 6 (24)

Round 5 :

R 5: ( 3 sc, inc) x 6 (30)

Round 6 :

R 6: ( 4 sc, inc) x 6 (36)

Info :

Change to white yarn !!!!!

Round 7 :

R 7: (5 sc, inc) x 6 (42)

Info :

Change to yellow yarn !!!!!

Round 8 :

R 8: (6 sc, inc) x 6 (48)

β€” Slice of lemon (make 3) :

Info :

yellow yarn

Round 1 :

R 1: 6 sc in MR (6)

Round 2 :

R 2: ( inc) x 6 (12)

Round 3 :

R 3: ( 1 sc, inc) x 6 (18)

Round 4 :

R 4: ( 2 sc, inc) x 6 (24)

Round 5 :

R 5: ( 3 sc, inc) x 6 (30)

Round 6 :

R 6: ( 4 sc, inc) x 6 (36)

Info :

Change to white yarn !!!!!

Round 7 :

R 7: ( 5 sc, inc) x 6 (42)

Info :

Change to yellow yarn !!!!!

Round 8 :

R 8: ( 6 sc, inc) x 6 (48)

Info :

Don't stuff with fiberfill. We fold the part in half and knit 1 row, tying both halves together.

β€” Assembly :

Info :

Connect half of a lemon and a lemon slice (circle) with a needle. Fill the toy with holofiber as it is sewn. Do not forget to put a plastic or paper circle (the diameter of the circle should correspond to the diameter of the circle - a lemon slice). Embroider lemon slices with white thread (see photo).

Assembly Instructions

  • Connect the half lemon and the circular lemon slice by aligning the edges and sewing them together with a needle, using the long tail left for sewing.
  • As you sew the circle to the half lemon, fill the hollow space with holofiber (poly fiber fill) to give the lemon body shape and firmness.
  • Place a plastic or paper circle inside the slice before finishing the seam; the diameter of the inserted circle should match the diameter of the slice to keep the slice flat and supported.
  • Fold each slice in half (for the 3 slices) and sew one row to join both halves together, then embroider the segments and dots with white thread as shown in the photos.

Important Notes

  • πŸ’‘Use a stitch marker to mark the beginning of each round, especially during increases and color changes.
  • πŸ’‘Fasten off your work using the needle join method for the neatest visible join at color changes and ends.
  • πŸ’‘Stuff the half lemon gradually as you sew to avoid lumps and to keep the shape even.
  • πŸ’‘Do not stuff the small slice halves; they are folded and sewn together without fiberfill as instructed.

This bright little half lemon and slice set is a cheerful, quick crochet project that makes delightful gifts and decor. πŸ‹ The pattern is compact and beginner-friendly, perfect for practicing round increases and color changes. ✨ Have fun stitching the details and enjoy the sunny, handmade result! 🧢

You ask,

we answer.

FAQs

What size will the finished pieces be?

The half lemon measures about 5 cm (1.96 inches) in length and about 4 cm (1.57 inches) in diameter; each lemon slice is about 5 cm (1.96 inches) long when using the recommended yarn and hook.

Can I use a different yarn weight or hook size?

Yes, you can change yarn weight and hook size, but this will alter the finished size; adjust the hook accordingly and expect the shape and tightness to vary.

Do I need to stuff the lemon slices?

No, the slice pieces should not be stuffed with fiberfill; each slice is folded in half and sewn together, and a paper or plastic circle is inserted for support.

Is this pattern suitable for beginners?

Yes, the pattern is rated easy and is suitable for beginners who are familiar with basic crochet stitches such as single crochet, increases, and working in the round.

How do I finish color changes neatly?

Fasten off with a needle join when changing colors and weave in ends as you go; this produces the neatest visible joins for the white detail and yellow body.