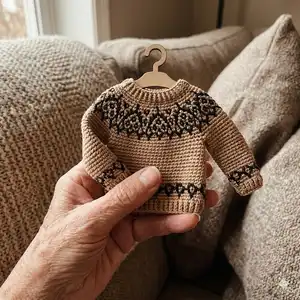
Make a timeless top-down circular yoke sweater for girls, worked seamlessly from the neckline with beautiful stranded colorwork. This pattern includes full instructions for multiple sizes from 12 months to 12–14 years, charted yokes, short-row shaping and sleeve division. Youll get detailed needle and yarn recommendations, stitch abbreviations, and clear step-by-step shaping guidance to create a professional finished sweater.
Progress Tracker
0% Complete
— Begin of work :
Info :
Using 1.5 mm [US000] needles and preferred cast-on method, cast on 140; 140; 140 (152; 152; 152) (152; 152; 152) sts, place BoR marker, and join into the round without twisting.
Info :
Work in Ribbing pattern to a height of 3 cm [1.2 in] from cast-on edge, then change to 2.75 mm [US2] needles, and continue.
Info :
In the next round, increases a total of 0; 0; 0 (2; 2; 2) (2; 2; 2) sts the following way: Measurements 4 yrs; 5 yrs; 6–7 yrs; 8–9 yrs; 10–12 yrs; 12–14 yrs – slip BoR marker to right needle, RLI, k76, LLI, work in st st to end of round.
Info :
After having worked 7 rounds in st st, change to 3 mm [US2.5] needles, and continue from Circular Yoke Chart #1.
Info :
You now have a total of 140; 140; 140 (154; 154; 154) (154; 154; 154) sts.
Info :
Work all rows of Chart #1, then continue from Chart # 2; 4; 5 (3; 4; 5) (6; 7; 8). Complete all rows of the chart, then change to 2.75 mm [US2] needles, and continue by working 2 rounds of st st even.
Info :
You now have a total of 240; 260; 270 (275; 286; 297) (308; 319; 352) sts.
Infos :
To center the colorwork motif on the circular yoke, move the BoR marker by the number of sts listed for your size in the indicated direction: 12 mos: 4 sts to the left. 18–24 mos: 3 sts to the left. 3 yrs: 3 sts to the left. 4 yrs: 6 sts to the right. 5 yrs: 6 sts to the right. 6–7 yrs: 7 sts to the right. 8–9 yrs: 7 sts to the right. 10–12 yrs: 6 sts to the right. 12–14 yrs: 4 sts to the right.
— Distribute stitches (next round) :
12 mos :
slip BoR marker, k45, place marker M1 (right sleeve), k75, place marker M2 (Front), k45, place marker M3 (left sleeve), k75
18–24 mos :
slip BoR marker, k51, place marker M1 (right sleeve), k79, place marker M2 (Front), k51, place marker M3 (left sleeve), k79
3 yrs :
slip BoR marker, k52, place marker M1 (right sleeve), k83, place marker M2 (Front), k52, place marker M3 (left sleeve), k83
4 yrs :
slip BoR marker, k53, place marker M1 (right sleeve), k85, place marker M2 (Front), k53, place marker M3 (left sleeve), k84
5 yrs :
slip BoR marker, k56, place marker M1 (right sleeve), k87, place marker M2 (Front), k56, place marker M3 (left sleeve), k87
6–7 yrs :
slip BoR marker, k58, place marker M1 (right sleeve), k91, place marker M2 (Front), k58, place marker M3 (left sleeve), k90
8–9 yrs :
slip BoR marker, k61, place marker M1 (right sleeve), k93, place marker M2 (Front), k61, place marker M3 (left sleeve), k93
10–12 yrs :
slip BoR marker, k59, place marker M1 (right sleeve), k101, place marker M2 (Front), k59, place marker M3 (left sleeve), k100
12–14 yrs :
slip BoR marker, k61, place marker M1 (right sleeve), k115, place marker M2 (Front), k61, place marker M3 (left sleeve), k115
— Short row shaping for the yoke :
Next Round :
slip BoR marker, k24; 26; 27 (27; 28; 29) (30; 30; 31), turn work to wrong side, slip 1 stitch purl-wise to the right needle, lead the working yarn behind the stitch, over the right needle. Pull the working yarn taut so both legs of the stitch sit on the right needle. Continue on the WS in purl.
Info :
Work to BoR marker, slip BoR marker, work to marker M3, slip marker M3, p24; 26; 27 (27; 28; 29) (30; 30; 31), turn work to right side, slip 1 stitch knit-wise, lead the working yarn behind the stitch, over the right needle. Pull the working yarn taut so both legs of the stitch sit on the right needle. Continue on the RS.
Next Row 1 (RS) :
Work to marker M3, slip marker M3, knit to BoR marker, slip BoR marker, Work to 5 sts before the Double Stitch, turn work to wrong side. Slip 1 stitch purl-wise to the right needle, lead the working yarn behind the stitch, over the right needle. Pull the working yarn taut so both legs of the stitch sit on the right needle. Continue on the WS in purl.
Row 2 (WS) :
Work to BoR marker, slip BoR marker, purl to marker M3, slip marker M3, Work to 5 sts before the Double Stitch, turn work to right side, slip 1 stitch knit-wise, lead the working yarn behind the stitch, over the right needle. Pull the working yarn taut so both legs of the stitch sit on the right needle. Continue on the RS. Repeat Rows 1 and 2 another 1; 1; 1; (1; 2; 2) (3; 3; 3) time(s).
Next Row 3 (RS) :
knit to 3 sts before the Double Stitch, turn work to wrong side. Slip 1 stitch purl-wise to the right needle, lead the working yarn behind the stitch, over the right needle. Pull the working yarn taut so both legs of the stitch sit on the right needle. Continue on the WS in purl.
Row 4 (WS) :
purl to 3 sts before the Double Stitch, turn work to right side, slip 1 stitch knit-wise, lead the working yarn behind the stitch, over the right needle. Pull the working yarn taut so both legs of the stitch sit on the right needle. Continue on the RS. Repeat Rows 3 and 4 another 1; 1; 1; (1; 2; 2) (3; 3; 3) time(s).
Next Row 5 (RS) :
knit to 1 st before the Double Stitch, slip 1 stitch purl-wise to the right needle, lead the working yarn behind the stitch, over the right needle. Pull the working yarn taut so both legs of the stitch sit on the right needle. Continue on the WS in purl.
Row 6 (WS) :
purl to 1 st before the Double Stitch, turn work to right side, slip 1 stitch knit-wise, lead the working yarn behind the stitch, over the right needle. Pull the working yarn taut so both legs of the stitch sit on the right needle. Continue on the RS. Repeat Rows 5 and 6 another 0; 0; 0; (0; 1; 1) (1; 1; 1) time(s).
Info :
Continue, working st st in the round to BoR marker, knitting both legs of the Double Stitch together as one.
Info :
Work in st st for a total of 0; 0; 1 (1; 5; 8) (12; 16; 19) round(s), then proceed to dividing for the sleeves.
— Divide for the sleeves :
Next Round – dividing for the sleeves :
slip BoR marker to right needle, transfer 45; 51; 52 (53; 56; 58) (61; 59; 61) right sleeve sts to a spare needle or stitch holder for holding, cast on 10; 10; 10 (12; 12; 14) (14; 18; 18) new underarm sts, slip marker M1 to right needle, work over the sts of the Front in st st to marker M2, slip marker M2 to right needle, transfer 45; 51; 52 (53; 56; 58) (61; 59; 61) left sleeve sts to a spare needle or stitch holder for holding, cast on 10; 10; 10 (12; 12; 14) (14; 18; 18) new underarm sts, slip marker M3 to right needle, work over the sts of the Back in st st to BoR marker.
Info :
After having divided for the sleeves, you should have a total of 170; 178; 186 (193; 198; 209) (214; 237; 266) sts.
— Body of the sweater :
Info :
Continue working over the sts of the Body of the sweater in st st in the round until piece has either reached a length of 12; 14; 15 (16; 19; 21) (24; 27; 29) cm [4.8; 5.5; 5.9 (6.3; 7.5; 8.3) (9.45; 10.6; 11.4)] in from division for sleeves, or is 10 cm [4 in] shorter than desired length.
Info :
In the next round, increase 6; 9; 1 (5; 0; 0) (6; 5; 9) st(s) evenly distributed as follows:
12 mos :
k14, RLI, k29, (LLI, k28) 3 times, RLI, k29, RLI, k14
18–24 mos :
k10, RLI, k19, (RLI, k20) 3 times, (LLI, k20) 3 times, LLI, k19, LLI, k10
4 yrs :
k19, RLI, k38, (RLI, k39) 2 times, LLI, k38, LLI, k20
5 yrs, 6–7 yrs :
Work one round even over an unchanged stitch count.
8–9 yrs :
k18, RLI, k35, (LLI, k36) 3 times, RLI, k35, RLI, k18
10–12 yrs :
k23, RLI, k48, (RLI, k47) 2 times, LLI, k48, LLI, k24
12–14 yrs :
k15, (RLI, k29) 2 times, (LLI, k30) 4 times, (RLI, k29) 2 times, RLI, k15
Info :
Change to 3 mm [US2.5] needles, and continue from Chart #9.
Info :
After having completed all rows of Chart #9, change to 2.75 mm [US2] needles, and continue. Work 7 rounds in st st.
Info :
Before the next round, change to 1.5 mm [US000] needles, and continue as follows: k1, *(p2, k2), repeat from * to last 3 sts of this round, ending with "p2, k1".
Info :
During the first round, decrease, evenly distributed, a total of 0; 3; 3 (2; 2; 1) (0; 2; 3) st(s). You now have a total of 176; 184; 184 (196; 196; 208) (220; 240; 272) sts.
Info :
After having worked in Ribbing for 3 cm [1.2 in], bind off all sts.
— Right sleeve :
Info :
Take up the formerly held sleeve sts again, and place them on 2.75 mm [US2] needles. RS of work facing, join new working yarn, work in st st to end of round, place marker M1, Work 10; 10; 10 (12; 12; 14) (14; 18; 18) sts into the corresponding underarm sts at the side of the sweater, place BoR marker, and join into the round without twisting.
Info :
You should now have a total of – 55; 61; 62 (65; 68; 72) (75; 77; 79) sts.
Info :
Work in the established pattern for 21 rounds. Now, continue as follows:
Round 1 (decrease rnd) :
slip BoR marker to right needle, k2, k2tog, work in st st to 4 sts before marker M1, ssk, k2 = 2 sts decreased.
Rounds 2–20 :
Work in earlier established pattern over an unchanged stitch count.
Info :
Repeat Rounds 1–20 another 0; 0; 0 (0; 1; 1) (1; 1; 1) time(s). You should now have a total of 53; 59; 60 (63; 64; 68) (71; 73; 75) sts.
Info :
Work in the established pattern until sleeve has either reached a length of 13; 15; 18 (20; 23; 25) (27; 30; 33) cm [5.1; 5.9; 7 (7.9; 9.1; 9.8) (10.6; 11.8; 13) in] from armhole, or is 6 cm [2.4 in] shorter than desired length.
Info :
In the next round, increase, evenly distributed, 2; 1; 0 (2; 1; 2) (4; 2; 0) st(s) as listed for your size.
12 mos :
slip BoR marker to right needle, k2, LLI, work in st st to 2 sts before marker M1, RLI, k2
18–24 mos :
slip BoR marker to right needle, k2, LLI, work in st st to end of round
3 yrs :
Work one round even over an unchanged stitch count
4 yrs :
slip BoR marker to right needle, k2, LLI, work in st st to 2 sts before marker M1, RLI, k2
5 yrs :
slip BoR marker to right needle, k2, LLI, work in st st to end of round
6–7 yrs :
slip BoR marker to right needle, k2, LLI, work in st st to 2 sts before marker M1, RLI, k2
8–9 yrs :
slip BoR marker to right needle, k2, LLI, k2, LLI, work in st st to 4 sts before marker M1, RLI, k2, RLI, k2
10–12 yrs :
slip BoR marker to right needle, k2, LLI, work in st st to 2 sts before marker M1, RLI, k2
12–14 yrs :
Work one round even over an unchanged stitch count
Info :
Change to 3 mm [US2.5] needles, and continue from Chart #10. You now have a total of 55; 60; 60 (65; 65; 70) (75; 75; 75) sts.
Info :
After having completed all rows of Chart #10, change to 2.75 mm [US2] needles, and continue. Work 7 rounds in st st.
Info :
Before the next round, change to 1.5 mm [US000] needles, and continue as follows: k1, *(p2, k2), repeat from * to last 3 sts of this round, ending with "p2, k1".
Info :
During the first round, either increase or decrease as listed for your size as follows: 12 mos – slip BoR marker to right needle, k2, k2tog, k2, k2tog, work in st st to 4 sts before marker M1, ssk, k2 = 3 sts decreased.
18–24 mos :
Work one round even over an unchanged stitch count.
3 yrs :
Work one round even over an unchanged stitch count.
4 yrs :
slip BoR marker to right needle, k2, k2tog, work in st st to end of round = 1 st decreased.
5 yrs :
slip BoR marker to right needle, k2, k2tog, work in st st to end of round = 1 st decreased.
6–7 yrs :
slip BoR marker to right needle, k2, k2tog, work in st st to 4 sts before marker M1, ssk, k2 = 2 sts decreased.
8–9 yrs :
slip BoR marker to right needle, k2, k2tog, k2, k2tog, work in st st to 4 sts before marker M1, ssk, k2 = 3 sts decreased.
10–12 yrs :
slip BoR marker to right needle, k2, LLI, work in st st to end of round = 1 st increased.
12–14 yrs :
slip BoR marker to right needle, k2, LLI, work in st st to end of round = 1 st increased.
Info :
You now have a total of 52; 60; 60 (64; 64; 68) (72; 76; 76) sts.
Info :
After having worked in Ribbing for 3 cm [1.2 in], bind off all sts.
Info :
Work the left sleeve the same way.
Info :
Moisten the sweater, and block it spread out flat until completely dry.
This cozy Guell girls sweater brings classic stranded yoke style to a child-sized wardrobe with a top-down seamless construction. The pattern features clearly charted colorwork, short-row shaping for a smooth yoke fit, and step-by-step sleeve division for a polished finish. Perfect for gifting or making a heirloom sweater with luxurious yarn choices. 🧶✨