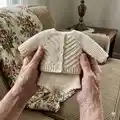
Make a sweet DK-weight baby set with this detailed pattern that includes a raglan-sleeve cardigan and coordinating bloomers. You get full charts, sizing from newborn to 24 months, two hem finish options, and step-by-step shaping instructions. Perfect for creating a timeless handmade gift you and your little one will adore.
Progress Tracker
0% Complete
— Bloomer :
Waistband :
Using B needles, CO 84, 92, 100, 108 (114, 118, 124) sts using the long tail cast on method. Join in the round being careful not to twist the CO row and PBORM.
Info :
Work 2cm / 0.8" in stockinette st, then p one row. Switch to A needles and work 3cm/1.2" in stockinette st (measurement taken from the p row).
Shaping the back part - R1 (RS) :
k 42, 46, 50, 54 (57, 59, 62), PM, k until 1, 1, 1, 1, 1 (1, 2, 2) sts from BORM, turn your work and perform a GSR.
Shaping the back part - R2 (WS) :
p until 1, 1, 1, 1 (1, 2, 2) sts from M, turn your work and perform a GSR.
Shaping the back part - R3 (RS) :
k until 3, 3, 4, 4 (3, 3, 3) sts from the previous GSR, turn your work and perform a GSR.
Shaping the back part - R4 (WS) :
p until 3, 3, 4, 4 (3, 3, 3) sts from the previous GSR, turn your work and perform a GSR.
Info :
Work R3 & R4 a total of 3, 3, 3, 3 (4, 4, 4) times.
Info :
Resume working in stockinette st in the round, working the double legged sts as regular ones, until the piece is 9, 9, 11, 11 (13, 15, 15) cm / 3.5, 3.5, 4.5, 4.5 (5, 6, 6)" long from the p row. The measurement is taken on the front of the thighs (no short rows).
Front/back separation :
RBORM, BO 8, 9, 10, 10 (11, 11, 12) sts, k 26, 28, 30, 34 (35, 37, 38), BO 8, 9, 10, 10 (11, 11, 12) sts, RM. Put the front sts on hold.
Back part flat - R1 (RS) :
BO 2 sts, k until EOR.
Back part flat - R2 (WS) :
BO 2 sts, p until EOR.
Info :
Work R1 & R2 a total of 8, 7, 8, 10 (9, 11, 10) times.
Sizes note :
Sizes - , 3m, 6m, - (12m, -, 24m) only: R3 (RS) : BO 3 sts, k until EOR. R4 (WS) : BO 3 sts, p until EOR. You now have 10, 12, 12, 14 (15, 15, 16) sts left on the needles. Put the sts on hold and cut the yarn.
Front :
Put back on the needles the sts from the front part and work as follows to shape the inner thighs portion.
Front - R1 (RS) :
BO 2 sts, k until EOR.
Front - R2 (WS) :
BO 2 sts, p until EOR.
Info :
Work R1 & R2 a total of 4, 4, 3, 5 (5, 4, 4) fois.
Sizes note :
Sizes - , -, 6m, - (, 18m, 24m) only: R3 (RS) : BO 3 sts, k until EOR. R4 (WS) : BO 3 sts, p until EOR. You now have 10, 12, 12, 14 (15, 15, 16) sts left on the needles. Work 8, 8, 10, 10 (11, 12, 12) rows in stockinette st.
Join :
Turn your work inside out, put back on the needles the back sts and perform a 3 needle BO to join the back to the front.
Thighs finish :
Using B needles, pick up 40, 40, 46, 50 (52, 56, 56) sts on the thigh opening. PBORM and join in the round.
Picot edging option :
Work 5 rows in stockinette st. Picot row : *k2tog, yo, repeat from * until BORM. Switch to C needles and work 5 more rows in stockinette st. Loosely BO the sts and sew the edge onto the pick up line using an elastic technique, on the WS of the bloomer.
Ribbing option :
Work 5 rows in 1/1 ribbing, then loosely BO the sts.
Finishing :
Fold the waistband WS together and sew it. Be mindful to leave an opening at the back to insert the elastic band. Sew the ends of the elastic band together, making sure it's not twisted. Close the opening with a seam.
— Cardigan :
Neckline :
Using B needles, CO 74, 78, 78, 80 (92, 86, 90) sts using the long tail cast on method. Do not join in the round.
R1 (WS) :
*p1, k1, repeat from * until EOR.
R2 (RS) :
*p1, k1, repeat from * until EOR. Work R1 once more.
Buttonhole row (RS) :
1/1 ribbing until 6 sts from EOR, p1, k1, yo, k2tog, p1, k1.
Info :
Work R1 & R2 once more.
Raglan - Setup :
Switch to A needles. You are now going to place markers on the raglan lines, then you'll work increases while creating the buttonholes. The textured st placement is detailed using charts for each size (pages 3 to 9).
Setup row (WS) :
6 sts in 1/1 ribbing, PM, p 7, 8, 8, 9 (10, 9, 10), PM, p1, PM, p 12, 12, 12, 12 (16, 14, 14), PM, p1, PM, p 20, 22, 22, 22 (24, 24, 26), PM, p1, PM, p 12,12,12,12 (16,14,14), PM, p1, PM, p7,8,8 (9,10,10), PM, 6 sts in 1/1 ribbing.
R3 (RS) :
1/1 ribbing until M, SM, follow the chart for the size you're knitting, SM, k1, SM, *M1L, k until M, M1R, SM, k1, SM, repeat from * a total of 3 times, follow backward the chart for the size you're knitting, SM, 1/1 ribbing until EOR. (+8 sts)
Separation row (RS) :
1/1 ribbing until M, SM, work the left front as established, RM, k1, RM, put the sleeve sts on hold, CO 4 sts, RM, k1, RM, k until M, RM, k1, RM, put the sleeve sts on hold, CO 4 sts, RM, k1, RM, work the right front as established, SM, 1/1 ribbing until EOR.
Body - R0 (WS) :
1/1 ribbing until M, SM, work 20, 20, 20, 26 (26, 26, 26) sts as per row 4, 2, 4, 6 (2, 2, 6) of the common chart, PM, p until 20, 20, 20, 26 (26, 26, 26) sts from M, PM, work as per row 4, 2, 4, 6 (2, 2, 6) of the common chart, SM, 1/1 ribbing until EOR.
R1 (RS) :
1/1 ribbing until M, SM, common chart until M, SM, k until M, SM, common chart backward until M, SM, 1/1 ribbing until EOR.
R2 (WS) :
1/1 ribbing until M, GM, common chart backward until M, SM, p until M, SM, common chart until M, GM, 1/1 ribbing until EOR.
Info :
Continue working R1 & R2 until the body is 13, 13, 14, 15 (15, 15, 16) cm / 5, 5, 5.5, 6 (6, 6, 6.5)" long from the underarm, or 2cm / 0.8" shorter than the desired length. End on an R2.
Buttonband :
Switch to B needles and work 5 rows in 1/1 ribbing. Then loosely BO the sts.
Sleeves :
Put back on the needles the 32, 34, 36, 38 (42, 42, 44) sts from one sleeve onto A needles. Starting at the centre of the underarm, pick up 2 sts, k the sleeve sts, then pick up another 2 sts at the underarm and PBORM. You now have a total of 36, 38, 40, 42 (46, 46, 48) sts.
Work :
Work in stockinette st until the sleeve is 2, 2, 2, 2 (2, 2, 3) cm / 0.8, 0.8, 0.8, 0.8 (0.8, 0.8, 1.2)" long from the underarm.
DR :
k1, k2tog, k until 3 sts from BORM, SSK, k1.
Decrease repeats :
Work DR every 2.5, 2, 2.5, 2 (2, 2.5, 2.5) cm / 1, 0.8, 1, 0.8 (0.8, 1, 1)" for a total of 4, 5, 5, 6 (7, 6, 6) times. You now have 28, 28, 30, 30 (32, 34, 36) sts on the needles.
Continue :
Continue working in stockinette st until the sleeve is 13, 14, 16, 17 (18, 19, 20) cm / 5, 5.5, 6.5, 6.5 (7, 7.5, 8)" long from the underarm, or 2cm / 0.8" shorter than the desired length.
Picot edging option :
Switch to B needles. Work 5 rows in stockinette st. Picot row: *k2tog, yo, repeat from * until BORM. Switch to C needles and work 5 more rows in stockinette st. Loosely BO the sts and sew the edge onto the pick up line using an elastic technique, on the WS of the sleeve.
Ribbing option :
Work 5 rows in 1/1 ribbing, then loosely BO the sts.
Finishing :
Work the second sleeve the exact same way. You've now got some finished objects! Don't forget to weave in the ends, block your pieces to the finished measurements, sew the buttons on and proudly wear them.
This Gaufrette (mini) set is designed to be a timeless, comfortable baby outfit you will love to knit and gift. The textured fronts and neat finishing options make it equally suitable for baby showers or everyday wear. Make one to cherish or to match with adult sizes for a special set. 🧶👶