🧢 Beautiful ✨ Detailed πŸ’ Adorable

Frog Granny Square Pattern

Frog Granny Square Pattern
4.5β˜… Rating
2-3 Hours Time Needed
3.3K Made This
βœ‚οΈ

Beginner Friendly Level

Perfect for those just starting their crochet journey, with clear instructions and simple techniques

⏱️

Bite-Sized Project

Finishes in 2-4 hoursβ€”perfect for an afternoon of creative relaxation.

πŸ€—

Soft Hug

Gentle, plush, and full of warmth, creating a sense of comfort and coziness wherever they find a home.

About This Frog Granny Square Pattern

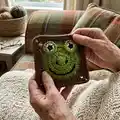
This pattern creates a cute frog granny square featuring a round frog face, two small crochet eyes, and a brown square border. The instructions include detailed rounds for the circle, color-change options, eye construction, and simple assembly notes. It uses basic crochet stitches and an invisible finish option for a tidy edge.

Frog Granny Square Pattern crochet pattern - detailed view of completed project

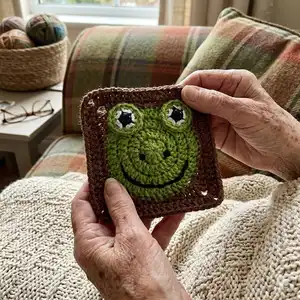
Perfect as a motif for blankets, cushions, or small gifts, the square measures about 11 cm x 11 cm. Follow the step-by-step rounds and photos to reproduce crisp, even stitches and a friendly frog face.

Why You'll Love This Frog Granny Square Pattern

I absolutely love this pattern because it turns a simple granny square into a playful character with very little extra work. I enjoy how a few color changes and small embroidered details can totally change the personality of the motif. Making the eyes separately and attaching them gives great control over placement and expression. I also appreciate that the pattern uses common stitches and a 4 mm hook, so it works up quickly and is very satisfying to complete.

Frog Granny Square Pattern step 1 - construction progress Frog Granny Square Pattern step 2 - assembly progress Frog Granny Square Pattern step 3 - details and accessories Frog Granny Square Pattern step 4 - final assembly and finishing

Switch Things Up

I love how easy it is to customize the frog by changing colors β€” try pastel greens for a softer look or neon greens for a playful modern vibe.

I sometimes swap the brown border for a multicolor stripe to make the square more vibrant and playful.

If you want a larger motif, I increase the yarn weight and use a bigger hook, which gives a chunky, textured frog perfect for cushions.

For tiny keychain versions, I use thinner yarn and a smaller hook to create mini frog squares that are super cute and portable.

I often embroider different mouth shapes with black yarn to give each frog a unique expression β€” a smile, smirk, or surprised O look great.

Try adding tiny felt cheeks or blush with embroidery floss to give the frog more character and depth.

I recommend experimenting with eye placement before stitching; moving the eyes slightly closer or further apart changes the personality a lot.

Want a polished finish? I use the invisible stitch method for smoother edges and a neater appearance around the color changes.

I like to join multiple frog squares together into a playful blanket; try different background colors for a patchwork effect that pops.

For durable, toy-safe motifs, I reinforce eye attachments by sewing through rounds multiple times and securely weaving in tails on the back.

Common Mistakes & How to Fix Them

βœ— Not tightening the magic ring properly can leave a loose center hole; pull the tail firmly and close the MR before slip stitching to secure the center. βœ— Forgetting to change colors at the correct stitch can create visible joins; use the Method 1 change at the last sc/dc as instructed to make a clean color transition. βœ— Skipping stitch counts at the end of rounds causes shape distortions later; always count your stitches after each round and correct mistakes immediately. βœ— Leaving tails too short for sewing makes assembly harder; leave long tails after finishing the eyes and rounds to allow easy sewing and secure weaving. βœ— Crocheting into only one loop when the pattern expects both loops will change the fabric texture; work through both loops unless the pattern specifies BLO or FLO explicitly.

Frog Granny Square Pattern

Make a charming frog granny square perfect for blankets, pillows, or fun appliques. This approachable pattern walks you through each round, eye construction, and simple assembly so you can create a sweet frog face motif. Use four contrasting colors to make the eyes and background pop for a playful handmade accent.

Beginner Friendly 2-3 Hours

Materials Needed for Frog Granny Square Pattern

β€” Main Fabric

  • 01
    Lightweight acrylic yarn in Green (for frog face)
  • 02
    Lightweight acrylic yarn in Brown (for square border)
  • 03
    Lightweight acrylic yarn in Black (for eyes and facial details)
  • 04
    Lightweight acrylic yarn in White (for eye highlights)
  • 05
    Finished square measures approximately 11 cm x 11 cm

β€” Tools Required

  • 01
    Crochet hook size 4 mm
  • 02
    Yarn needle
  • 03
    Scissors

Progress Tracker

0% Complete

β€” Notes :

Infos :

The ( ) at the end of each round/row indicates the total number of stitches that should be completed for that round/row. When working through the rounds/rows, work through the entire stitch (back loop and front loop); unless stated otherwise. The chains at the beginning of the round/row do not count as a stitch unless stated otherwise. You can use any yarn to make this square. For example, if you use a larger hook and a suitable yarn, the square will be bigger.

Info :

Measurements: The square is 11 cm x 11 cm

β€” Square :

Info :

Using the green yarn

Round 1 :

MR, ch2, 12dc inside MR (12)

Info :

Tighten the MR by pulling on the tail and then sl st in the 1st dc (skip the ch2).

Round 2 :

ch2, *dc inc* all around (24)

Round 3 :

ch2, *dc, dc inc* all around (36)

Round 4 :

ch2, *2dc, dc inc* all around (48)

Info :

Invisible stitch: after you are done with Round 4, cut the yarn, leave a long tail, and pull it all the way through. With your needle, go into the 2nd dc from the back to the front through both loops, and then go through the center of the last dc towards the back. Pull the tail tight enough to create a stitch on top of the 1st dc and then weave in the excess yarn to secure it.

Info :

Color Change: at the end of Round 4, you will need to do a color change to brown. Method 1: change color at the last dc of Round 4. Method 2: after Round 4 is done, finish off with an invisible stitch and then attach the brown yarn.

Info :

Insert your hook into any stitch and attach the brown yarn by pulling it through.

Round 5 :

ch1, *3sc, 2hdc, 2dc, [2tc + ch2 + 2tc] in the same stitch, 2dc, 2hdc* all around (68)

Info :

Sl st in the 1st sc that you did at the beginning of Round 5.

Round 6 :

ch2, *dc* all around and [2dc + ch2 + 2dc] in the ch2 space (84)

Info :

At the end of the round, finish off and weave in any excess yarn. You can finish off using the invisible stitch method or sl st in the 1st dc and then yarn over and pull it all the way through.

β€” Eyes x2 :

Info :

The eyes are worked using the continuous rounds method; meaning you move from one round to another without slip stitching. Using the black yarn

Round 1 :

MR, ch1, 5sc in MR (5)

Info :

Change color to white at the last sc using Method 1.

Round 2 :

*inc* all around (10)

Info :

Change color to green at the last sc using Method 1.

Round 3 :

*sc, inc* all around (15)

Info :

Finish off and leave a long tail for stitching.

β€” Assembly :

Info :

Place the eyes on the square. Use the tails for sewing.

Info :

Using the black yarn and a needle, stitch a mouth on the square at the end of Round 3. For the nose, you can stitch 2 french knots at the edge of Round 1 of the square.

Assembly Instructions

  • Place the eyes on the square and use the long tails from the eyes to sew them in place securely through the rounds so they sit evenly.
  • Using black yarn and a needle, stitch the mouth on the square at the end of Round 3 following the photo reference for curve and placement.
  • For the nose, stitch two french knots at the edge of Round 1 of the square to form nostrils and secure the tails by weaving them on the back.
  • Weave in all remaining tails securely on the wrong side of the square to hide them and prevent unraveling.
  • Position the eyes symmetrically on the frog face before stitching by comparing both sides and using pins or small tacking stitches for accurate placement.

Important Notes

  • πŸ’‘The number in parentheses at the end of each round indicates the total stitch count for that round; use it to verify your work.
  • πŸ’‘Work through the entire stitch (both front and back loops) for rounds unless the pattern specifically states BLO or FLO.
  • πŸ’‘Chains at the beginning of rounds do not count as a stitch unless the pattern explicitly states otherwise.
  • πŸ’‘You can change yarn weight and hook size to alter the square size; larger hook and yarn make a bigger square.
  • πŸ’‘Finish off options include the invisible stitch method or slip stitching into the first stitch and pulling the yarn through to secure.

This frog granny square pattern brings a playful amphibian to your next blanket, cushion, or applique project. Use bright greens and a warm brown border to make the frog pop and add personality with embroidered details. Happy crocheting and enjoy making a whole pond of froggy squares! 🧢🐸

You ask,

we answer.

FAQs

What size will the finished piece be?

The finished square measures approximately 11 cm x 11 cm when using the recommended lightweight acrylic yarn and a 4 mm hook.

Can I use different yarn weights for this pattern?

Yes, you can use different yarn weights, but the final size will change; use an appropriate hook for your chosen yarn and expect a different stitch gauge.

Do I need prior crochet experience for this pattern?

This pattern is beginner friendly and uses basic stitches like dc, sc, and hdc, but familiarity with the magic ring and color changes is helpful.

How long does this project typically take to complete?

Most crocheters finish a single frog granny square in 2-3 hours, though time may vary depending on experience and whether you make multiple squares.

How do I attach the eyes cleanly?

Leave long tails on the eyes, position them on the square, then sew through the rounds with those tails to secure the eyes neatly and hide ends later.