🧶 Beautiful ✨ Detailed 💝 Adorable

Fried Egg Amigurumi Pattern

Fried Egg Amigurumi Pattern
4.8★ Rating
1-2 Hours Time Needed
1.4K Made This
✂️

Beginner Friendly Level

Perfect for those just starting their crochet journey, with clear instructions and simple techniques

⏱️

Quick Make

Complete in under 2 hours—lightning fast fun for instant gratification and quick gifts.

🎁

Tiny Treasure

Small, sweet, and gift-worthy creations that fit perfectly in the palm of your hand with detailed charm.

About This Fried Egg Amigurumi Pattern

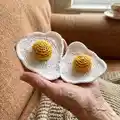
This pattern makes a charming fried egg made from two crocheted parts: an egg white and a stuffed yolk. Both pieces are worked in a spiral from a magic ring and sewn together for a realistic look. It is a quick project that produces a playful home decor piece or a small gift.

Fried Egg Amigurumi Pattern crochet pattern - detailed view of completed project

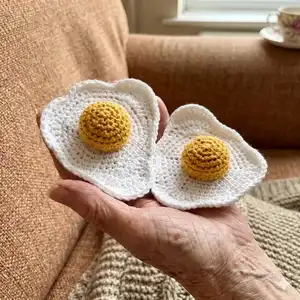
The finished egg measures approximately 4 inches across and the pattern is written in US terms. It uses simple stitches and a small hook for a neat, compact result.

Why You'll Love This Fried Egg Amigurumi Pattern

I absolutely love this pattern because it turns simple stitches into a whimsical kitchen friend you can make in an evening. I enjoy how the stuffed yolk adds dimension and personality to the tiny fried egg. The piece is small and satisfying to finish, making it perfect for gift-making or stash-busting. I also appreciate that the pattern uses common stitches and a compact construction, so it's relaxing yet rewarding every time I make one.

Fried Egg Amigurumi Pattern step 1 - construction progress Fried Egg Amigurumi Pattern step 2 - assembly progress Fried Egg Amigurumi Pattern step 3 - details and accessories Fried Egg Amigurumi Pattern step 4 - final assembly and finishing

Switch Things Up

I love to change up the colors to make a whole breakfast set—try beige for toast, pink for ham, or green for avocado halves.

You can change the yarn weight and hook size to make minis for keychains or larger pieces for placemats; heavier yarn yields a chunkier egg.

I sometimes embroider small freckles on the yolk for character, using a contrasting yarn and a few simple stitches.

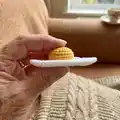
To make the yolk flatter, use less stuffing and skip a round or two; for a puffier yolk, add more stuffing and keep all rounds.

I often add a tiny loop of yarn to the edge and turn the egg into an ornament or gift tag for a playful present.

Try using a textured or variegated yarn for the egg white to give a rustic, handcrafted look that stands out on a shelf.

If you want the yolk removable, sew it to the white with a few long basting stitches that can be undone, allowing for interchangeable toppings.

I like to create matching sets—make a little bacon strip, tomato slice, or pancake to pair with the egg for a cute breakfast collection.

For a child-safe toy, use embroidered eyes on additional characters rather than safety eyes; this egg is a great accessory to a play food set.

Experiment with edging: add a scalloped border by working picots or decorative chains around the white to give a lacy, whimsical finish.

Common Mistakes & How to Fix Them

✗ Skipping the magic ring start can create a visible hole in the center; always begin with a magic ring and tighten it after the first round. ✗ Crocheting with inconsistent tension causes uneven edges and lumpy shapes; maintain steady tension and check your stitch counts frequently. ✗ Forgetting to stuff the yolk before closing makes it hard to shape smoothly; stuff the yolk gradually and finish stuffing just before closing the seam. ✗ Not sewing the yolk tightly to the white may cause it to move; place the yolk in position and use a hidden seam with matching yarn to firmly secure it.

Fried Egg Amigurumi Pattern

Make a cute fried egg amigurumi with this simple crochet pattern. You will create two pieces — a white base and a stuffed yolk — then sew them together for a playful kitchen-themed toy or decoration. The pattern is written in US terms and uses basic stitches, so it is a fun, quick make for crafters who enjoy small projects.

Beginner Friendly 1-2 Hours

Materials Needed for Fried Egg Amigurumi Pattern

— Main Fabric

  • 01
    DMC Natura Just Cotton in white (1 - Ibiza)
  • 02
    DMC Natura Just Cotton in yellow (16 - Tournesol)
  • 03
    Small amounts of each color (the pattern uses just scraps; approximately 25-50g of white and a small amount of yellow are sufficient)

— Tools Required

  • 01
    Crochet hook 3 mm
  • 02
    Toy stuffing / polyester fiberfill
  • 03
    2 stitch markers
  • 04
    Scissors
  • 05
    Yarn needle for sewing and weaving in ends

Progress Tracker

0% Complete
— Pattern :

Info :

Note: This cute fried egg is made of two parts, which are sewn together. The yolk is additionally stuffed with some toy filling, for more realistic look. Both pieces require starting with a magic ring and crocheting in a spiral (without joining the separate rounds with a slip stitch). The finished piece measures approximately 4 inches and it takes about 1.5 hours to make. The pattern is written in US terms. Gauge : 2'' = 12 sts x 13 rows in sc

— Egg white :

Round 1 :

6 sc in MR (6)

Round 2 :

inc x 6 (12)

Round 3 :

(sc, inc) x 6 (18)

Round 4 :

(2 sc, inc) x 6 (24)

Round 5 :

(3 sc, inc) x 6 (30)

Round 6 :

(4 sc, inc) x 6 (36)

Round 7 :

(5 sc, inc) x 6 (42)

Round 8 :

(6 sc, inc) x 6 (48)

Round 9 :

4 sc, 2 hdc, 3 dc inc, hdc, 3 sc, 3 hdc, 4 sc, hdc, dc inc, dc, hdc, 11 sc, hdc, dc inc, dc, dc inc, hdc, 7 sc (54)

Round 10 :

3 sc, 3 hdc, dc, 3 dc inc, dc, hdc, 28 sc, hdc, dc, 3 dc inc, dc, 3 hdc, 5 sc (60)

Round 11 :

5 sl st, 11 sc, 3 sl st, 5 sc, 2 sl st, 4 sc, inc, 3 sc, 3 sl st, 5 sc, 2 sl st, 4 sc, inc, 3 sc, 3 sl st, 5 sc, 2 sl st, 4 sc (64)

Info :

Fo and weave in the ends.

— Yolk :

Round 1 :

6 sc in MR (6)

Round 2 :

inc x 6 (12)

Round 3 :

(sc, inc) x 6 (18)

Round 4 :

(2 sc, inc) x 6 (24)

Round 5-7 :

sc around (24)

Round 8 :

sl st around (24)

Info :

Fo and weave in the ends. Stuff the yolk with toy stuffing before closing for a realistic look.

— Assembly :

Assembly :

Choose the right spot for the yolk and sew it to the egg white. Ideally do it with your white yarn, using some hidden seam. Stuff it just before finishing the seam. Well done! You have just made your perfect fried egg :) What are you going to cook crochet next?

Assembly Instructions

  • Choose the right spot for the yolk on the egg white and place it centered or slightly offset depending on desired look.
  • Sew the yolk to the egg white using matching white yarn and a hidden mattress or whip stitch for a clean seam.
  • Stuff the yolk with toy filling just before finishing the seam so the yolk remains round and plump.
  • Weave in all ends securely on the wrong side of the work to hide tails and prevent unraveling.

Important Notes

  • 💡Start both pieces with a magic ring and crochet in a spiral without joining rounds to keep a smooth surface.
  • 💡Use stitch markers to mark the start of rounds if you need help keeping your place while working in spiral.
  • 💡Stuff the yolk gradually and firmly for a realistic dome shape, but avoid overstuffing which can distort stitches.
  • 💡Work with consistent tension throughout to maintain even stitch counts and a neat finished shape.

This tiny fried egg is a playful, handmade touch for kitchens, gift tags, or playful displays. It's quick to make and perfect for practicing small amigurumi techniques. Share your little creations with friends or keep them for your own cozy kitchen decor. 🥚🧶✨

You ask,

we answer.

FAQs

What size will the finished piece be?

The finished amigurumi measures approximately 4 inches across when using the recommended yarn and 3 mm hook.

Can I use different yarn weights for this pattern?

Yes, but changing yarn weight and hook size will affect the final size; use a suitable hook for your chosen yarn to keep stitch tension even.

Do I need prior crochet experience for this pattern?

This pattern is beginner friendly, but you should be comfortable with basic stitches like single crochet, increases, and working in the round.

How long does this project typically take to complete?

Most crocheters complete this project in about 1 to 2 hours, depending on experience and finishing time for sewing and stuffing.