🧶 Beautiful ✨ Detailed 💝 Adorable

Festive Gnomes Amigurumi Pattern

Festive Gnomes Amigurumi Pattern
4.2★ Rating
5-7 Hours Time Needed
3.9K Made This
✂️

Intermediate Level

Ideal for those with basic crochet experience, featuring slightly more advanced stitches and techniques to expand your skills.

⏱️

Weekend Treat

Takes 5-7 hours, making it an enjoyable project to finish over a couple of days.

🧸

Cute Companion

An adorable friend to cherish, handcrafted with love to bring comfort and joy for years to come.

About This Festive Gnomes Amigurumi Pattern

This pattern creates two small festive gnomes — one with a loop-stitch beard and one with braided hair — perfect for holiday decor. It uses Paintbox Yarns Cotton DK and a 3mm hook to make tidy, dense stitches and firm shapes. The design features easy embroidery details for star motifs and a simple assembly process for a neat finish.

Festive Gnomes Amigurumi Pattern crochet pattern - detailed view of completed project

Youll make a rounded body, little hands, a nose, and either a loop-stitch beard or braided hair, plus a tall cone hat. The instructions include exact round-by-round shaping and tips for sewing and decorating.

Why You'll Love This Festive Gnomes Amigurumi Pattern

I absolutely love this pattern because it transforms simple shapes into charming seasonal characters with a few clever stitches. I enjoy the contrast between the dense body and the playful loop-stitch beard or neat braids, which give each gnome personality. I also love that the hat offers plenty of space for embroidery, so each make feels unique. The pattern is satisfying to sew together and finishes into a stable, gift-ready piece. I get excited seeing different color combinations bring out new moods in the gnomes.

Festive Gnomes Amigurumi Pattern step 1 - construction progress Festive Gnomes Amigurumi Pattern step 2 - assembly progress Festive Gnomes Amigurumi Pattern step 3 - details and accessories Festive Gnomes Amigurumi Pattern step 4 - final assembly and finishing

Switch Things Up

I love customizing the hat color and embroidery to create different personalities — try deep greens, navy, or metallic threads for a festive look.

I sometimes swap the main body color for pastel shades to make non-seasonal, year-round gnomes.

I often use a thicker yarn and a larger hook to make a chunky, cuddly version; adjust the cardboard base size accordingly.

You can make a mini keychain version by using finer yarn and a smaller hook, and attaching a keyring before closing the hat.

I like adding tiny accessories like a crocheted heart, tiny bell, or felt star sewn to the hat for gifts.

Try embroidering initials or small motifs on the hat or body to personalize each gnome as a present.

I sometimes add wire to the brim of the hat to shape it into a jaunty curve for more character.

For different beard styles, experiment with longer or shorter loop stitch lengths or trim loops for a fluffy look.

I recommend making a set of three gnomes in coordinating shades for a stylish mantel display.

Also consider combining yarn textures — for example a boucle or wool hat with a cotton body — for a mixed-fibre aesthetic.

Common Mistakes & How to Fix Them

✗ Skipping the cardboard circle for the base makes the gnome unstable and floppy; cut and insert the recommended 2¼–2¾in/6–7cm cardboard disk into the base before closing to create a flat, stable bottom. ✗ Forgetting to stuff gradually causes lumps and misshapen curves; add stuffing slowly and evenly as you work, shaping gently with each addition to maintain a smooth silhouette. ✗ Not counting stitches after increases or decreases can throw off shaping early; count your stitches at the end of each round, especially after rounds with repeated increases or decreases. ✗ Pulling loops too tight when making loop stitch for the beard gives uneven loop sizes; create loops approximately ¾in/2cm long and keep them consistent, checking against earlier loops as you work. ✗ Failing to pin or mark placement for hands and nose causes asymmetry; use pins to position parts and count rounds to ensure hands are sewn between rounds 17–18 and the nose is placed as instructed.

Festive Gnomes Amigurumi Pattern

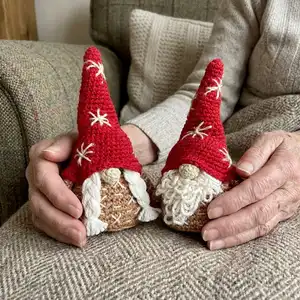
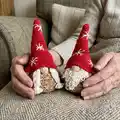
Make charming Festive Gnomes to decorate your home or give as handmade gifts. This pattern guides you through two cute styles—a bearded gnome and a braided-hair gnome—using simple shaping and a fun loop stitch for the beard. Youll enjoy embroidering star motifs and customizing colors for a seasonal touch. Perfect for gifting or holiday display.

Intermediate 5-7 Hours

Materials Needed for Festive Gnomes Amigurumi Pattern

— Main Fabric

  • 01
    Paintbox Yarns Cotton DK (50g balls): 1 ball Soft Fudge 410 (A)
  • 02
    Paintbox Yarns Cotton DK (50g balls): 1 ball Red Wine 416 (B)
  • 03
    Paintbox Yarns Cotton DK (50g balls): 1 ball Vanilla Cream 408 (C)
  • 04
    Paintbox Yarns Cotton DK (50g balls): 1 ball Champagne White 403 (D)
  • 05
    Cardboard circle 2¼-2¾in / 6-7cm diameter for flat bottom

— Tools Required

  • 01
    Crochet hook size US D-3 (3mm)
  • 02
    Toy stuffing (polyester fibrefill)
  • 03
    Scissors
  • 04
    Yarn needle for sewing and embroidery
  • 05
    Cardboard circle 2¼-2¾in / 6-7cm diameter
  • 06
    Stitch markers (recommended)
  • 07
    Tape measure (optional)

Progress Tracker

0% Complete

— Size :

Info :

Height 6¼in/16cm

— Materials :

Info :

Yarn available at lovecrafts.com. 1 3/4oz/50g balls of Paintbox Yarns Cotton DK: 1 ball in Soft Fudge 410 (A). 1 ball in Red Wine 416 (B). 1 ball in Vanilla Cream 408 (C). 1 ball in Champagne White 403 (D). US D-3 (3mm) crochet hook. Toy stuffing. Scissors. Yarn needle. Cardboard circle 2¼-2¾in/6-7cm in diameter to make flat bottom.

— Good to Know :

Infos :

Paintbox Yarns cannot accept responsibility for the finished item if any yarn other than the recommended yarn is used. Yarn quantities are based on average requirements and are therefore approximate. Instructions are written using US terminology with UK terminology given in italics in round brackets ( ) afterwards. Repeat figures in square brackets [ ] the number of times stated afterwards. Instructions are given for the smallest size, with changes for the larger sizes given in round brackets ( ) afterwards. Where only one figure is given, this relates to all sizes. Where the figure 0 appears, no stitches, times or rows are worked for this size.

— Gauge (Tension) :

Info :

Not essential.

— Abbreviations :

Info :

blo working into back loop only. cm centimetres. dec decrease by working 2 sc(dc) together. g grams. in inches. inc increase by working 2 sc(dc) in next stitch or space. mm millimetres. oz ounces. sc(dc) single (double) crochet. st/s stitch/es. yrh yarn round hook.

— Special Stitch :

Info :

lp st loop st working from wrong side, wrap yarn from back to front around and over the index finger holding the yarn, (pull out a loop approx ¾in/2cm long – or desired length), insert hook in next stitch, grab the yarn from behind your index finger and draw the yarn through the stitch. With the loop still on your finger, yrh hook and draw through both loops on hook. Try to ensure all loops are equal size.

— Body :

Round 1 :

Using A and US D-3 (3mm) hook, make an adjustable ring. 6 sc(dc) in ring. (6 sts)

Round 2 :

Inc in each st around. (12 sts)

Round 3 :

[1 sc(dc), inc] 6 times. (18 sts)

Round 4 :

[2 sc(dc), inc] 6 times. (24 sts)

Round 5 :

[3 sc(dc), inc] 6 times. (30 sts)

Round 6 :

[4 sc(dc), inc] 6 times. (36 sts)

Round 7 :

[5 sc(dc), inc] 6 times. (42 sts)

Round 8 :

[6 sc(dc), inc] 6 times. (48 sts)

Round 9 :

Sc(dc) blo around.

Round 10-14 :

Sc(dc) around.

Info :

Insert cardboard circle into bottom of work.

Round 15 :

[6 sc(dc), dec] 6 times. (42 sts)

Round 16 :

Sc(dc) around.

Round 17 :

[5 sc(dc), dec] 6 times. (36 sts)

Round 18 :

Sc(dc) around.

Round 19 :

[4 sc(dc), dec] 6 times. (30 sts)

Round 20-22 :

Sc(dc) around.

Round 23 :

[3 sc(dc), dec] 6 times. (24 sts)

Round 24 :

[2 sc(dc), dec] 6 times. (18 sts)

Info :

Add stuffing.

Round 25 :

[1 sc(dc), dec] 6 times. (12 sts)

Round 26 :

[Dec] 6 times. (6 sts)

Info :

Cut yarn. Fasten off. Using C embroider the pattern on the body.

— Hands (MAKE 2) :

Round 1 :

Using B and US D-3 (3mm) hook, make an adjustable ring. 6 sc(dc) in ring. (6 sts)

Round 2 :

Sc(dc) around.

Round 3 :

[1 sc(dc), inc] 3 times. (9 sts)

Info :

Break B, join in A.

Round 4-9 :

Sc(dc) around.

Info :

Break yarn leaving a tail for sewing. Using C embroider the pattern on the arms. Sew hands between 17th and 18th rounds of body leaving 14 sts between them.

— Beard :

Round 1 :

Using D and US D-3 (3mm) hook ch 4. 1 sc(dc) in 2nd ch from hook and in each of next 2 ch, turn. (3 sts)

Round 2 :

3 lp st, turn.

Round 3 :

Inc, 1 sc(dc), inc, turn. (5 sts)

Round 4 :

5 lp st, turn.

Round 5 :

Inc, [1 sc(dc), inc] twice, turn. (8 sts)

Round 6 :

8 lp st, turn.

Round 7 :

[Inc, 1 sc(dc)] 4 times, turn. (12 sts)

Round 8 :

12 lp st, turn.

Round 9 :

[Inc, 2 sc(dc)] 4 times, turn. (16 sts)

Round 10 :

16 lp st.

Info :

Break yarn leaving a tail for sewing. Sew between arms on 12th - 21st rounds.

— Braids :

Info :

Using D cut 27 pieces of yarn each 12in/30cm long. Divide into 3 even parts and make a braid. Cut 2 pieces 2in/5cm long and tie the braid from each side to keep them together. Cut the ends leaving ½in/1cm long tassels. Fold braid in half and place it on front of the gnome so it will form both braids. Connect the middle (at point of fold) to the 25th - 26th rounds of body with a 2–3in/5–7cm piece of yarn.

— Nose :

Round 1 :

Using C and US D-3 (3mm) hook make an adjustable ring. 6 sc(dc) in ring. (6 sts)

Round 2 :

[1 sc(dc), inc] 3 times. (9 sts)

Round 3 :

Sc(dc) around.

Info :

Break yarn leaving a tail for sewing. For bearded gnome sew nose on top of the beard. For braided gnome sew nose between braids on 17th - 19th rounds.

— Hat :

Round 1 :

Using B and US D-3 (3mm) hook make an adjustable ring. 6 sc(dc) in ring. (6 sts)

Round 2 :

Sc(dc) around.

Round 3 :

[1 sc(dc), inc] 3 times. (9 sts)

Round 4-6 :

Sc(dc) around.

Round 7 :

[2 sc(dc), inc] 3 times. (12 sts)

Round 8-10 :

Sc(dc) around.

Round 11 :

[3 sc(dc), inc] 3 times. (15 sts)

Round 12-14 :

Sc(dc) around.

Round 15 :

[4 sc(dc), inc] 3 times. (18 sts)

Round 16-17 :

Sc(dc) around.

Round 18 :

[5 sc(dc), inc] 3 times. (21 sts)

Round 19-20 :

Sc(dc) around.

Round 21 :

[6 sc(dc), inc] 3 times. (24 sts)

Round 22 :

Sc(dc) around.

Round 23 :

[7 sc(dc), inc] 3 times. (27 sts)

Round 24 :

Sc(dc) around.

Round 25 :

[8 sc(dc), inc] 3 times. (30 sts)

Round 26 :

[9 sc(dc), inc] 3 times. (33 sts)

Round 27 :

[10 sc(dc), inc] 3 times. (36 sts)

Round 28 :

[11 sc(dc), inc] 3 times. (39 sts)

Round 29 :

[12 sc(dc), inc] 3 times. (42 sts)

Round 30 :

[13 sc(dc), inc] 3 times. (45 sts)

Round 31 :

[14 sc(dc), inc] 3 times. (48 sts)

Round 32 :

[15 sc(dc), inc] 3 times. (51 sts)

Info :

Break yarn leaving a tail for sewing. Using C embroider big stars randomly. Place hat on top of the body and position at beginning of the arms and nose. Sew to back of body and around arms.

Assembly Instructions

  • Insert the cardboard circle into the bottom of the body after round 14, then continue stuffing and closing to maintain a flat stable base.
  • Sew the hands between rounds 17 and 18 of the body, leaving 14 stitches between them and using a tail left when breaking the yarn to whipstitch in place.
  • For the bearded gnome sew the finished beard between the arms aligning it across rounds 12–21, then sew the nose on top of the beard.
  • For the braided gnome fold the braid in half and attach the midpoint to rounds 25–26 of the body with a 2–3in/5–7cm piece of yarn, then position the nose between braids at rounds 17–19.
  • Place the hat on the head so it begins at the top of the arms and nose, then sew the hat to the back of the body and around the arms using the tail left on the hat.
  • Embroider the star details using C (Vanilla Cream) onto the body and hat as desired, and trim braid tassels to ½in/1cm.

Important Notes

  • 💡Use stitch markers to keep track of round beginnings and any increases or decreases for accurate shaping.
  • 💡Stuff gradually and evenly to avoid lumps; add stuffing before the final decreases to maintain shape.
  • 💡Count your stitches at the end of each round, especially after increase/decrease rounds, to ensure the pattern remains correct.
  • 💡Fasten off and leave a long tail for sewing where indicated to make assembly easier and neater.
  • 💡Embroider details after stitching and before final placement where possible to allow for easier handling.

These Festive Gnomes are perfect for holiday displays, handcrafted with cotton DK for a clean, modern look. Customize hats and embroideries to match your decor and create a set of gnomes for friends and family. Theyre small, gift-ready, and full of personality—perfect for gifting or seasonal styling. 🧶🎄

You ask,

we answer.

FAQs

What size will the finished piece be?

The finished amigurumi measures approximately 6¼ in / 16 cm tall when using the recommended Paintbox Cotton DK yarn and a 3mm hook.

Can I use different yarn weights for this pattern?

Yes, you can change yarn weight but it will affect the final size and stitch counts; choose an appropriate hook for your yarn and be prepared to adjust stuffing and cardboard base size.

Do I need prior crochet experience for this pattern?

This pattern is rated intermediate and assumes you know basic amigurumi techniques including working in the round, increases/decreases, and the loop stitch.

How long does this project typically take to complete?

Most crocheters complete a single gnome in about 5-7 hours depending on experience and how much time you spend on embroidery and assembly.