๐Ÿงถ Beautiful โœจ Detailed ๐Ÿ’ Adorable

Farm Finger Puppet Amigurumi Pattern

Farm Finger Puppet Amigurumi Pattern
4.7โ˜… Rating
5-7 Hours Time Needed
2.2K Made This
โœ‚๏ธ

Beginner Friendly Level

Perfect for those just starting their crochet journey, with clear instructions and simple techniques

โฑ๏ธ

Weekend Treat

Takes 5-7 hours, making it an enjoyable project to finish over a couple of days.

๐ŸŽ

Tiny Treasure

Small, sweet, and gift-worthy creations that fit perfectly in the palm of your hand with detailed charm.

About This Farm Finger Puppet Amigurumi Pattern

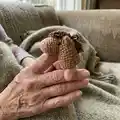
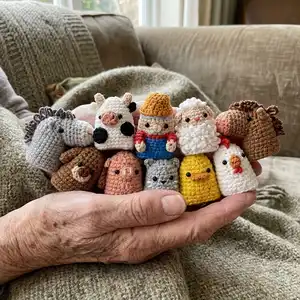
This pattern creates a full set of 10 Farm Finger Puppets including Old McDonald and nine animals. Each puppet is crocheted flat using back loop only (BLO) technique, resulting in thin, stackable finger puppets. You will make small parts (noses, ears, beaks) and sew them onto the body to create each character.

Farm Finger Puppet Amigurumi Pattern crochet pattern - detailed view of completed project

Clear round-by-round instructions are provided for each puppet part and assembly. All materials, tools, and abbreviations are listed to help you work smoothly.

Why You'll Love This Farm Finger Puppet Amigurumi Pattern

I absolutely love this pattern because it turns simple stitches into a charming set of tiny characters that spark imagination. I enjoy the compact size โ€” they are quick to make and perfect for gifts or teaching little ones songs like 'Old MacDonald'. I love how the BLO technique creates a neat flat puppet that stacks easily for storage. I also appreciate that each puppet uses the same basic body shape, so once you know one, you can quickly make the rest and customize colors.

Farm Finger Puppet Amigurumi Pattern step 1 - construction progress Farm Finger Puppet Amigurumi Pattern step 2 - assembly progress Farm Finger Puppet Amigurumi Pattern step 3 - details and accessories Farm Finger Puppet Amigurumi Pattern step 4 - final assembly and finishing

Switch Things Up

I love how easy it is to customize these puppets by changing color schemes; I often swap colors to make seasonal or themed sets.

I sometimes use pastel yarns to create a softer, baby-friendly collection instead of the bright farm colors shown in the photos.

I also enjoy making mini keychain versions by using thinner yarn and a smaller hook to create tiny charms.

I will add embroidered smiles or freckles to give each puppet a unique personality when I want a more expressive face.

I recommend adding felt or tiny crocheted clothes, scarves, or hats to build a whole set of characters with different outfits.

For a more tactile lamb or sheep, I like using loop stitch or fluffy yarn on the body rows to create a curly fur effect.

If I want a sturdier puppet for young children, I replace bead eyes with embroidered eyes for safety.

I sometimes use metallic or variegated yarn for small details like hats or patches to make the puppets pop visually.

To create posable features, I add a bit of craft wire inside limbs or hats, but I avoid this for toys for very young children.

I also group puppets into themed sets (farm, jungle, ocean) by simply changing a few colors and accessory shapes; the basic body pattern stays the same so variations are fast and fun.

Common Mistakes & How to Fix Them

โœ— Skipping the back loop only (BLO) instruction can make your puppet lose its flat shape; always work in BLO when the pattern specifies it to keep the body thin and tidy. โœ— Forgetting to change colors exactly where instructed causes visible color bands to shift; change yarn at the end of the round and carry or weave in ends neatly to maintain clean stripes. โœ— Not counting stitches during increase rounds will make the body size inconsistent; count after each increase round to ensure you reach the correct stitch total. โœ— Sewing facial features without pinning first can result in uneven placement; pin or mark each piece on the body before sewing to achieve symmetry and the desired expression.

Farm Finger Puppet Amigurumi Pattern

Make a delightful set of 10 tiny farm finger puppets you can gift, play with, or use in storytelling. This pattern walks you through each cute character with clear step-by-step rounds and simple assembly notes. You will learn to create small, flat finger puppets using back loop only (BLO) technique for a neat finish. Perfect for handmade gifts, teaching, or a cozy craft afternoon.

Beginner Friendly 5-7 Hours

Materials Needed for Farm Finger Puppet Amigurumi Pattern

โ€” Main Fabric

  • 01
    Small amounts of yarn in the following colors: Cream, Grey, Orange, Red, Blue, White, Dark Grey, Pink, Black, Brown, Dark Brown, Yellow (use DK/light-worsted weight yarn; approx 5-15g per color depending on number of puppets)
  • 02
    Use contrasting small amounts for details such as noses and patches (approx 3-10g per detail color)
  • 03
    Sewing thread in black, red, orange, pink and cream for facial embroidery (small lengths)

โ€” Tools Required

  • 01
    Crochet hook no. 3
  • 02
    Needle to sew (yarn needle)
  • 03
    Small black beads for eyes (1 pair per puppet)
  • 04
    Yarn for crocheting
  • 05
    Sewing thread (various colors for details)
  • 06
    Toy stuffing (for items that require small stuffing like horse nose)
  • 07
    Scissors
  • 08
    Pins for assembly (optional)

Progress Tracker

0% Complete

Info :

I'm using Back loop only (BLO) technique. It creates a flat and thin finger puppet.

โ€” Old McDonald :

BODY - Start with grey yarn - Round 1 :

5 sc in a magic ring [5]

Round 2 :

inc x 5 [10]

Round 3 :

(sc, inc) x 5 [15]

Round 4 :

(sc 2, inc) x 5 [20]

Round 5 :

(sc 3, inc) x 5 [25]

Info :

Change to cream yarn

Round 6-8 :

sc around [25]

Info :

Change to red yarn

Round 9 :

sc around [25]

Info :

Change to blue yarn

Round 10-14 :

sc around [25]

Round (finish) :

slst

HANDS, make two - Start with cream yarn - Round 1 :

4 sc in a magic ring [4]

Round 2 :

inc, sc, inc, sc [6]

Info :

Change to red yarn

Round 3 :

sc 6 [6]

Round 4 :

sc 6 [6]

Round (finish) :

slst

HAT - Start with orange yarn - Round 1 :

4 sc in a magic ring [4]

Round 2 :

inc x 4 [8]

Round 3 :

(sc, inc) x 4 [12]

Round 4 :

sc around [12]

Round 5 :

(sc 2, inc) x 4 [16]

Round 6 :

(sc 3, inc) x 4 [20]

Round (finish) :

slst

NOSE - Start with cream yarn - Round 1 :

4 sc in a magic ring [4]

Round (finish) :

slst

โ€” Cow :

BODY - Start with white yarn - Round 1 :

5 sc in a magic ring [5]

Round 2 :

inc x 5 [10]

Round 3 :

(sc, inc) x 5 [15]

Round 4 :

(sc 2, inc) x 5 [20]

Round 5 :

(sc 3, inc) x 5 [25]

Round 6-13 :

sc around [25]

Round (finish) :

slst

NOSE - Start with pink yarn - Round 1 :

4 sc in a magic ring [4]

Round 2 :

inc x 4 [8]

Round (finish) :

slst

EARS, make two - Ear 1 - Start with white yarn :

Make a chain [3], turn. Row 2: sc 2, slst

Ears - Ear 2 - Start with black yarn :

Make a chain [3], turn. Row 2: sc 2, slst

HORNS, make two - Start with cream yarn - Round 1 :

3 sc in a magic ring [3]

Round 2 :

sc x 3 [3]

Round 3 :

sc x 3 [3]

Round (finish) :

slst

BLACK PATCH, make two - Patch 1 - Start with black yarn - Round 1 :

3 sc in a magic ring [3]

Round 2 :

inc x 3 [6]

Round (finish) :

slst

Patch 2 - Start with black yarn - Round 1 :

4 sc in a magic ring [4]

Round 2 :

inc x 4 [8]

Round (finish) :

slst

โ€” Chicken :

BODY - Start with white yarn - Round 1 :

5 sc in a magic ring [5]

Round 2 :

inc x 5 [10]

Round 3 :

(sc, inc) x 5 [15]

Round 4 :

(sc 2, inc) x 5 [20]

Round 5 :

(sc 3, inc) x 5 [25]

Round 6-13 :

sc around [25]

Round (finish) :

slst

CHICKEN BEAK - Start with orange yarn :

Make a chain [4], turn. Row 2: sc 2, inc, sc 2, slst

CHICKEN COMB - Start with red yarn :

Make a chain [6], turn. Row 2: sc, dc, slst, dc, sc, slst

โ€” Cat :

BODY - Start with grey yarn - Round 1 :

5 sc in a magic ring [5]

Round 2 :

inc x 5 [10]

Round 3 :

(sc, inc) x 5 [15]

Round 4 :

(sc 2, inc) x 5 [20]

Round 5 :

(sc 3, inc) x 5 [25]

Round 6-13 :

sc around [25]

Round (finish) :

slst

EARS, make two - Start with grey yarn :

Make a chain [3], turn. Row 2: sc 2, slst

โ€” Duck :

BODY - Start with yellow yarn - Round 1 :

5 sc in a magic ring [5]

Round 2 :

inc x 5 [10]

Round 3 :

(sc, inc) x 5 [15]

Round 4 :

(sc 2, inc) x 5 [20]

Round 5 :

(sc 3, inc) x 5 [25]

Round 6-13 :

sc around [25]

Round (finish) :

slst

BEAK - Start with orange yarn :

Make a chain [5], turn. Rnd 1: sc 3, inc, sc 3 [8]. slst

โ€” Pig :

BODY - Start with pink yarn - Round 1 :

5 sc in a magic ring [5]

Round 2 :

inc x 5 [10]

Round 3 :

(sc, inc) x 5 [15]

Round 4 :

(sc 2, inc) x 5 [20]

Round 5 :

(sc 3, inc) x 5 [25]

Round 6-13 :

sc around [25]

Round (finish) :

slst

NOSE - Start with pink yarn - Round 1 :

4 sc in a magic ring [4]

Round 2 :

inc, sc, inc, sc [6]

Round (finish) :

slst

EARS, make two - Start with pink yarn :

Make a chain [3], turn. Row 2: sc 2, slst

โ€” Dog :

BODY - Start with brown yarn - Round 1 :

5 sc in a magic ring [5]

Round 2 :

inc x 5 [10]

Round 3 :

(sc, inc) x 5 [15]

Round 4 :

(sc 2, inc) x 5 [20]

Round 5 :

(sc 3, inc) x 5 [25]

Round 6-13 :

sc around [25]

Round (finish) :

slst

EARS - Start with brown yarn - Round 1 :

4 sc in a magic ring [4]

Round 2 :

inc x 4 [8]

Round 3-5 :

sc around [8]

Round (finish) :

slst

SNOUT - Start with cream yarn :

Make a chain [4], turn. Round 2: sc, sc, inc, sc, sc, inc [8]. Round 3: sc around [8]. slst

NOSE - Start with brown yarn - Round 1 :

4 sc in a magic ring [4]

Round (finish) :

slst

โ€” Horse :

BODY - Start with brown yarn - Round 1 :

5 sc in a magic ring [5]

Round 2 :

inc x 5 [10]

Round 3 :

(sc, inc) x 5 [15]

Round 4 :

(sc 2, inc) x 5 [20]

Round 5 :

(sc 3, inc) x 5 [25]

Round 6-13 :

sc around [25]

Round (finish) :

slst

NOSE - Start with pink yarn - Round 1 :

5 sc in a magic ring [5]

Round 2 :

inc x 5 [10]

Round 3 :

(sc, inc) x 5 [15]

Round 4 :

(sc 2, inc) x 5 [20]

Info :

Change to brown yarn

Round 5-7 :

sc around [20]

Round (finish) :

slst

EARS, make two - Start with brown yarn :

Make a chain [3], turn. Row 2: sc 2, slst

โ€” Donkey :

BODY - Start with grey yarn - Round 1 :

5 sc in a magic ring [5]

Round 2 :

inc x 5 [10]

Round 3 :

(sc, inc) x 5 [15]

Round 4 :

(sc 2, inc) x 5 [20]

Round 5 :

(sc 3, inc) x 5 [25]

Round 6-13 :

sc around [25]

Round (finish) :

slst

NOSE - Start with white yarn - Round 1 :

5 sc in a magic ring [5]

Round 2 :

inc x 5 [10]

Round 3 :

(sc, inc) x 5 [15]

Round 4 :

(sc 2, inc) x 5 [20]

Info :

Change to grey yarn

Round 5-7 :

sc around [20]

Round (finish) :

slst

EARS, make two - Start with grey yarn :

Make a chain [3], turn. Row 2: sc 2, slst

โ€” Lamb :

BODY - Start with white yarn - Round 1 :

5 sc in a magic ring [5]

Round 2 :

inc x 5 [10]

Round 3 :

(sc, inc) x 5 [15]

Info :

Change to cream yarn

Round 4 :

(sc 2, inc) x 5 [20]

Round 5 :

(sc 3, inc) x 5 [25]

Round 6-7 :

sc around [25]

Info :

Change to white yarn

Round 8-13 :

sc around [25]

Round (finish) :

slst

EARS, make two - Start with cream yarn :

Make a chain [3], turn. Row 2: sc 2, ch 1, slst

Assembly Instructions

  • Sew the nose in the center on the 7th round for Old McDonald and some animals; position carefully and stitch securely.
  • Sew the eyes between the nose according to each character notes (example: Old McDonald - on 7th round, 1 stitch apart; Cat - 5th round, 4 stitches apart).
  • Sew ears, horns, patches, and other small parts following the step photos; pin parts into place first to ensure symmetry before stitching.
  • For animals with separate snouts or noses (dog, horse), sew the nose onto the snout first and then attach the snout to the body at the specified round.
  • Embroider small details (mustache, mouth, whiskers) with sewing thread after beads are secured to avoid shifting.
  • Sew hands, beaks, crests, and combs to the specified rounds (examples: chicken beak on 5th round; duck nose on 7th round) to match photos.

Important Notes

  • ๐Ÿ’กWork in BLO (back loop only) when indicated to create the flat, thin puppet shape that stacks comfortably.
  • ๐Ÿ’กUse small black beads for eyes and secure them well, or embroider eyes if making puppets for very young children to avoid choking hazards.
  • ๐Ÿ’กPin and check placement of facial features before sewing to achieve even, symmetrical results consistent with the pattern photos.

This Farm Finger Puppet set brings ten tiny characters to life โ€” from Old McDonald to a fluffy lamb and playful pig. Each puppet is designed to be quick to crochet, easy to assemble, and perfect for gifts or storytelling. Gather your favorite colors, stitch a barnyard, and enjoy playful moments with these handmade pals. ๐Ÿท๐Ÿ‘๐ŸŽ

You ask,

we answer.

FAQs

What size will the finished piece be?

Each finger puppet measures approximately 4-6 cm tall depending on yarn thickness and your tension; these are designed to fit standard adult fingers.

Can I use different yarn weights for this pattern?

Yes, you can use different yarn weights but it will change the final size; use an appropriate hook size to match your chosen yarn and expect size differences.

Do I need prior crochet experience for this pattern?

This pattern is beginner friendly, so basic knowledge of single crochet, increases, and working in a magic ring is sufficient to complete the puppets.

How long does this project typically take to complete?

Most crafters finish a set over a weekend; making one puppet takes about 20-45 minutes depending on experience and whether you make small parts by hand.