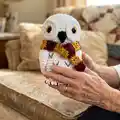
Create a charming Eira Owl amigurumi with this detailed crochet pattern. You will make adorable eyes, wings, a beak, tail, feet, scarf and a tiny envelope accessory. The pattern includes complete stitch-by-stitch rounds and clear assembly notes so you can finish a delightful handmade owl to gift or display.
Progress Tracker
0% Complete
— Eyes (make 2) :
Round 1 :
Using YELLOW - In MR, SC 3, HDC, DC, HDC, SC 2. *Close the MR loosely, leaving enough room to insert the safety eye post through the middle*. Join with a SlSt (8sts)
Round 2 :
Using WHITE - Ch 2 (counts as a st). HDC in same st as the ch. HDC INC in each stitch around. Join with a SlSt (16sts)
Round 3 :
Ch 1. SC in the same stitch. {SC, INC} 7x, SC in last stitch (24sts)
Info :
Fasten off with a tail for sewing. Insert the safety eye into the centre of the MR and pull the tail to tighten.
— Body :
Round 1 :
In MR, SC 6. Pull yarn tail to close ring (6sts)
Round 2 :
INC once in each stitch (12sts)
Round 3 :
{SC, INC} 6x (18sts)
Round 4 :
SC, INC, {SC 2, INC} 5x, SC (24sts)
Round 5 :
{SC 3, INC} 6x (30sts)
Round 6-15 :
SC once in each stitch (30sts)
Round 16 :
{SC 3, DEC} 6x (24sts)
Round 17 :
{SC 3, INC} 6x (30sts)
Round 18 :
SC 2, INC, {SC 4, INC} 5x, SC 2 (36sts)
Round 19 :
{SC 5, INC} 6x (42sts)
Round 20-24 :
SC once in each stitch (42sts)
Round 25 :
{SC 5, DEC} 6x (36sts)
Round 26 :
SC once in each stitch (36sts)
Round 27 :
SC 2, DEC, {SC 4, DEC} 5x, SC 2 (30sts)
Round 28 :
{SC 3, DEC} 6x (24sts)
Info :
*Stop & attach the eyes. Counting down 7 rows from the current one, insert the eye post between the 21st & 22nd row, with 3 stitches visible between the eye patches. The patches can be sewn in place now, or later. See assembly*
Round 29 :
SC, DEC, {SC 2, DEC} 5x, SC (18sts)
Round 30 :
{SC, DEC} 6x (12sts)
Info :
Fasten off, and weave in the end.
— Feet (make 2) :
Round 1 :
Ch 4. SC in the 2nd Ch from the hook *mark this stitch as the start*. SC. In last Ch, SC 3. Rotate the piece so you’re now working the other side of the chain *skipping the loop the previous 3 sts were worked in* INC once in each of the 2 open Ch spaces (9sts)
Round 2 :
In FLO, {SlSt, Ch 2, SC in 2nd Ch from hook, SlSt in the same stitch as first SlSt} once in each of the next 3 sts. Working in both loops again, SC 2 (4 toes, 4 SC sts)
Round 3 :
Flip the toes down towards the sole, and work 3 SC into the back loops left open from rnd 3 (one near the middle of each toe). Skip the marked stitch. Working in both loops again, SC in the next stitch, and then SC into the SlSt. Flip the back toe down, and SC in the BLO of the next 2 sts. Working in both loops again, SC 2 (9sts)
Info :
Fasten off with a tail for sewing.
— Wings (make 2) :
Round 1 :
In MR, SC 6. Pull yarn tail to close ring (6sts)
Round 2 :
INC once in each stitch (12sts)
Round 3 :
{SC, INC} 6x (18sts)
Round 4 :
{SC 5, INC} 3x (21sts)
Round 5-6 :
SC once in each stitch (21sts)
Round 7 :
{SC 5, DEC} 3x (18sts)
Round 8 :
SC once in each stitch (18sts)
Round 9 :
{SC, DEC} 6x (12sts)
Round 10 :
SC once in each stitch (12sts)
Round 12 :
SC once in each stitch (6sts)
Info :
Fasten off, and weave in ends.
— Beak :
Item :
1) Using BLACK - Leaving a long tail for sewing, Ch 4. SlSt in 2nd Ch from hook. HDC. In last Ch, DC, SC, DC. Turn. Working on the other side of the chain *skipping the loop the previous 3 sts were worked in*, HDC, SlSt to last Ch. (7sts)
Info :
Fasten off with a tail for sewing. Pinch the tip of the beak (SlSt side) closed and sew back and forth a couple times to secure the point in place. Weave in end.
— Tail :
Round 1 :
Ch 6. SC in 2nd Ch from hook. SC 3. In last Ch, SC 3. Turn (7sts)
Round 2 :
Working on the other side of the chain, SC 3. In last Ch, SC 2 (5sts)
Round 3-4 :
Working in rounds from this point on, SC once in each stitch (12sts)
Round 4 :
{DEC, SC 4} 2x (10sts)
Round 5 :
SC once in each stitch (10sts)
Round 6 :
{DEC, SC 3} 2x (8sts)
Info :
Fasten off with a tail for sewing. Because you worked in the round there will be a low side and a high side; take note of this for assembly, as the low side will be sewn on facing down so the tail is angled correctly.
— Wax Seal :
Item :
1) Using RED - In MR, SC 4 (4sts)
Info :
Pull ring closed tightly, and fasten off with a small tail for sewing.
— Envelope :
Round 1 :
Using BEIGE, and a 5mm hook - Leaving a 6" tail, Ch 15. SC in 2nd Ch from hook, and once in each stitch across (14sts)
Round 3-14 :
SC once in each stitch (14sts)
Info :
Your goal here is to make a 3x3" square, so depending on your gauge you may need to go up/down a hook size, adjust the chain length, or add/subtract rows to correctly achieve this. Once the proper size is reached, fasten off with another tail for sewing.
— Scarf :
Round 1 :
Ch 4. SC in 2nd Ch from hook, SC 2 (3sts)
Round 2-4 :
Ch 1. SC once in each stitch (3sts)
Info :
*Change yarn colour*
Round 5-7 :
Ch 1, SC once in each stitch (3sts)
Info :
*Change yarn colour back to the first colour used*
Info :
Repeat your colour change rows until your scarf is around 13" long, or long enough to wrap around the owls neck at least 1.5x. Mine ended up being 17 coloured sections, and 51 rows, but yours may need to be adjusted depending on your gauge. I worked in colour block rows of 3, but you can alter your colour changes however you like. Weave in all the ends. I sewed a loop on one end, big enough to pull the scarf through, to secure it on her.
— Assembly :
Info :
Starting with the eyes, position the patches so that the DC side of the yellow is facing towards the outside edge of her head. Leaving the top section for last, and starting at the inside corner of the eye, sew 2/3 of the way around the patch. When you get to the outside corner on the top, sew through the patch on a downward angle towards your starting point, leaving the top edge able to fold down slightly (as illustrated in the photo below). Fasten off and weave in ends.
Info :
Moving onto the beak, position it so that the top of the beak is level with the bottom of the safety eyes. Sew 2 stitches on one side, across the top, and 2 stitches on the other side to secure 1/3 of the beak to your owl's face, leaving the tip free so your owl will be able to carry her mail! Fasten off and weave in ends.
Info :
Embroider a few small "V" shapes onto the front of her body using grey yarn.
Info :
For the wings, position them so they abut the bottom edge of your owls head, are centre on her body when viewed from the side, and are slightly tilted back. I stitched only through the layer closest to her body, and only secured the top, but you can sew it on however you're most comfortable with. Fasten off and weave in ends.
Info :
For the feet (important - make sure to attach the feet before the tail, otherwise it may not be freestanding as intended), they should be positioned one row over from the starting MR of the body, and centre when viewed from the side. Sew around the final SC round of the "leg" only, leaving the toes free. Fasten off and weave in ends.
Info :
Once the feet are attached, you can embroider on talons.
Info :
Moving onto the tail, position it in the centre of the owl's back, 7-8 rows up from the starting MR on the bottom of the body. Make sure the low side (from working in the round) is facing down, and the position of the tail allows it to function as a sort of kickstand, so your owl can stand on its own.
Info :
For the envelope, lay it flat with the yarn tails on the left & right, or left & bottom (depending on how many rows you needed to make the piece square, your tails could be in either of these placements). Fold the left section in, and the bottom up, and whip stitch down the seam to the left corner of the envelope. Fasten off.
Info :
Fold the right section in, and whip stitch it to the bottom section, down the seam to the right corner. Fasten off, and weave in the ends.
Info :
Fold the top section down, and sew the wax seal onto the tip of the envelope closure.
Info :
The top of the envelope may have a tendency to stay open, so I recommend putting a small stitch somewhere in the middle of the top flap, and through to the front of the envelope, to stop this from happening.
Info :
& You’re done! Now sit back and enjoy your adorable creation!
This cute Eira Owl amigurumi is full of cozy, handmade charm and small delightful details like the striped scarf and tiny envelope accessory. Make one for yourself or stitch a flock of owls to gift to loved ones — each will have its own personality. Happy crocheting and enjoy every stitch! 🧶🧵