🧢 Beautiful ✨ Detailed πŸ’ Adorable

Duck and Goose Trinket Tray + Pin Cushion Pattern

Duck and Goose Trinket Tray + Pin Cushion Pattern
4.5β˜… Rating
2-4 Hours Time Needed
4.2K Made This
βœ‚οΈ

Intermediate Level

Ideal for those with basic crochet experience, featuring slightly more advanced stitches and techniques to expand your skills.

⏱️

Bite-Sized Project

Finishes in 2-4 hoursβ€”perfect for an afternoon of creative relaxation.

🧸

Cute Companion

An adorable friend to cherish, handcrafted with love to bring comfort and joy for years to come.

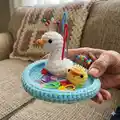
About This Duck and Goose Trinket Tray + Pin Cushion Pattern

This pattern creates a small crochet trinket tray with a standing goose and a mini duck that also works as a pin cushion. It combines basic amigurumi shaping with a simple tray base to hold pins and notions. Techniques include continuous rounds, increases, decreases, and small sewn-on details for beaks and eyes.

Duck and Goose Trinket Tray + Pin Cushion Pattern crochet pattern - detailed view of completed project

You will learn to work in the round and shape tiny bodies with stuffing and sewn-on parts. The finished piece is customizable by color and makes a delightful handmade gift or sewing room companion.

Why You'll Love This Duck and Goose Trinket Tray + Pin Cushion Pattern

I absolutely love this pattern because it combines a functional trinket tray with tiny amigurumi characters that bring personality to your crafting space. I enjoy the small-scale shaping required to make the goose's curved neck and the tiny duck β€” it feels like sculpting with yarn. The tray is practical and pretty, and I find myself making several color variations as quick gifts. Sewing the parts onto the tray is very satisfying and the finished result always looks charming on my work table.

Duck and Goose Trinket Tray + Pin Cushion Pattern step 1 - construction progress Duck and Goose Trinket Tray + Pin Cushion Pattern step 2 - assembly progress Duck and Goose Trinket Tray + Pin Cushion Pattern step 3 - details and accessories Duck and Goose Trinket Tray + Pin Cushion Pattern step 4 - final assembly and finishing

Switch Things Up

I love how easy it is to change the personality of these little characters by simply switching colors and yarn textures.

I often make the tray in pastel shades for a softer look, or bright colors for a playful room accent.

I sometimes use sport-weight yarn and a smaller hook to make a miniature keychain-sized version of the duck and goose.

I also like to use bulky yarn with a larger hook to create a chunky, decorative tray that doubles as a desk tidy.

I add felt beaks and embroidered eyes when I want a more handmade, stitched look rather than safety eyes.

I experiment with adding tiny crocheted accessories like scarves or bows to give each bird a unique personality.

I recommend trying different rim heights by adding or subtracting rounds to the tray to suit your storage needs.

I sometimes glue a small circle of craft felt to the inside base for a smoother pin cushion surface and extra stability.

I enjoy making sets in coordinating colors as quick gifts β€” swap the duck color for pastel or neon to change the mood instantly.

I encourage you to try different stuffing levels: firmer stuffing for stability, or a softer fill for a squishier pin cushion feel.

Common Mistakes & How to Fix Them

βœ— Not using stitch markers when working continuous rounds can cause confusion in round starts; place a marker at the first stitch of every round to track progress accurately. βœ— Forgetting to stuff as you go can lead to awkward shapes and gaps; stuff gradually and firmly while shaping to achieve smooth curves and stable bodies. βœ— Inserting safety eyes too late can make placement inaccurate and difficult; insert safety eyes between the recommended rounds and secure before heavy stuffing. βœ— Skipping the BLO round for the tray rim will prevent the rim from forming correctly; work the BLO round exactly as written to encourage the tray sides to curve inwards. βœ— Pulling stitches too tight on tiny pieces makes sewing difficult and parts stiff; maintain an even, moderate tension to keep pieces flexible for assembly.

Duck and Goose Trinket Tray + Pin Cushion Pattern

Make a charming hand-crocheted trinket tray that doubles as a pin cushion featuring a goose and a tiny duck. This pattern walks you through crocheting a neat tray base, a cute goose with a bendable neck, and a mini duck for sweet tabletop storage and crafting organization. Perfect as a gift or a pretty desk accessory you can customize with your favorite colors.

Intermediate 2-4 Hours

Materials Needed for Duck and Goose Trinket Tray + Pin Cushion Pattern

β€” Main Fabric

  • 01
    Type 4 / Worsted weight yarn (main - Color A: base trinket color, blue)
  • 02
    Type 4 / Worsted weight yarn (Color B: goose color, white)
  • 03
    Type 4 / Worsted weight yarn (Color C: ducky color, yellow)
  • 04
    Type 4 / Worsted weight yarn (Color D: beak color, orange)
  • 05
    Small amounts (10-30g) of each color should be sufficient for this project

β€” Tools Required

  • 01
    Crochet hook size 3.0mm
  • 02
    Type 4 / Worsted weight yarn (see colors A-D)
  • 03
    Polyfill stuffing
  • 04
    Darning needle
  • 05
    Scissors
  • 06
    Safety eyes 4.0mm (2) OR black felt and fabric glue
  • 07
    Stitch markers (recommended)

Progress Tracker

0% Complete

β€” Base Trinket Tray :

Round 1 :

8 sc into mr (8)

Round 2 :

incr into every st (16)

Round 3 :

(1 sc, 1 incr) x8 (24)

Round 4 :

(2 sc, 1 incr) x8 (32)

Round 5 :

(3 sc, 1 incr) x8 (40)

Round 6 :

(4 sc, 1 incr) x8 (48)

Round 7 :

(5 sc, 1 incr) x8 (56)

Round 8 :

(6 sc, 1 incr) x8 (64)

Round 9 :

BLO sc into every st (64)

Round 10-12 :

sc into every st (64)

Info :

Slip stitch and fasten off, weave in the tail. The 'neater' side of the trinket should be facing the inside, so that the rims of the tray would naturally curve inwards. The base of your trinket dish is now complete.

β€” Goose Body :

Round 1 :

6 sc into mr (6)

Round 2 :

incr into every st (12)

Round 3 :

(1 sc, 1 incr) x6 (18)

Round 4-5 :

sc into every st (18)

Info :

You may now insert the safety eyes between rounds 4-5. The safety eyes should be placed along the side of the goose's head. Begin to stuff the goose's body. Continue stuffing as you decrease.

Round 6 :

3 sc, 6 decr, 3 sc (12)

Round 7 :

2 sc, 4 decr, 2 sc (8)

Round 8-10 :

sc into every st (8)

Round 11 :

2 incr, 4 sc, 2 incr (12)

Round 12 :

3 incr, 6 sc, 3 incr (18)

Round 13 :

4 incr, 11 sc, 3 incr (25)

Round 14 :

6 incr, 14 sc, 5 incr (36)

Round 15 :

sc into every st (36)

Round 16 :

12 sc, 6 decr, 12 sc (30)

Round 17 :

9 sc, 6 decr, 9 sc (24)

Round 18 :

6 sc, 6 decr, 6 sc (18)

Round 19 :

3 sc, 6 decr, 3 sc (12)

Info :

Fasten off, leaving a long tail for sewing. You may need to bend the neck of the goose to create a "2" shape.

β€” Goose beak :

Using color D, Row 1 :

ch 4 (4)

Row 2 :

sc in the second st from hook. Sc in the last two st (3)

Info :

Fasten off, leaving a tail for sewing.

β€” Mini Ducky :

Round 1 :

6 sc into mr (6)

Round 2 :

incr into every st (12)

Round 3 :

(3 sc, 1 incr) x3 (15)

Round 4-6 :

sc into every st (15)

Info :

You may now insert the safety eyes between rounds 3-4. Begin to stuff the duck's body. Continue stuffing as you decrease.

Round 7 :

1 sc, 7 dec (8)

Info :

Fasten off, leaving a long tail for sewing

β€” Assembly :

Info :

Sew the goose's beak between rounds 4-5 of the goose's head.

Info :

Using the long tail of the goose body, sew the goose onto the base trinket dish at the position you'd like.

Info :

Using yarn color D, sew on a beak between rounds 3-4 of the ducky.

Info :

Using the long tail of the duck's body, sew it onto the base trinket dish at the position you'd like.

Info :

Congrats !! Your duck and goose trinket tray is now complete :")

Assembly Instructions

  • Sew the goose's beak between rounds 4-5 of the goose's head using the beak tail and secure with small whipstitches.
  • Using the long tail of the goose body, position the goose on the base trinket dish and sew it onto the rim and base securely so it stands upright.
  • Using yarn color D, sew on the duck's beak between rounds 3-4 of the mini duck, centering it on the head before securing.
  • Using the long tail of the duck's body, sew the mini duck onto the base trinket dish at your desired location, anchoring it so it sits stably on the tray.

Important Notes

  • πŸ’‘This pattern is written in US terminology.
  • πŸ’‘This pattern is worked in continuous rounds, there is no need to sl st and ch 1 at the end of every row.
  • πŸ’‘The number written in parenthesis ( ) at the end of each row indicates the total number of stitches for that row.

This delightful Duck and Goose trinket tray is a tiny handcrafted treasure perfect for your sewing table or as a sweet gift. Customize the colors to match your space and make multiple sets for friends and family. The finished tray is both decorative and useful, keeping pins and small tools corralled with charm. 🧢✨

You ask,

we answer.

FAQs

What size will the finished piece be?

The finished trinket tray measures approximately 8-12 cm across depending on yarn tension and hook, with the goose and duck standing a few centimeters tall.

Can I use different yarn weights for this pattern?

Yes, you can change yarn weight, but the final size will vary; switch to an appropriate hook size and be mindful of stuffing amounts for proportions.

Do I need prior crochet experience for this pattern?

This pattern is rated intermediate, so basic knowledge of single crochet, increases, decreases, working in the round, and simple sewing is recommended.

How long does this project typically take to complete?

Most crocheters complete this project in 2-4 hours, depending on experience and how many details or color changes you add.