🧢 Beautiful ✨ Detailed πŸ’ Adorable

Donut Amigurumi Pattern

Donut Amigurumi Pattern
4.3β˜… Rating
2-3 Hours Time Needed
1.3K Made This
βœ‚οΈ

Beginner Friendly Level

Perfect for those just starting their crochet journey, with clear instructions and simple techniques

⏱️

Bite-Sized Project

Finishes in 2-4 hoursβ€”perfect for an afternoon of creative relaxation.

🎁

Tiny Treasure

Small, sweet, and gift-worthy creations that fit perfectly in the palm of your hand with detailed charm.

About This Donut Amigurumi Pattern

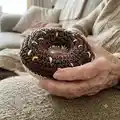
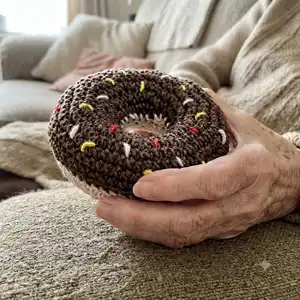
This pattern creates a small stuffed crochet donut with a removable frosting layer and embroidered yarn sprinkles. It uses sport/fine (4-ply) yarn and basic single crochet rounds to build both the base and the topping. The design is compact, portable, and perfect for gifting or making as a set of colorful treats. You will enjoy quick rounds, simple shaping, and easy assembly.

Donut Amigurumi Pattern crochet pattern - detailed view of completed project

The instructions include step-by-step rounds for the base and frosting as well as clear attachment notes. No advanced techniques required β€” ideal for beginners looking to practice consistent tension and joining methods.

Why You'll Love This Donut Amigurumi Pattern

I absolutely love this pattern because it turns simple stitches into an irresistibly cute finished piece that everyone recognizes and smiles at. I enjoy how quickly the donut takes shape, so it's great for satisfying crochet cravings between larger projects. The frosting layer gives a lovely texture contrast and lets you play with color combinations for sprinkles. I also appreciate that the assembly is straightforward, making the final sewing and stuffing relaxing and fun.

Donut Amigurumi Pattern step 1 - construction progress Donut Amigurumi Pattern step 2 - assembly progress Donut Amigurumi Pattern step 3 - details and accessories Donut Amigurumi Pattern step 4 - final assembly and finishing

Switch Things Up

I love changing up the frosting color to create a whole shop of donuts; try pastel shades for a sweet, soft look.

I sometimes use bulky yarn and a larger hook to make a chunky, plush donut that works as a pincushion or kid-safe toy.

I like adding tiny embroidered faces on the side to turn each donut into a cute character with personality.

For portable charms, I make the donut smaller with thinner yarn and attach a keyring or charm loop to the center.

I often use metallic or variegated yarn for sprinkles to add sparkle and visual interest to the top.

I recommend experimenting with different stuffing levels: firmer for plush display pieces or softer for squeezable toys.

I sometimes add a small felt or crocheted tag to label flavors or give as gift tags for market sales.

I also swap the base color to chocolate or pink to pair with contrasting frostings for variety.

I enjoy creating donut sets with matching mini boxes as gift packaging for a sweet handmade present.

I occasionally stitch on tiny beads as secure sprinkle alternatives to give a different texture and polished finish.

Common Mistakes & How to Fix Them

βœ— Not leaving a long tail on the base piece; start with a 15 cm tail to make sewing the pieces together much easier. βœ— Counting rounds incorrectly during increases can change the donut circumference; recount after each increase round to maintain stitch totals. βœ— Overstuffing or understuffing the donut before closing causes poor shape; add polyester fiberfill gradually until the donut feels firm but not stretched. βœ— Attaching the frosting without using BLO creates a messy join; use Back Loop Only when slip stitching frosting to the base for a neat edge. βœ— Forgetting to secure sprinkle yarn ends can cause unraveling; knot and weave in ends with a yarn needle for a secure finish.

Donut Amigurumi Pattern

Create a sweet crocheted donut that doubles as a charming gift or decorative accent. This beginner-friendly amigurumi uses simple rounds and basic stitches so you can finish quickly. Add colorful sprinkles with a yarn needle for a fun, personalized touch. The pattern is compact and perfect for short crafting sessions.

Beginner Friendly 2-3 Hours

Materials Needed for Donut Amigurumi Pattern

β€” Main Fabric

  • 01
    Sport/Fine Yarn/4 Ply Weight Yarn
  • 02
    Alize Cotton Gold - Beige Colour (used for base)
  • 03
    YarnArt Jeans - Brown Colour (used for frosting) (55% Acrylic, 45% Cotton)
  • 04
    Some colours of yarn for sprinkles (small amounts of accent colors)

β€” Tools Required

  • 01
    Crochet Hook : 3 mm
  • 02
    Stitch marker
  • 03
    Yarn Needle/Tapestry Needle
  • 04
    Polyester Fiberfill

Progress Tracker

0% Complete

β€” DONUT BASE :

Info :

Start with BEIGE YARN, make a long tail about 15 cm and start with 20 chain

Round 1 :

sc 20 in the chain (20)

Round 2 :

(sc, inc) x 10 (30)

Round 3 :

(2 sc, inc) x 10 (40)

Round 4 :

(3 sc, inc) x 10 (50)

Round 5 :

(4 sc, inc) x 10 (60)

Round 6-8 :

Sc around

Info :

Sl, leave a long tail for sewing

β€” DONUT FROSTING / TOPPING :

Info :

Make same with BROWN (ANY COLOUR) YARN but no need give a long tail (sl and cut the yarn)

Round 1 :

sc 20 in the chain (20)

Round 2 :

(sc, inc) x 10 (30)

Round 3 :

(2 sc, inc) x 10 (40)

Round 4 :

(3 sc, inc) x 10 (50)

Round 5 :

(4 sc, inc) x 10 (60)

Round 6-8 :

Sc around

Info :

Sl, cut the yarn

Info :

With yarn Needle attach colours yarn as the sprinkles.

β€” ATTACHMENT :

Info :

First attach the inner of donuts (base and frosting/topping) using the long tail of yarn with slip stich (20).

Info :

Then attach the outside (base and top side): slip stitch donut base with frosting (BLO frosting/top base) until 50 stitch, then fill the polyfill.

Info :

Then slip stitch all until done (60).

Assembly Instructions

  • Attach the inner of the donuts (base and frosting/topping) using the long tail of yarn with slip stich (20).
  • Attach the outside (base and top side) by slip stitching donut base with frosting (BLO frosting/top base) until 50 stitch, then fill the polyfill.
  • Continue slip stitching all until you reach 60 stitches and finish off securely.
  • With a yarn needle attach coloured yarn as the sprinkles, knotting and weaving in ends to secure.
  • Leave a long tail on the base piece for sewing before fastening off to help with assembly and positioning.

Important Notes

  • πŸ’‘Start with a long tail of about 15 cm to make joining and sewing easier and neater.
  • πŸ’‘Leave a long tail on the base for sewing; the frosting/top layer can be slipped and cut after finishing.
  • πŸ’‘Use Back Loop Only (BLO) when joining frosting to base to create a neat top ridge before stuffing.
  • πŸ’‘Stuff with polyester fiberfill before closing the final rounds to maintain a round, even donut shape.

This sweet donut pattern is perfect for quick makes, gifts, and colorful craft sessions. 🍩 Mix and match frosting and sprinkle colors to create an adorable set of treats for home or market stalls. 🧢 Have fun, experiment with tiny details, and enjoy making something delightful by hand. ✨

You ask,

we answer.

FAQs

What size will the finished piece be?

The finished donut measures approximately 8-10 cm in diameter using sport/fine 4-ply yarn and a 3 mm hook, though size may vary with yarn and tension.

Can I use different yarn weights for this pattern?

Yes, you can use different yarn weights, but this will affect the final size and texture; adjust your hook accordingly and expect a larger or smaller donut.

Do I need prior crochet experience for this pattern?

This pattern is beginner friendly, so basic knowledge of single crochet, increases, and slip stitch is sufficient to complete the project.

How long does this project typically take to complete?

Most crocheters complete this project in 2-3 hours, depending on experience level and how many details like sprinkles you add.