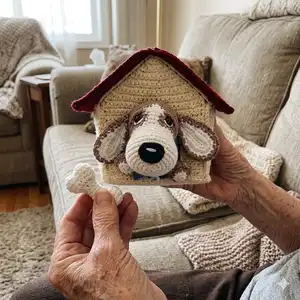
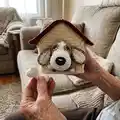
Make an adorable Dog PuPa amigurumi complete with a removable coat, dog bowl, treat and a cozy doghouse. This pattern walks you through each piece step-by-step so you can create a charming little dog with movable paws and hand-embroidered details. Perfect for gifting or displaying, the finished toy is full of personality and texture. Follow the clear photos and rounds to complete every part with confidence.
Progress Tracker
0% Complete
— Dog :
Tail :
With beige yarn Chain 8. Start from the second chain from the hook: 5sl st, 2sc Leave a long tail for sewing.
— Legs (make 4) :
Round 1 :
With white yarn. 6sc in MR
Round 2 :
Place row marker here. 6inc (12)
Round 3 :
Change color to beige. BLO (1sc, inc) *6 (18)
Round 4 :
(1sc, 4-dc Bobble st) *4, 10sc (18)
Round 5 :
(1sc, dec) *6 (12)
Info :
Stuff with fiberfill gradually.
Round 6 :
(2sc, dec) *3 (9)
Round 7 :
2sc, dec 5sc (8)
Round 8-11 :
sc (4 rounds)
Info :
Fasten off, cut the yarn, weave in the yarn ends.
— Body :
Round 1 :
With beige yarn. 6sc in MR
Round 2 :
Place row marker here. 6inc (12)
Round 3 :
(1sc, inc) *6 (18)
Round 4 :
(2sc, inc) *6 (24)
Round 5 :
(3sc, inc) *6 (30)
Round 6-8 :
30sc (3 rounds)
Round 9 :
6sc, (dec, 1sc) *6, 6sc (24)
Round 10 :
8sc, FLO 8sc, 8sc (24)
Round 11-12 :
24sc (2 rounds)
Round 13 :
8sc, 8sc with back loops of Rnd 10, 8sc (24)
Round 14 :
8sc, FLO 8sc, 8sc (24)
Round 16 :
8sc, 8sc with back loops of Rnd 14, 8sc (24)
Round 17 :
(3sc, inc) *6 (30)
Round 18-19 :
30sc (2 rounds)
Round 20 :
(3sc, dec) *6 (24)
Round 21 :
(2sc, dec) *6 (18)
Round 22 :
(1sc, dec) *6 (12)
Info :
Stuff the body with fiberfill.
Info :
Fasten off, cut the yarn, weave in the ends.
— Head :
Round 1 :
With white yarn. 6sc in MR
Round 2 :
Place row marker here. 6inc (12)
Round 3 :
3inc, 3sc, 3inc, 3sc (18)
Round 4 :
(1sc, inc) *2, 3sc, (inc, 1sc) *3, 4sc, inc (24)
Round 5 :
(2sc, inc) *2, 4sc, (inc, 2sc) *3, 4sc, inc (30)
Round 6 :
(3sc, inc) *2, 4sc, (inc, 3sc) *3, 5sc, inc (36)
Round 7 :
(4sc, inc) *2, 5sc, (inc, 4sc) *3, 5sc, inc (42)
Round 8-10 :
42sc (3 rounds)
Round 11 :
(4sc, dec) *2, 5sc, (dec, 4sc) *3, 5sc, dec (36)
Round 14 :
(3sc, dec) *2, 4sc, (dec, 3sc) *3, 5sc, dec (30)
Round 14-15 :
30sc (2 rounds)
Round 16 :
Add beige yarn. Attention! Crochet in jacquard technique from Rnd 16 to 21. White stitches are highlighted in red. (3sc, inc)*2, 4sc, inc, 2sc, inc, (3sc, inc)*2, 6sc (36)
Round 17 :
10sc, 4sc, 22sc (36)
Round 18 :
10sc, 4sc, 22sc (36)
Round 19 :
9sc, 6sc, 21sc (36)
Round 20 :
9sc, 6sc, 21sc (36)
Round 21 :
11sc, 2sc, 23sc (36)
Round 22 :
Cut the white yarn. Continue in beige: 36sc
Info :
Insert eyes between rounds 18-19 at a distance of 8-10 sc.
Round 23 :
(4sc, dec) *6 (30)
Round 24 :
(3sc, dec) *6 (24)
Round 25 :
(2sc, dec) *6 (18)
Round 26 :
(1sc, dec) *6 (12)
Info :
Stuff the head with fiberfill.
Info :
Fasten off, cut the yarn, weave in the ends.
— Ears (make 2) :
Info :
Crochet 2 pieces in beige and 2 pieces in white color. Work in rows.
Row 1 :
Ch13, start from the second chain on the hook: 11sc, 4dc in the last chain , on the other side of the chain: 11sc, turn (25)
Row 2 :
Ch1, 7sc, 4dc, 4dc-inc, 4dc, 7sc (30)
Info :
Cut the yarn on the white pieces. Continue crocheting with beige yarn. Put the white part on the top of beige and crochet with beige yarn through both pieces: (sl st, inc) *15 along other side. Leave a long tail for sewing.
— Nose :
Round 1 :
With black yarn. Ch5, Start in the second chain from the hook: inc, 2sc, 3sc in the last chain, 3sc (10)
Round 2 :
inc, 4sc, 2inc, 2sc, inc (14)
Round 3 :
14sc. Leave a long tail for sewing.
Info :
Sew the head to the body.
Info :
Fasten the paws to the body with a button mount.
Info :
Embroider whites of the eyes with a white thread. Sew the nose to the head. Embroider the highlights on the nose with a white thread. Embroider eyebrows with beige yarn. Make 3 large stitches and wind the thread around them (rococo stitch).
Info :
Sew the ears to the head. Sew the tail to the body.
— Coat :
Row 1 :
With blue yarn. Work in rows. Ch32, from the third chain on the hook: 30dc, turn (30)
Row 2 :
Ch2, 30dc, turn (30)
Row 3 :
Ch2, 4dc, ch8 (skip 8 dc, start from the next stitch), 6dc, ch8 (skip 8 dc, start from the next stitch), 4dc, turn (30)
Row 4 :
Ch2, 30dc, turn (30)
Row 5 :
Ch2, (BPdc, FPdc ) *15, turn (30)
Row 6 :
Ch2, (FPdc, BPdc )*15 (30)
Info :
Cut the yarn. Make a fastener on the coat (sew buttons on one side, make button loops on the other). Put on the coat on the dog.
— Dog bowl :
Round 1 :
With yellow yarn. 6sc in MR Place row marker here.
Round 3 :
(1sc, inc) *6 (12)
Round 4 :
(2sc, inc) *6 (24)
Round 6-8 :
24sc (3 rounds)
Round 9 :
Change color to burgundy. 24sl st. Fasten off, cut the yarn, weave in the ends.
— Dog Treat :
Round 1 :
With white yarn. Stuff with fiberfill gradually 6sc in MR Place row marker here.
Round 3 :
2inc, 3sc, 3inc, 3sc, inc (18)
Round 5 :
(1sc, dec) *6 (12)
Round 7-10 :
6sc (4 rounds)
Round 12 :
(1sc, inc) *6 (18)
Round 14 :
2dec, 3sc, 3dec, 3sc, dec (12)
Round 15 :
6dec. Fasten off, cut the yarn, weave in the ends.
Info :
Make tightening from each side (see photos for reference) and place treat into bowl as shown.
— Doghouse :
Infos :
Recommendations: Before starting work, read the description carefully. Depending on chosen yarn and crochet density, the size of the piece may differ. Cut the base of plastic to the size of the resulting pieces. All pieces are attached along the outer contour.
Info :
Pattern of the main pieces: back wall, roof, side wall, bottom, front wall (see diagram in photos for layout and orientation).
— Side Walls (make 2) :
Row 1 :
Crochet 4 pieces in yellow color. Work in rows. Chain 22. From the second chain on the hook: 21sc, turn (21)
Row 2-16 :
Ch1, 21sc, turn (15 rows).
Info :
Continue crocheting from one yellow piece. Cut a rectangle from plastic and put it between two pieces. Crochet with yellow yarn through both pieces: 19sc, inc in the corner, 15sc, inc in the corner, 19sc, inc in the corner, 15sc, inc in the corner. Fasten off, cut the yarn, weave in the ends.
— Bottom :
Row 1 :
Crochet 2 pieces in yellow color. Work in rows. Chain 25. From the second chain on the hook: 24sc, turn (24)
Row 2-22 :
Ch1, 24sc, turn (24 rows).
Info :
Continue crocheting from one yellow piece. Cut a rectangle from plastic and put it between two pieces. Crochet with yellow yarn through both pieces: 23sc, inc in the corner, 21sc, inc in the corner, 23sc, inc in the corner, 21sc, inc in the corner. Fasten off, cut the yarn, weave in the ends.
— Front Wall :
Row 1 :
Crochet 2 pieces in yellow color. Work in rows. Chain 2, start from the second chain on the hook: inc, turn (2)
Row 2 :
ch1, 2inc, turn (4)
Row 3 :
ch1, inc, 2sc, inc, turn (6)
Row 4 :
ch1, inc, 4sc, inc, turn (8)
Row 5 :
ch1, inc, 6sc, inc, turn (10)
Row 6 :
ch1, inc, 8sc, inc, turn (12)
Row 7 :
ch1, inc, 10sc, inc, turn (14)
Row 8 :
ch1, inc, 12sc, inc, turn (16)
Row 9 :
ch1, inc, 14sc, inc, turn (18)
Row 10 :
ch1, inc, 16sc, inc, turn (20)
Row 11 :
ch1, inc, 18sc, inc, turn (22)
Row 12 :
ch1, inc, 20sc, inc, turn (24)
Row 13 :
ch1, 24sc, turn (24)
Row 14 :
ch1, 8sc, turn (8)
Row 15 :
ch1, dec, 6sc, turn (7)
Row 16 :
ch1, 5sc, dec, turn (6)
Row 17 :
ch1, dec, 4sc, turn (5)
Row 18-29 :
Ch1, 5sc, turn (12 rows). Cut the yarn and fasten off.
Info :
Skip 8 stitches for the doorway. Attach the yarn and crochet doorway rows: ch1, 8sc, turn (8); ch1, 6sc, dec, turn (7); ch1, dec, 5sc, turn (6); ch1, 4sc, dec, turn (5). Then continue ch1, 5sc, turn (12 rows). Continue crocheting from one yellow piece. Cut a rectangle from the plastic and put it between two pieces.
— Back Wall :
Row 1 :
Crochet 2 pieces in yellow color. Work in rows. ch2, From the second chain on the hook: inc, turn (2)
Row 2 :
ch1, 2inc, turn (4)
Row 3 :
ch1, inc, 2sc, inc, turn (6)
Row 4 :
ch1, inc, 4sc, inc, turn (8)
Row 5 :
ch1, inc, 6sc, inc, turn (10)
Row 6 :
ch1, inc, 8sc, inc, turn (12)
Row 7 :
ch1, inc, 10sc, inc, turn (14)
Row 8 :
ch1, inc, 12sc, inc, turn (16)
Row 9 :
ch1, inc, 14sc, inc, turn (18)
Row 10 :
ch1, inc, 16sc, inc, turn (20)
Row 11 :
ch1, inc, 18sc, inc, turn (22)
Row 12 :
ch1, inc, 20sc, inc, turn (24)
Row 13-29 :
24sc (17 rows). Continue crocheting from one yellow piece.
Info :
Cut a rectangle from plastic and put it between two pieces. Crochet with yellow yarn through both pieces: 22sc, inc in the corner, 28sc, inc in the corner, 28sc, inc in the corner. Fasten off, cut the yarn, weave in the ends.
This Dog PuPa amigurumi pattern includes the full dog, coat, bowl, treat and a sturdy doghouse with detailed assembly steps. It combines jacquard colorwork, bobble stitches and practical construction techniques for a lovely finished toy. Perfect as a heartfelt handmade gift or a sweet shelf companion. 🧶🐶✨