🧢 Beautiful ✨ Detailed πŸ’ Adorable

Dip Edge Crochet Basket Pattern

Dip Edge Crochet Basket Pattern
4.8β˜… Rating
5-7 Hours Time Needed
2.4K Made This
βœ‚οΈ

Beginner Friendly Level

Perfect for those just starting their crochet journey, with clear instructions and simple techniques

⏱️

Weekend Treat

Takes 5-7 hours, making it an enjoyable project to finish over a couple of days.

🏑

Cozy Accent

A warm touch for your space that transforms ordinary corners into inviting nooks filled with handmade charm.

About This Dip Edge Crochet Basket Pattern

This pattern makes a roomy dip-edge crochet basket worked in the round using two strands of Bernat Blanket yarn held together. The design features a textured top edge and comfortable crocheted handles for easy carrying. It is ideal for storage and adds a handmade, modern accent to your home.
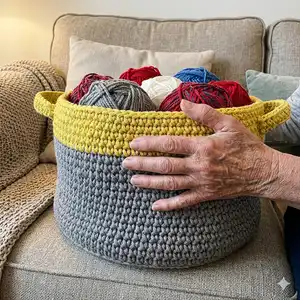
Dip Edge Crochet Basket Pattern crochet pattern - detailed view of completed project

Worked from the base up, the basket uses simple single crochet increases for a flat bottom and straight sides, then switches to a contrasting color for the dip edge. No advanced techniques are required, making this a satisfying weekend project.

Why You'll Love This Dip Edge Crochet Basket Pattern

I absolutely love this pattern because it turns bulky yarn into a sophisticated, functional home accessory with minimal effort. I enjoy how quickly the basket grows when working with two strands held together β€” it feels rewarding to see progress fast. The dip edge creates a beautiful color contrast that brightens any room, and the crocheted handles are both attractive and practical. This pattern is versatile, so I often customize colors to match my decor or make a set in coordinating hues.

Dip Edge Crochet Basket Pattern step 1 - construction progress Dip Edge Crochet Basket Pattern step 2 - assembly progress Dip Edge Crochet Basket Pattern step 3 - details and accessories Dip Edge Crochet Basket Pattern step 4 - final assembly and finishing

Switch Things Up

I love changing the color placement to create different looks; try swapping the dip edge color for a bright contrast or a neutral tone to match your decor.

You can easily change the size by working more or fewer increase rounds at the base; more increases will give you a wider basket and fewer will give you a smaller one.

Want a taller basket? Simply continue the side rounds until the piece reaches your desired height before adding the dip edge.

Using a bulkier or thinner yarn will change the texture and size; I often use a slightly smaller hook with the same yarn to make the fabric denser for heavy use.

I sometimes line the basket with fabric for added stability and a neater interior finish; choose a coordinating fabric and hand-stitch or machine-sew it in place.

Try adding decorative trims like pom-poms, tassels, or a crocheted belt around the dip edge for a personalized touch I really enjoy.

If you want sturdier handles, you can insert a strip of cardboard or lightweight plastic inside the crocheted handle before closing to keep it rigid.

I like to make sets in graduated sizes using the same color palette so the baskets stack nicely and look cohesive on a shelf.

Experiment with stitch variations on the side β€” for example, replace some sc rounds with hdc for a slightly different texture and drape.

For gift giving, embroider a small initial or applique a felt tag to the side to make each basket uniquely special.

Common Mistakes & How to Fix Them

βœ— Not holding two strands together evenly can create uneven tension and an inconsistency in stitch size; hold both strands together throughout and tension them evenly with your fingers. βœ— Forgetting to place a marker at the end of the rnd makes it hard to track rows and shaping; place a stitch marker at the end of each rnd as instructed to keep track of your rounds. βœ— Twisting the handle chain when joining will make the handle sit awkwardly; when joining the chain to form the handle ring, be careful not to twist the chain and check orientation before slip stitching. βœ— Skipping the instruction to work into back loops only will change the texture of the side edge; follow the back loop only and both loops instructions exactly to achieve the correct shape and texture. βœ— Failing to join Contrast B at the correct time can create a visible jog in color transition; join the two strands of B at the end of the marked rnd as written to keep the dip edge neat.
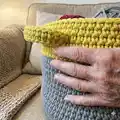
Dip Edge Crochet Basket Pattern

Create a stylish, sturdy storage basket with a textured dip edge using Bernat Blanket yarn. This pattern guides you step-by-step through crocheting the base, building the tall sides, and adding comfortable handles. Youll love the chunky, modern look that works beautifully in any room. Perfect for organizing yarn, toys, or cozy household items.

Beginner Friendly 5-7 Hours

Materials Needed for Dip Edge Crochet Basket Pattern

β€” Main Fabric

  • 01
    Bernat Blanket (10.5 oz/300 g; 220 yds/201 m)
  • 02
    Contrast A Dark Gray (10044) - 3 balls or 500 yds/455 m
  • 03
    Contrast B Moss (10803) - 1 ball or 140 yds/128 m

β€” Tools Required

  • 01
    Size U.S. M/13 (9 mm) crochet hook or size needed to obtain gauge
  • 02
    1 stitch marker

Progress Tracker

0% Complete

β€” Body :

Infos :

MEASUREMENTS: Approx 14" [35.5 cm] diameter x 9BD" [24.5 cm] high. GAUGE: 7 sc and 7 rows = 4" [10 cm] with 2 strands of yarn held tog. Note: Join all rnds with sl st to first sc.

Info :

With 2 strands of A held tog, ch 2.

Round 1 :

8 sc in 2nd ch from hook. Join.

Round 2 :

Ch 1. 2 sc in each sc around. Join. 16 sc.

Round 3 :

Ch 1. *2 sc in next sc. 1 sc in next sc. Rep from * around. Join. 24 sc.

Round 4 :

Ch 1. *2 sc in next sc. 1 sc in each of next 2 sc. Rep from * around. Join. 32 sc.

Round 5 :

Ch 1. *2 sc in next sc. 1 sc in each of next 3 sc. Rep from * around. Join. 40 sc.

Round 6 :

Ch 1. *2 sc in next sc. 1 sc in each of next 4 sc. Rep from * around. Join. 48 sc.

Round 7 :

Ch 1. *2 sc in next sc. 1 sc in each of next 5 sc. Rep from * around. Join. 56 sc.

Round 8 :

Ch 1. *2 sc in next sc. 1 sc in each of next 6 sc. Rep from * around. Join. 64 sc.

Round 9 :

Cont in this manner, inc 8 sc evenly around next 5 rnds (as established). 104 sc.

Round 10 :

Ch 1. Working into back loops only, 1 sc in each sc around. Join. Place marker at end of rnd.

Round 11 :

Ch 1. Working into both loops, 1 sc in each sc around. Join. Rep last rnd until work from marked rnd measures 8" [20.5 cm]. Join 2 strands of B at end of last rnd.

Round 12 :

With 2 strands of B held tog, rep last rnd twice more. Do not fasten off.

Round 13 (Handle openings) :

Ch 1. 1 sc in each of next 21 sc. Ch 1. Skip next sc. 1 sc in each of next 8 sc. Ch 1. Skip next sc. 1 sc in each of next 42 sc. Ch 1. Skip next sc. 1 sc in each sc to end of rnd. Join.

Round 14 :

Ch 1. 1 sc in each sc and ch-1 sp around. Join.

Round 15 :

Ch 1. 1 sc in each sc around. Join. Fasten off.

β€” Handles :

Handles (P1) :

With 2 strands of B held tog, ch 26. Thread chain through first ch-1 sp of Handle opening rnd and back out through second ch-1 sp of same rnd. Join with sl st to first ch to form ring, being careful not to twist.

Round 1 :

Ch 1. 1 sc in each ch around, rotating chain through Handle opening for ease of working. Join. Fasten off.

Info :

Rep for second Handle.

Assembly Instructions

  • Place a stitch marker at the end of the rnd after working into the back loops only to mark the start of the side measurement, and continue working until the marked rnd measures 8" [20.5 cm] before joining Contrast B.
  • Join 2 strands of Contrast B at the end of the marked rnd, then work 2 additional rnds with both strands of B held together before forming handle openings.
  • Work the Handle openings rnd exactly as written, skipping single crochets and creating ch-1 spaces in the specified positions to ensure correctly sized openings for the handles.
  • Form each handle by chaining 26 with 2 strands of B held together, threading the chain through the two adjacent ch-1 spaces of the opening, then join with a slip stitch to the first chain to form a ring and work single crochet around.
  • Rotate the chain through the handle opening while working 1 sc in each ch around to make the handle lie flat, then fasten off and repeat for the second handle.

Important Notes

  • πŸ’‘Use a stitch marker to mark the end of each rnd so you can easily count rows and track where to change color or create handle openings.
  • πŸ’‘Hold two strands of yarn together consistently throughout to maintain gauge and fabric density, ensuring the basket keeps its shape.
  • πŸ’‘When joining the handle chain into a ring, be careful not to twist the chain before slip stitching to avoid a twisted handle.
  • πŸ’‘Measure the height from the marked rnd to reach 8" [20.5 cm] as instructed to ensure the correct basket proportions before adding the dip edge and handles.

This Dip Edge Crochet Basket is a quick and satisfying project that makes a beautiful addition to any room. Its chunky texture and contrasting dip edge bring both function and style to your home decor. Make one for yourself or gift it to someone special β€” handmade organization never looked this good. 🧢🏑

You ask,

we answer.

FAQs

What size will the finished piece be?

The finished basket measures approximately 14" (35.5 cm) in diameter and 9BD" (24.5 cm) high when using the recommended yarn and hook size.

Can I use a different yarn weight?

Yes, but changing yarn weight will affect the final size and structure; if using a different weight, adjust your hook to obtain the gauge of 7 sc and 7 rows = 4" (10 cm) with two strands held together.

Do I need advanced crochet skills to make this basket?

No, this pattern is beginner friendly and uses basic single crochet, increases, and simple join techniques, though working with two strands held together requires consistent tension.

How long does this project typically take?

Most crocheters complete this basket in 5-7 hours, though time may vary based on experience and crochet speed.