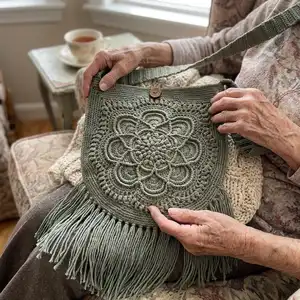
Make a stylish Delilah Boho Bag with this detailed crochet pattern designed for makers who love texture and a relaxed boho vibe. You will create two beautiful crocheted panels, join them, add a sturdy strap, liner and fringe for a finished bag. The pattern includes step-by-step instructions, special stitch tutorials and sewing guidance to help you finish a professional-looking bag.
Progress Tracker
0% Complete
— Front Panel :
Round 1 :
Magic ring. Ch1, 16sc into ring, slst in sc (16 sc)
Round 2 :
Ch1, *sc, ch2, skip 1 sc* x 8, slst in sc, slst in ch2 sp (8 sc, 8 ch2 sps)
Round 3 :
See Special Stitches for PC stitch. (PC, ch2) in each ch2 sp, slst in PC, slst in ch2 sp (8 PC, 8 ch2 sps)
Round 4 :
(PC, ch3, PC) in each ch2 sp, slst in PC, slst in ch2 sp (16 PC, 8 ch2 sps)
Round 5 :
*(PC, ch5, PC) in ch3 sp, dc between next 2 PC* x 8, slst in PC, slst in ch5 sp (16 PC, 8 dc, 8 ch5 sps)
Round 6 :
*9dc in ch5 sp, FPtr around dc* x 8, slst in dc (72 dc, 8 FPtr)
Round 7 :
Ch1, *BPsc x 9, (FPtr, ch3, FPtr) around FPtr* x 8, slst in BPsc (Stitch counts are per side for rounds 7-17: 9 BLsc, 2 FPtr, 1 ch3 sp)
Round 8 :
Ch1, *sc x 9, FPdc around FPtr, 5dc in ch3 sp, FPdc around FPtr* x 8, slst in sc, slst in next sc (9 sc, 2 FPdc, 5 dc)
Round 9 :
Ch1, *sc x 7, skip 1 sc, FPdc, 2BLdc x 5, FPdc, skip 1 sc* x 8, slst in sc, slst in next sc (7 sc, 2 FPdc, 10 BLdc)
Round 10 :
Ch1, *sc x 5, skip 1 sc, FPdc, [2dc, dc] x 5, FPdc, skip 1 sc* x 8, slst in sc, slst in next sc (5 sc, 2 FPdc, 15 dc)
Round 11 :
Ch1, *sc x 3, skip 1 sc, FPdc, [dc x 2, 2dc] x 5, FPdc, skip 1 sc* x 8, slst in sc, slst in next sc (3 sc, 2 FPdc, 20 dc)
Round 12 :
Ch1, *sc, skip 1 sc, FPdc, BPsc x 20, FPdc, skip 1 sc* x 8, slst in sc, slst in FPdc, slst in BPsc (1 sc, 2 FPdc, 20 BPsc)
Round 13 :
*dc x 20, FPdc2tog using next 2 FPdc (skipping sc)* x 8, slst in dc, slst in next 3 dc (20 dc, 1 FPdc2tog)
Round 14 :
Replace the first BPdc of the round with (BPsc, ch2). Ch1, *[BPdc, ch1] x 14, BPdc6tog using next 6 dc (skipping dc2tog), ch1* x 8, slst in top ch2, slst in ch1 space (14 BPdc, 1 BPdc6tog, 15 ch1 sps)
Round 15 :
Mark the 3rd sc in each set. Ch1, *sc in ch1 sp, 2sc in next 11 ch1 sps, sc in ch1 sp, skip BPdc, skip ch1 sp, skip BPdc6tog, skip ch1 sp, skip BPdc* x 8, slst in sc, slst in next (24 sc)
Round 16 :
*[dc, ch2, skip 1 sc] x 9, dc2tog using next sc and next marked stitch, ch2* x 8, replace last ch2 with dc in first dc (9 dc, 10 ch2 sps, 1 dc2tog)
Round 17 :
First PC goes into the sp created by the joining dc. Note that there is no chain space between the 2 PC either side of the dc2tog. *[PC in ch2 sp, ch3] x 9, PC in ch2 sp, skip dc2tog* x 8, slst in PC. Fasten off. (10 PC, 9 ch3 spaces)
Round 18 :
Attach yarn to the 5th space of any 'petal'. There is no ch3 space between the 2 PC either side of the dc2tog. Skip all PC. I have broken this round down into steps to make it easier to understand. 3dc in next 6 ch3 sps (photo 18a), *3hdc in next ch3 sp, 3sc in next 5 ch3 sps, 3hdc in next ch3 sp, 3dc in next 2 ch3 sps* x 5 (photo 18b), 3dc in next 3 ch3 sps, (3dc, ch2, 3dc) in next ch3 space (photo 18c), 3dc in next 5 ch3 sps, 3hdc in next ch3 sp, 3sc in next 5 ch3 sps (photo 18d), 3hdc in next ch3 sp, 3dc in next 5 ch3 sps, 3dc in first ch3 sp, ch1, sc in first dc (counts as ch2 sp) (photo 18e).
Round 19 :
3dc into space created by joining sc, dc x 18, hdc x 3, *sc x 15, hdc x 3, dc x 6, hdc x 3* x 4, sc x 15, hdc x 3, dc x 18, (3dc, ch2, 3dc) in ch2 space, dc x 15, hdc x 6, sc x 15, hdc x 6, dc x 15, 3dc in first space, ch1, sc in first dc. (102 dc, 42 hdc, 90 sc, 2 ch2 sps)
Round 20 :
3dc into space created by joining sc, dc x 21, hdc x 3, sc x 15, hdc x 3, dc x 87, hdc x 3, sc x 15, hdc x 3, dc x 21, (3dc, ch2, 3dc) in ch2 space, dc x 18, hdc x 3, sc x 21, hdc x 3, dc x 18, 3dc into first space, ch1, sc in first dc. (177 dc, 18 hdc, 51 sc, 2 sps)
Round 21 :
3dc in sp created by joining sc (mark first dc), dc x 177, 5dc in ch2 sp (mark 3rd dc), dc x 69, 2dc in first sp, slst in dc. Fasten off. (256 dc)
Info :
Repeat the pattern for the second panel then block both panels to the same size.
— Blocking :
Info :
Blocking will give a neat, flat, even look to your project while making it easier to keep the correct shape. You can either dip your project in cold water, or spray it with clean water. Squeeze it gently to remove any excess water, but do not wring or twist it. Pin your project out to the desired shape and size on blocking boards or foam mats. Allow it to dry completely before unpinning. I blocked my panels to 32cm x 32cm (12.6in x 12.6in). The size you block your panels to doesn't have to be the same as mine, just make sure both panels are blocked to the same size.
— Joining the panels together :
Info :
With the wrong sides of the panels facing each other, and the corners aligned, attach the yarn to the left-hand marked stitches of both panels. Ch1, sc in corresponding stitches of both panels of the bag all the way around the curved edge, stopping at the right-hand corner marked stitch. 183 sc. Do not fasten off, continue on to top edge.
— Top Edge :
Round 1 :
Mark the first st of each round. Ch1, sc x 73 starting with the next dc, sc in the first sc of the joining row, sc x 37, ch20 (button loop), sc x 36, sc in the last sc of the joining row (148 sc, 1 ch20)
Round 2 :
Sc x 148 (moving the button loop to the outside of the bag) (148 sc)
Round 3 :
Sc x 143 (finishing with 5 stitches left). Do not fasten off, continue on to the strap. (143 sc)
— Strap :
Row 1 :
Ch2 at the start of the row does not count as a stitch. Ch2, dc in same stitch as last sc, dc x 11, turn (12 dc)
Row 2-61 :
Ch2, dc in first dc, dc x 11, skip ch2, turn. Approximately 60cm (24in) long. (12 dc)
Info :
With no twists in the strap, place the right side of the strap against the right side of the bag. Ch1, slst the strap to the bag with 6 slst either side of the seam. Fasten off and weave in the ends.
— Fringe :
Info :
Cut 135 strands of yarn at 30cm (12in) each. (27 tassels with 5 strands in each = 135 strands). Attach the first tassel to the 53rd sc of the joining row by following these instructions: Fold 5 strands in half. Place a hook through the indicated stitch from the back to the front. Place the folded end of the strands over the hook and pull them through the stitch. Yarn over with the strands. Pull through the stitch and tighten the strands as necessary. Repeat for the remaining strands in every 3rd stitch around the bottom curve of the bag. There should be 27 tassels. Iron the fringe and trim the ends with sharp scissors as needed.
— Lining :
Infos :
Basic sewing knowledge and skills assumed. Supplies: crochet bag, paper bigger than the bag, pencil, ruler, scissors, pins, lining fabric, thread to match the bag, sewing machine. Choose a fabric you are happy with if the wrong side shows through the crochet. The width of the fabric needs to be twice the width of your bag, plus 10cm. The length of the fabric needs to be the height of your bag, plus 5cm. Pattern: 1) Fold the strap to the back of the bag, place bag in centre of paper and press flat. Mark top edge where strap joins bag and draw around curve. 2) Remove bag and draw a straight line joining marks. 3) Add 2cm above the red line and 1cm around the curved edge. 4) Fold the pattern in half sideways and cut through both layers along the green line to get the largest pattern. 5) Pin the pattern onto your fabric with the selvedge parallel to the grainline. Cut two pieces if needed. 6) With right sides together, sew around the curved edge with 1cm (0.4in) seam allowance. Top stitch the seam. 7) Fold the top edge over to the wrong side by 1cm then again by another 1cm and pin. Sew close to the first fold. 8) Fold the button loop down and secure out of the way. 9) Place the lining inside the bag with the right side facing inwards, side seams aligned. Pin the lining to the bag just below the top edge adjusting crochet as necessary to get a neat fit. Sew close to the fold of the lining being careful not to sew the button loop or straps. Fasten off and weave in ends.
— Special Stitches :
Info :
Chainless Starting Double Crochet (CSdc) - CSdc counts as a double crochet. CSdc replaces the traditional ch3 at the start of a round and produces a consistent look to all double crochet stitches as well as disguising the start of the round better. This stitch is used at the start of every round when the round starts with a double crochet. This includes the first double crochet of every popcorn stitch at the start of the round. If you find it difficult to master then I recommend you start the round with ch2 then crochet a regular double crochet into the stitch. At the end of the round, skip the ch2 and stitch into the double crochet to join the round. Steps: 1. Lengthen the active loop to the height of a double crochet. 2. Place your finger on top of the loop to hold it in place. 3. Wrap the hook counter clockwise around the lengthened loop. (The hook will come towards you then continue around the back of the active loop.) 4. Hook into the stitch. 5. Yarn over, pull through the stitch. 6. Yarn over, pull through 3 loops on the hook. 7. Yarn over, pull through 2 loops on the hook. 8. The CSdc is complete. Mark the CSdc stitch loops to make it easier to find at the end of the round. Popcorn (PC) - 4 double crochet in the same stitch, drop the loop from the hook, insert hook into the first double crochet, grab the dropped loop and pull it through the stitch on the hook, ch1 to close. Ch1 is not counted as a stitch. Use a CSdc for the first double crochet of all PC at the start of a round.
This Delilah Boho Bag pattern brings a touch of bohemian charm to your crochet projects and makes a thoughtful handmade gift. The textured mandala panels, crisp cotton stitch definition and fringe create a striking, versatile accessory you can dress up or down. Enjoy the process of stitching, blocking and sewing it together — the finished bag is worth every step. 🧶✨