🧢 Beautiful ✨ Detailed πŸ’ Adorable

Crochet Market Bag Pattern

Crochet Market Bag Pattern
4.3β˜… Rating
5-7 Hours Time Needed
1.5K Made This
βœ‚οΈ

Intermediate Level

Ideal for those with basic crochet experience, featuring slightly more advanced stitches and techniques to expand your skills.

⏱️

Weekend Treat

Takes 5-7 hours, making it an enjoyable project to finish over a couple of days.

✨

Stylish Touch

An elegant detail to elevate any look, combining traditional techniques with contemporary design sensibilities.

About This Crochet Market Bag Pattern

This clear, photo-supported pattern teaches you how to crochet a large, sturdy market bag from cotton cord. The design features a round base that grows into a flexible net body, ideal for groceries and bulky items. You can make it in a single color or switch colors partway through for a two-tone look. Handles are constructed directly on the bag and can be adjusted for length or width.
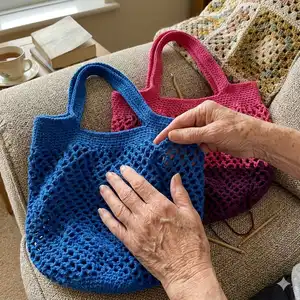
Crochet Market Bag Pattern crochet pattern - detailed view of completed project

The pattern includes full row-by-row instructions from the round base through to the finished handles. Helpful tips on stitch placement, markers, and finishing are included to ensure a polished result.

Why You'll Love This Crochet Market Bag Pattern

I absolutely love this pattern because it turns simple materials into a highly functional everyday item that looks great. I enjoyed designing the round base to grow evenly into a stretchy net that holds heavier items without losing shape. The pattern is versatile β€” you can change colors or yarn types to create many different looks from the same instructions. I also appreciate that the handles are built into the top edge, which keeps sewing to a minimum and creates a clean, durable finish.

Crochet Market Bag Pattern step 1 - construction progress Crochet Market Bag Pattern step 2 - assembly progress Crochet Market Bag Pattern step 3 - details and accessories Crochet Market Bag Pattern step 4 - final assembly and finishing

Switch Things Up

I love how easy it is to customize this market bag by changing yarn and color β€” try bright color blocks for a bold statement or soft neutrals for everyday use.

You can make the bag bigger or smaller simply by changing the yarn weight and hook size; bulky cord and a larger hook gives a chunkier bag, while sport or DK yarn will make a lighter, smaller version.

I often add a fabric lining for extra structure and to prevent very small items from slipping through the mesh; cut a circular base and a tall rectangular panel to sew in place.

Try making the handles shorter to convert the bag into a handheld tote, or longer for a shoulder bag; adjust the 65-chain counts in Row 47 to get the length you like.

For extra durability, crochet a second row or two of single crochet around handle bases so they sit more securely and are more comfortable on the shoulder.

I sometimes add a button loop or a small crocheted flap at the top edge for a simple closure to keep contents secure during transport.

Want a more breathable net? Increase the chain spaces in rows 8–10 to make larger holes, or reduce them for a denser mesh β€” the pattern adapts easily.

I like to embellish with a tassel or a small crocheted tag for gifting β€” embroidering initials on a small fabric tag also makes a lovely personal touch.

If you want a reversible look, consider making two panels and crocheting them together so each side shows a different color or texture; just be mindful of how the mesh aligns.

For a polished retail-ready finish, weave ends neatly and block the bag slightly to shape the top band and handles before use.

Common Mistakes & How to Fix Them

βœ— Working without stitch markers makes it hard to track the beginning of rows and increases; place a marker at the first chain of each row to stay on track. βœ— Counting stitches only at the end of several rounds may let mistakes accumulate; count stitches after each increase round to correct errors early. βœ— Failing to leave consistent chain spaces when forming the mesh will distort the net; maintain even tension and count chain spaces as you work each row. βœ— Not testing gauge or yarn thickness can change the finished size significantly; use the recommended cotton cord and 4 mm hook or adjust yarn amount and hook size accordingly.
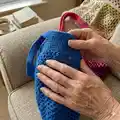
Crochet Market Bag Pattern

Make a sturdy, reusable crochet market bag using cotton cord and a 4 mm hook. This pattern guides you step-by-step through creating a round base, a stretchy net body, and comfortable handles. The bag stretches to hold larger loads yet folds flat for easy storage β€” perfect for everyday shopping or gifting. Suitable for crocheters who want a practical, eco-friendly project.

Intermediate 5-7 Hours

Materials Needed for Crochet Market Bag Pattern

β€” Main Fabric

  • 01
    Cotton crochet cord suitable for a 4 mm crochet hook, approximately 400 grams total (two rolls of about 200 g each used in the tutorial)
  • 02
    Optional: lighter cotton yarn if you prefer a less sturdy, more flexible bag (adjust yarn usage accordingly)
  • 03
    Use contrasting colors if you want a color-change effect as shown in the sample photos

β€” Tools Required

  • 01
    Crochet hook size 4 mm
  • 02
    Stitch marker (optional but useful)
  • 03
    Scissors
  • 04
    Yarn/tapestry needle for weaving in ends
  • 05
    Measuring tape or ruler

Progress Tracker

0% Complete

β€” Materials :

Info :

Yarn: cotton crochet cord that can be used with a 4 mm crochet hook. While you can basically use any kind of cotton yarn, cotton cord makes the bag sturdier (although a little heavier too). For the bags presented in this tutorial, two rolls or recycled cotton cord were used (each roll weights approximately 200 grams). Yarn Usage: Approximately 400 grams of cotton cord, although you should have a little leftover. Crochet hook: 4 mm. Stitch marker: not absolutely necessary but useful to help keep track of the rows.

β€” Abbreviations :

Infos :

Ch: Chain. Sst: Slip stitch. Sc: Single crochet. Dc: Double crochet.

β€” Instructions :

Row 1 :

On a magic ring Ch 2 (counts as a double crochet) and then add 11 Dc into the ring (12 stitches in total). Pull the thread to close the ring and join with a Sst.

Row 2 :

Ch 2 (counts as a double crochet) and then add 1 Dc in the same stitch from Row 1. Add two Dc over each of the stitches from Row 1 (24 stitches in total). Join with a Sst.

Row 3 :

Ch 2 (counts as a double crochet), then add two Dc over the next stitch from previous row. Alternated *one Dc in the next stitch, two Dc in the following stitch*. Repeat between * until the end of the row. Join with a Sst (36 stitches in total).

Row 4 :

Ch 2 (counts as a double crochet), one Dc in the next stitch from previous row, two Dc in the following one. *One Dc, one Dc, two Dc in the following stitch*. Repeat between * until the end of the row. Join with a Sst (48 stitches in total).

Row 5 :

Ch 2 (counts as a double crochet), one Dc in each of the next two stitches from previous row, two Dc in the next one. *One Dc, one Dc, one Dc, two Dc in the following stitch*. Repeat between * until the end of the row. Join with a Sst (60 stitches in total).

Row 6 :

Ch 2, *Sc in the next stich from the previous row, Ch 1*. Repeat between * until the end of the row (you will have the same sixty stitches from the previous row, now with a chain space between each of them).

Info :

From this point onwards it's useful to use a crochet marker at the first chain of each row so that you can keep track of the increases. Also, there's no need to slip stitch at the end of each row, you can work in spiral and start the next row chains right after the last stitch from the previous row.

Row 7 :

*Ch 2, Sc over the next chain from the previous row*. Repeat between * until the end of the row. Please note that each Sc goes over the chain space from previous row, not the stitches from previous row.

Info :

The wavy effect is totally normal and will stabilize once the increments are over and enough rows are added to form the body of the bag.

Row 8 :

*Ch 3, Sc over the next chain from the previous row*. Repeat between * until the end of the row.

Row 9 :

*Ch 4, Sc over the next chain from the previous row*. Repeat between * until the end of the row.

Info :

If you're using stitch markers, place one now at the end of this row and leave it there. Since the next rows are a repetition of row 9, it is much easier to keep track of the number of rows you've finished if you know where row 9 ends and row 10 begins. If you're not using stitch markers, you can for example tie a contrasting piece of yarn in place.

Rows 10 to 40 :

repeat row 9. This is how your stitches will look like as you work:

Row 41 :

Ch 2. *One Sc over the Sc from previous row, one Sc over the chain from previous row, one Sc over the next Sc from previous row, skip the next chain*. Repeat the pattern between * until the end of the row. Sst over the initial chain to finish the row (90 stitches in total). Basically you'll be adding one Sc over each Sc from row 40 and one Sc on alternated chains from row 40.

Row 42 :

Ch 2. Add one Sc over each of the stitches from previous row. Sst to join at the end of the row (always 90 stitches).

Rows 43 – 46 :

Repeat row 42. This is what the bag will look like at this point:

Info :

After row 46, you will start to create the bag handles.

Row 47 :

Ch 2. Add one Sc over each of the next 12 stitches from previous row. Ch 65, skip 20 stitches and then add one Sc over each of the next 25 stitches from previous row. Ch 65, skip 22 stitches, and add one Sc over the next 13 stitches from previous row, to complete the row. Sst over the initial chain to join.

Info :

Note: as per the instructions above, the handles will have an approximate total length of 47 cm/18.5 inches. If you want your bag handles longer or shorter, increase or decrease the 65 chains in row 47 (make sure the number of chains is the same on both handles). Everything else remains the same.

Row 48 :

Ch 2 and add one Sc over each stitch from previous row, including the chains. Sst to join at the end.

Rows 49-51 :

Repeat row 48.

Info :

Note: as per the instructions above, the handles will have an approximate total width of 2.5 cm/1 inch. If you want your bag handles wider or narrower, increase or decrease the number of rows after row 48. Everything else remains the same. Cut the yarn, weave in ends, and your new crochet market bag is ready to be used.

Assembly Instructions

  • Join the round base as instructed in Row 1 and work the increase rounds evenly; use a stitch marker at the start chain to keep track of the beginning of each round.
  • Work the mesh body from Row 6 onward, following the chain-space and sc placements exactly so the net forms consistently across the bag.
  • After finishing Rows 43–46, create the handles according to Row 47 by chaining the specified 65 chains for each handle gap and working sc across the handle chains as instructed.
  • Secure all joins with a slip stitch, cut the yarn, and weave in ends neatly with a yarn needle to finish the bag.
  • If changing colors, fasten off and join the new color at the start of a row to create clean color transitions as shown in the sample photos.

Important Notes

  • πŸ’‘Use a stitch marker at the first chain of each row to keep track of the start and increases; this makes counting rows much easier.
  • πŸ’‘Working in a spiral is allowed for this pattern; you do not need to slip stitch at the end of each row if you prefer spiral construction.
  • πŸ’‘The wavy effect during increases is normal and will settle as you progress; do not alter increases unless you want a different bag shape.
  • πŸ’‘Adjust the number of chains in Row 47 to lengthen or shorten the handles, and adjust the number of rows after Row 48 to widen or narrow the handles.

This crochet market bag pattern turns simple cotton cord into a durable, foldable tote you will reach for again and again. It stretches to carry heavier loads yet folds flat for storage β€” the perfect eco-friendly swap for disposable bags. Make it in bold solid colors or two-tone stripes to suit your style. πŸ§ΆπŸ›οΈ

You ask,

we answer.

FAQs

What size will the finished piece be?

When made with the recommended cotton cord and 4 mm hook, the bag has an approximate top diameter of 30 cm/12 inches and a height of about 50 cm/19.5 inches (70 cm/28 inches including handles).

Can I use different yarn weights for this pattern?

Yes, you can use another yarn weight but finished size and drape will change; if you choose a lighter yarn, reduce chain counts or add more rows to reach the desired dimensions.

Do I need prior crochet experience for this pattern?

This pattern is rated intermediate; basic knowledge of chains, single crochet, double crochet, and working in rounds is recommended for best results.

How long does this project typically take to complete?

Most crocheters finish this project in 5-7 hours, depending on yarn weight, experience, and how quickly you work through the net portion.

How can I adjust handle length or width?

Increase or decrease the 65 chains in Row 47 to change handle length, and add or remove rows after Row 48 to adjust handle width; keep counts consistent for symmetry.