🧢 Beautiful ✨ Detailed πŸ’ Adorable

Crochet Landscape Rings Pattern

Crochet Landscape Rings Pattern
4.0β˜… Rating
1-2 Hours Time Needed
1.4K Made This
βœ‚οΈ

Beginner Friendly Level

Perfect for those just starting their crochet journey, with clear instructions and simple techniques

⏱️

Quick Make

Complete in under 2 hoursβ€”lightning fast fun for instant gratification and quick gifts.

✨

Stylish Touch

An elegant detail to elevate any look, combining traditional techniques with contemporary design sensibilities.

About This Crochet Landscape Rings Pattern

This pattern creates delicate Crochet Landscape Rings using Scheepjes Sugar Rush yarn and basic double crochet rounds. You will make a small tubular ring about 20mm in diameter using three color bands and finish with simple embroidered details. The technique is straightforward and great for testing color palettes and tiny surface embroidery.

Crochet Landscape Rings Pattern crochet pattern - detailed view of completed project

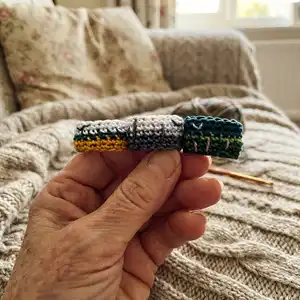
Perfect for gifting or wearing alone or stacked, these rings are quick to crochet and require minimal materials. The pattern includes instructions for beach, city, and woodland colour suggestions and small embroidery ideas.

Why You'll Love This Crochet Landscape Rings Pattern

I absolutely love this pattern because it takes just a few simple stitches and turns them into a charming, wearable miniature landscape. I enjoy how quick the rings are to make, letting me try different colour combinations in one sitting. The embroidery step lets me add personality and tiny details that make each ring unique and personal. I find these are perfect last-minute gifts or a lovely way to use up small yarn scraps. Making them is relaxing and immediately rewarding.

Crochet Landscape Rings Pattern step 1 - construction progress Crochet Landscape Rings Pattern step 2 - assembly progress Crochet Landscape Rings Pattern step 3 - details and accessories Crochet Landscape Rings Pattern step 4 - final assembly and finishing

Switch Things Up

I love changing the colour palette to match seasons; try soft pastels for spring or deep jewel tones for a rich winter look.

I often make the rings larger or smaller by adjusting the starting chain length β€” increasing chains for a bigger ring and decreasing for a smaller fit.

Using a sport or fingering weight yarn with a slightly larger hook creates a squishier, chunkier ring while preserving the landscape bands.

I like to experiment with metallic or variegated yarns for the top band to add subtle shimmer or movement to the design.

Try embroidering different motifs: tiny houses, waves, or stars instead of birds to change the theme of the ring.

I sometimes add a tiny bead or sequin on the top band before embroidery for a little sparkle and texture.

For a more rustic look, use thicker embroidery thread and longer trunk stitches to mimic bark or fence lines across the band.

Make matching sets in different palettes and stack them on one finger to create a layered landscape effect that tells a story.

Turn a ring into a pendant by leaving a longer yarn tail and attaching a jump ring through the tube, then add a chain for a mini landscape necklace.

I also like to mix techniques: combine simple surface slip stitches with the embroidered details to outline buildings or create horizon lines for extra definition.

Common Mistakes & How to Fix Them

βœ— Twisting the foundation chain can prevent joining into a proper ring and distort the shape; ensure the chain lays flat before joining and double-check for twists before slip-stitching the first round. βœ— Not counting your starting chain accurately will change the finished diameter; count 20 chains for the recommended 20mm diameter and increase or decrease evenly if you need a different size. βœ— Pulling your tension too tight when working double crochet rounds can make the ring too stiff to wear comfortably; use a relaxed, consistent tension and adjust hook size if needed. βœ— Skipping the colour change notes can create messy joins between bands; switch colours at the end of the indicated round and carry or fasten off tidy tails to weave in later. βœ— Failing to weave in ends before embroidery can lead to loose threads under stitches; weave in and secure yarn tails before adding embroidered details to keep the surface neat.

Crochet Landscape Rings Pattern

Make tiny, wearable landscape rings with simple crochet stitches and colorful yarn. This pattern walks you through an easy six-row construction with simple color changes and embroidery details so you can create rings inspired by beach, city, or woodland scenes. You will enjoy a quick, portable project that makes a perfect handmade gift or accessory.

Beginner Friendly 1-2 Hours

Materials Needed for Crochet Landscape Rings Pattern

β€” Main Fabric

  • 01
    Scheepjes Sugar Rush yarn (main yarn used for rings)
  • 02
    Beach palette: Saffron, Dark Teal, Snow White (use in that order)
  • 03
    City palette: Charcoal, Mercury, Snow White (use in that order)
  • 04
    Woodland palette: Spruce, Sage Green, Teal (use in that order)
  • 05
    Small amounts of Charcoal, Snow White, and Moon Rock for embroidery details

β€” Tools Required

  • 01
    1.5 mm crochet hook
  • 02
    Yarn needle

Progress Tracker

0% Complete

β€” Starting from the bottom :

Info :

Make sure you have the three colours selected for your landscape banding and a 1.5 mm hook ready.

Round 1 :

Make a slip knot in first colour. Ch 20 (20ch makes a ring about 20mm in diameter – increase or decrease as required) & join with a slip stitch

Info :

*Make sure the chain isn't twisted

Round 2 :

ch 1 (does not count as a stitch), 1 dc in each st & join with a sl st

Round 3 :

ch 1 (does not count as a stitch), 1 dc in each st & join with a sl st

Info :

*Change to middle colour

Round 4 :

ch 1 (does not count as a stitch), 1 dc in each st & join with a sl st

Info :

*Change to top colour

Round 5 :

ch 1 (does not count as a stitch), 1 dc in each st & join with a sl st

Round 6 :

ch 1 (does not count as a stitch), 1 dc in each st, join with a sl st & fasten off

Info :

Weave in your ends

Info :

Embroider small v shapes for birds in charcoal or snow white and lines for tree trunks or buildings in moon rock and charcoal.

Assembly Instructions

  • Fasten off at the end of Round 6 and weave in ends securely using a yarn needle, hiding tails inside the ring tube.
  • Position your embroidered motifs on the top colour band before securing threads fully so you can adjust placement easily for symmetry.
  • Use small running stitches or 'v' shaped stitches for bird details and straight stitches for tree trunks or building lines, using moon rock and charcoal threads as specified.
  • If stacking rings, ensure embroidery and tails are tucked in so adjacent rings sit flush without snagging each other.
  • Trim any remaining yarn ends close to the fabric after weaving to avoid bulk and create a neat finish on the inside of the ring.

Important Notes

  • πŸ’‘Work with consistent tension throughout the rounds to ensure an even tube that fits comfortably around a finger.
  • πŸ’‘Check the foundation chain for twists before joining into a ring to avoid a twisted final piece.
  • πŸ’‘Weave in and secure yarn ends before adding embroidery to prevent loose threads under surface stitches.
  • πŸ’‘Try the ring on as you go if you need a slightly larger or smaller diameter; adjust the starting chain length accordingly.

Create tiny wearable landscapes that capture beach, city, or woodland vibes in miniature form. These rings are quick to make and endlessly customizable with colour and stitch choices. Share them as sweet handmade gifts or stack them for a bold, personal statement. 🧢✨

You ask,

we answer.

FAQs

What size will the finished piece be?

The finished ring measures approximately 20 mm in diameter when using the recommended 20-chain foundation and a 1.5 mm hook; adjust the chain to change the size.

Can I use different yarn weights for this pattern?

You can substitute yarn, but different weights will change the finished size and drape; choose an appropriate hook for your selected yarn and make a gauge test ring.

Do I need prior crochet experience for this pattern?

This pattern is beginner friendly and uses basic stitches (chain and double crochet), so basic crochet knowledge is sufficient to complete it.

How long does this project typically take to complete?

Most crocheters finish one ring in under 2 hours, depending on embroidery detail and experience.