🧶 Beautiful ✨ Detailed 💝 Adorable

Christmas Minion Amigurumi Pattern

Christmas Minion Amigurumi Pattern
4.3★ Rating
5-7 Hours Time Needed
2.3K Made This
✂️

Intermediate Level

Ideal for those with basic crochet experience, featuring slightly more advanced stitches and techniques to expand your skills.

⏱️

Weekend Treat

Takes 5-7 hours, making it an enjoyable project to finish over a couple of days.

🧸

Cute Companion

An adorable friend to cherish, handcrafted with love to bring comfort and joy for years to come.

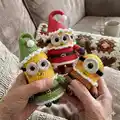
About This Christmas Minion Amigurumi Pattern

This pattern teaches you how to crochet three charming Christmas minions with hats, glasses and tiny details. Youll work in the round, changing colors to create festive outfits and simple facial features. The design emphasizes small-scale shaping and easy assembly for consistent, cute results.

Christmas Minion Amigurumi Pattern crochet pattern - detailed view of completed project

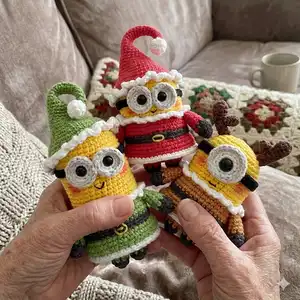
Clear round-by-round instructions make following the pattern straightforward. Perfect for making a trio of holiday gifts or ornaments.

Why You'll Love This Christmas Minion Amigurumi Pattern

I absolutely love this pattern because it captures holiday spirit in a tiny, squeezable form that brightens any shelf or tree. I enjoy the colorwork and how simple changes create three distinct characters with personality. The design balances quick rounds with small detailing, so I can finish a complete minion in a few hours. Sharing these as gifts always gets a delighted reaction, and I love that theyre small enough to make several in a weekend.

Christmas Minion Amigurumi Pattern step 1 - construction progress Christmas Minion Amigurumi Pattern step 2 - assembly progress Christmas Minion Amigurumi Pattern step 3 - details and accessories Christmas Minion Amigurumi Pattern step 4 - final assembly and finishing

Switch Things Up

I love to customize these minions by changing hat and shirt colors to match different holiday themes or team colors.

I often swap sport yarn for a slightly thicker yarn and a bigger hook to create a chunkier, more plush minion.

I sometimes add embroidery details like a tiny mouth or blush using pink thread to change facial expressions and personality.

I recommend swapping the safety eyes for embroidered eyes if youre making these for babies or want a completely soft toy.

For a keychain version, make the body a size smaller using thinner yarn and attach a keyring to the top of the hat.

I also experiment with adding tiny crocheted props like candy canes, scarves or tiny presents to make each minion unique.

You can make the horns longer or shorter by changing the extra rounds to adjust Stuart's antlers style.

I sometimes use felt for the glasses instead of crocheting them for a flatter, quicker option that still looks great.

To make a set, I change each minions outfit color and create a coordinating display or garland for holiday decor.

Dont be afraid to combine yarn textures; a fuzzy yarn for the hat brim creates a cozy, wintry look that I adore.

Common Mistakes & How to Fix Them

✗ Skipping stitch markers during long rounds can cause you to lose the round start; place a marker at the first stitch and move it each round to track progress. ✗ Switching colors without securing ends will lead to loose tails and unraveling; weave in or secure color changes immediately and hide tails inside the stuffing. ✗ Under-stuffing the body makes shapes floppy and unstable; stuff gradually and firmly, especially around shaping rounds to maintain the intended profile. ✗ Forgetting to count stitches after increases and decreases causes uneven shaping; count stitches at the end of each round to confirm the expected stitch count. ✗ Sewing parts without pinning first can result in crooked placement; pin or stitch-baste limbs and accessories in position before final sewing for accurate alignment.

Christmas Minion Amigurumi Pattern

Create three festive mini minions perfect for holiday gifting and decorating. This pattern guides you through crocheting bodies, hats, glasses and tiny accessories with clear round-by-round instructions. Youll enjoy playful color changes and simple shaping to make each character unique. Suitable for crafters who know basic amigurumi techniques and want a cheerful seasonal project.

Intermediate 5-7 Hours

Materials Needed for Christmas Minion Amigurumi Pattern

— Main Fabric

  • 01
    Sport weight yarn (size 1.5-2mm) - main yellow for minion bodies, approximate amount depends on color choices
  • 02
    Accent yarns: white, black, red, green, brown, dark brown, gray - small amounts each for hats, collars, glasses and details
  • 03
    Black yarn or black embroidery thread for decorating features and straps
  • 04
    Black safety eyes size 8-10mm (I used 8mm eyes) - 2 per minion
  • 05
    Fiberfill stuffing for filling bodies and shaping

— Tools Required

  • 01
    Crochet hook size 2.0mm - 2.5mm (use 2.0mm for recommended gauge)
  • 02
    Black safety eyes 8mm (2 pieces per minion)
  • 03
    Scissors
  • 04
    Yarn needle for sewing
  • 05
    Stitch markers
  • 06
    Polyester stuffing (fiberfill)
  • 07
    Glue (optional, to secure eyes to glasses)

Progress Tracker

0% Complete

— BOB'S BODY :

Info :

Start with yellow yarn

Round 1 :

7sc in MR (7)

Round 2 :

7 -inc (14)

Round 3 :

(sc, inc) * 7 (21)

Round 4 :

(inc, 2sc) * 7 (28)

Round 5 :

(3sc, inc) * 7 (35)

Round 6-14 :

(9 rnds) 35sc (35)

Info :

Switch to red yarn

Round 15 :

BLO (4sc, inc) * 7 (42)

Round 16-17 :

(2 rnds) 42sc (42)

Info :

Switch to black yarn

Round 18-19 :

(2 rnds) 42sc (42)

Info :

Switch to red yarn

Round 20 :

BLO 42sc (42)

Round 21 :

42sc (42)

Round 22 :

(4sc, dec) * 7 (35)

Round 23 :

(3sc, dec) * 7 (28)

Info :

Stuff the body tight with fiberfill

Round 24 :

(2sc, dec) * 7 (21)

Round 25 :

(sc, dec) * 7 (14)

Round 26 :

7 - dec (7)

Info :

Cut the yarn. Invisible fasten off. Thread a needle with your yarn tail and close the ramaning gap.

— KEVIN'S BODY :

Info :

Start with yellow yarn

Round 1 :

7sc in MR (7)

Round 2 :

7 -inc (14)

Round 3 :

(sc, inc) * 7 (21)

Round 4 :

(inc, 2sc) * 7 (28)

Round 5 :

(3sc, inc) * 7 (35)

Round 6-21 :

(16 rnds) 35sc (35)

Info :

Switch to green yarn

Round 22 :

BLO (4sc, inc) * 7 (42)

Round 23-24 :

(2 rnds) 42sc (42)

Info :

Switch to black yarn

Round 25-26 :

(2 rnds) 42sc (42)

Info :

Switch to green yarn

Round 27 :

BLO 42sc (42)

Round 28 :

42sc (42)

Round 29 :

(4sc, dec) * 7 (35)

Round 30 :

(3sc, dec) * 7 (28)

Info :

Stuff the body tight with fiberfill

Round 31 :

(2sc, dec) * 7 (21)

Round 32 :

(sc, dec) * 7 (14)

Round 33 :

7 - dec (7)

Info :

Cut the yarn. Invisible fasten off. Thread a needle with your yarn tail and close the ramaning gap.

— STUART'S BODY :

Info :

Start with yellow yarn

Round 1 :

7sc in MR (7)

Round 2 :

7 -inc (14)

Round 3 :

(sc, inc) * 7 (21)

Round 4 :

(inc, 2sc) * 7 (28)

Round 5 :

(3sc, inc) * 7 (35)

Round 6-17 :

(12 rnds) 35sc (35)

Info :

Switch to brrown yarn

Round 18 :

BLO (4sc, inc) * 7 (42)

Round 19-20 :

(2 rnds) 42sc (42)

Info :

Switch to black yarn

Round 21-22 :

(2 rnds) 42sc (42)

Info :

Switch to brown yarn

Round 23 :

BLO 42sc (42)

Round 24 :

42sc (42)

Round 25 :

(4sc, dec) * 7 (35)

Round 26 :

(3sc, dec) * 7 (28)

Info :

Stuff the body tight with fiberfill

Round 27 :

(2sc, dec) * 7 (21)

Round 28 :

(sc, dec) * 7 (14)

Round 29 :

7 - dec (7)

Info :

Cut the yarn. Invisible fasten off. Thread a needle with your yarn tail and close the ramaning gap.

— ARMS :

Info :

With black and minion shirt's yarn (make two)

Round 1 :

start with black 4sc in MR (4)

Round 2 :

4 - inc (8)

Info :

Switch color

Round 3-8 :

(6 rnds) 8sc (8)

Info :

Cut the yarn. Leave a long tail. Thread a needle with your yarn tail and sew to the body at the round you switch to minion shirt's color yarn.

— LEGS :

Info :

With black and minion shirt's yarn.

Round 1 :

start with black 7sc in MR (7)

Round 2 :

inc, 6sc (8)

Info :

Switch color

Round 3-4 :

8sc (8)

Info :

Cut the yarn. Leave a long tail. Thread a needle with your yarn tail and sew the legs to bottom of the body.

— BOB'S AND KEVIN'S GLASSES :

Info :

With white and gray.

Round 1 :

start with white 7sc in MR (7)

Round 2 :

7 - inc (14)

Info :

Switch to gray

Round 3 :

FLO 14sc, slst(14)

Info :

Cut the yarn. Leave a long tail. Thread a needle with your yarn tail and sew the glasses to the body. Place the eyes on glasses and use glue to stick them to the body.

— STUART'S GLASSES :

Info :

With white and gray.

Round 1 :

start with white 7sc in MR (7)

Round 2 :

7 - inc (14)

Round 3 :

(sc, inc) * 7 (21)

Info :

Switch to gray

Round 4 :

FLO 21sc, slst (21)

Info :

Cut the yarn. Leave a long tail. Thread a needle with your yarn tail and sew the glasses to the body.

— BLACK TRAP FOR BOB AND KEVIN GLASSES :

Info :

Start with black yarn, ch32, 31 - slst on chain.

Info :

Cut the yarn. Leave a long tail. Thread a needle with your yarn tail and sew it to the body of minion.

— BLACK TRAP FOR STUART GLASSES :

Info :

Start with black yarn, ch37, 36sc on chain.

Info :

Cut the yarn. Leave a long tail. Thread a needle with your yarn tail and sew it to the body of minion.

— PIECE OF SHIRT :

Info :

With minion shirt's yarn Insert your hook to FLO stitches of the second BLO round on the body,

Round 1 :

ch1, (5sc, inc) * 7, slst (49)

Round 2-3 :

(2 rnds) ch1, 49sc, slst (49)

Info :

Switch to white yarn

Round 4 :

49sc, slst (49)

Info :

Cut the yarn. Invisible fasten off. Hide your yarn tail.

— COLLAR :

Info :

With white yarn Insert your hook to FLO stitches of the first BLO round on the body, (ch 3, slst to the next stitch) * end round

Info :

Cut the yarn. Invisible fasten off. Hide your yarn tail.

— BOB'S AND KEVIN'S HAT :

Info :

With minion shirt's yarn

Round 1 :

4sc in MR (4)

Round 2-4 :

(3 rnds) 4sc (4)

Round 5 :

3sc, inc (5)

Round 6-8 :

(3 rnds) 5sc (5)

Round 9 :

4sc, inc (6)

Round 10-12 :

(3 rnds) 6sc (6)

Round 13 :

(sc, inc) * 3 (9)

Round 14 :

9sc (9)

Round 15 :

(2sc, inc) * 3 (12)

Round 16-17 :

(2 rnds) 12sc (12)

Round 18 :

(sc, inc) * 6 (18)

Round 19 :

18sc (18)

Round 20 :

(2sc, inc) * 6 (24)

Round 21 :

24sc (24)

Round 22 :

(3sc, inc) * 6 (30)

Round 23 :

(4sc, inc) * 6 (36)

Round 24 :

2sc, inc, (5sc, inc) * 5, 3sc (42)

Round 25 :

42sc (42)

Info :

Switch to white yarn

Round 26 :

42sc (42)

Round 27 :

(Ch 3, slst to the next stitch) * end round

Info :

Cut the yarn. Invisible fasten off. Hide your yarn tail.

— STUART'S HORN :

Info :

With dark brown yarn. Make two.

Item Name (Big piece) :

Rnd 1. 6sc in MR (6)

Round 2 :

(2sc, inc) * 2 (8)

Round 3 :

8sc (8)

Round 4 :

2sc, 2 - dec, 2sc (6)

Round 5 :

2sc, dec, 2sc (5)

Round 6-7 :

(2 rnds) 5sc (5)

Round 8 :

3sc, dec, slst (4)

Info :

Cut the yarn. Leave a long tail for sewing.

Item Name (Small piece) :

Rnd 1. 4sc in MR (4)

Round 2-3 :

(2 rnds) 4sc (4)

Info :

Cut the yarn. Leave a long tail. Thread a needle with your yarn tail. Sew small piece to big piece spanning rounds 5&6.

Info :

Sew the horn to the top of minion spanning rounds 4&5

Assembly Instructions

  • Sew arms to the body at the round where you switched to the minion shirt color, using the long tail left when you cut the yarn for a neat join.
  • Attach legs to the bottom of the body, spacing them evenly and sewing securely so the minion can sit flat.
  • Sew glasses onto the face, then place safety eyes into the glass openings and use a drop of glue if needed to hold them in place.
  • Sew horns to the top of Stuart by aligning and stitching them to span rounds 4 and 5, using the long sewing tails for strength.
  • Position the shirt piece and collar on the body (inserted into FLO/BLO rounds as instructed), then stitch around the edges to secure and hide tails.

Important Notes

  • 💡Use stitch markers to mark the beginning of each round to keep track of increases and decreases accurately.
  • 💡Stuff the body firmly but gradually so the shape remains smooth and natural without overfilling which may distort stitches.
  • 💡Hide and weave in yarn tails as you go for a clean finish and to avoid bulky knots under the stuffing.
  • 💡Pin or baste pieces in place before sewing to ensure correct placement and symmetry when attaching limbs and accessories.

This cheerful Christmas Minion trio makes a delightful handmade gift or seasonal decoration. Theyre small, detailed and bursting with holiday charm—perfect for shelves, desks, or as tree ornaments. Make a set in different colors to spread festive smiles 🎄🧶

You ask,

we answer.

FAQs

What size will the finished piece be?

The finished minion measures approximately 8-10 cm tall depending on your yarn weight and tension when using the recommended sport yarn and 2.0mm hook.

Can I use different yarn weights for this pattern?

Yes, you can use different yarn weights but this will change the final size; adjust your hook accordingly and make a gauge swatch to estimate the new dimensions.

Do I need prior crochet experience for this pattern?

This pattern is rated intermediate, so basic amigurumi skills—working in the round, increases/decreases, color changes—are recommended for best results.

How long does this project typically take to complete?

Most crocheters complete a single minion in a few hours; making all three plus accessories is usually a weekend project taking around 5-7 hours total.