🧢 Beautiful ✨ Detailed πŸ’ Adorable

Christmas Hoop Embroidery Pattern

Christmas Hoop Embroidery Pattern
4.3β˜… Rating
2-4 Hours Time Needed
2.2K Made This
βœ‚οΈ

Beginner Friendly Level

Perfect for those just starting their crochet journey, with clear instructions and simple techniques

⏱️

Bite-Sized Project

Finishes in 2-4 hoursβ€”perfect for an afternoon of creative relaxation.

🏑

Cozy Accent

A warm touch for your space that transforms ordinary corners into inviting nooks filled with handmade charm.

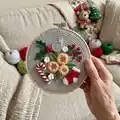
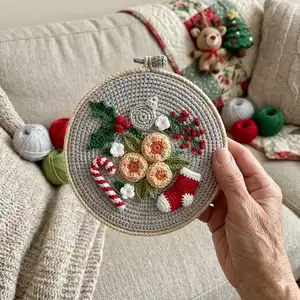
About This Christmas Hoop Embroidery Pattern

This pattern creates a festive Christmas hoop embroidery featuring holly, candy cane, bauble, leaves and woven-wheel flowers. It includes a printable transfer scheme and a clear color and stitch guide so you can follow along easily. The pattern highlights satin stitch, fishbone stitch, chain stitch, back stitch, woven wheel and French knots to create rich texture and holiday detail.

Christmas Hoop Embroidery Pattern crochet pattern - detailed view of completed project

Photographic step-by-step progress images and a full stitch guide help you master each technique. Use the included thread color codes (DMC) and transfer instructions to reproduce the design accurately.

Why You'll Love This Christmas Hoop Embroidery Pattern

I absolutely love this pattern because it brings a classic holiday scene to life using simple embroidery stitches that look more complex than they are. I enjoy teaching woven wheel flowers and satin-filled leaves because they add so much texture and depth with a small time investment. I love that the pattern includes a printable transfer and clear stitch descriptions so you can focus on relaxing and stitching. I also appreciate how customizable it is β€” you can change colors, thread counts, or add metallics to make it your own.

Christmas Hoop Embroidery Pattern step 1 - construction progress Christmas Hoop Embroidery Pattern step 2 - assembly progress Christmas Hoop Embroidery Pattern step 3 - details and accessories Christmas Hoop Embroidery Pattern step 4 - final assembly and finishing

Switch Things Up

I love how easy it is to customize this pattern by changing thread colors to match your holiday decor.

I often swap the DMC reds for pinks or golds to create a nontraditional holiday palette that still reads festive.

Try using metallic or variegated threads for the bauble to give it a sparkly highlight that catches the light.

I sometimes use two strands for satin stitch and three for woven wheel centers to vary the texture across the piece.

To make a mini keychain version, I reduce the pattern to a smaller hoop and use finer fabric with thinner threads.

I also like adding tiny beads for extra dimension on the berry clusters instead of French knots for a beaded effect.

If you want a rustic look, use a wooden hoop left natural and switch to linen fabric and muted DMC tones.

I recommend experimenting with thread direction in the fishbone stitch to change how leaves reflect light and add movement.

For a gift set, make several small hoops with one repeat motif each so the set feels cohesive but varied.

I encourage you to combine appliqued felt pieces under satin stitch areas for a raised effectβ€”this gives a plush, layered finish.

Common Mistakes & How to Fix Them

βœ— Not transferring the pattern accurately causes misplaced motifs and awkward spacing; use carbon paper, a window or tablet and secure the paper with tape to transfer cleanly. βœ— Using too many strands of thread for satin stitch can make the surface bulky and uneven; test with one or two strands and adjust to get smooth coverage. βœ— Pulling stitches too tightly will pucker the fabric and distort the design; keep even tension and allow the fabric to remain relaxed in the hoop. βœ— Skipping practice for woven wheel and fishbone stitches leads to uneven shapes; practice on a scrap piece to get comfortable with stitch direction and spacing before working on the final fabric. βœ— Forgetting to secure thread ends leads to loose stitches later; always bring thread to the back securely and weave in ends or tie small knots where appropriate. βœ— Not using two layers of cotton canvas as recommended can show marks and produce less stable stitching; consider using two layers if specified for best texture and stability.

Christmas Hoop Embroidery Pattern

Create a festive hoop embroidery design perfect for beginners and experienced stitchers alike. This printable PDF pattern guides you through satin stitch, fishbone stitch, woven wheel flowers and French knots for a charming holiday piece. Youll love the step-by-step photos and stitch guide that make each technique approachable. Make a beautiful handmade ornament or hoop to gift or display this season.

Beginner Friendly 2-4 Hours

Materials Needed for Christmas Hoop Embroidery Pattern

β€” Main Fabric

  • 01
    15 cm embroidery hoop (wood, plastic or bamboo) - I prefer a wooden hoop
  • 02
    100% cotton embroidery threads (DMC) - colors used include DMC 666, DMC BLANC (white), DMC 700, DMC 3841, DMC 353, DMC 352, DMC 954, DMC 702 (see color guide)
  • 03
    Natural fabric: 100% cotton or linen canvas (cotton canvas used in pattern, two layers recommended)
  • 04
    Felt or craft cardboard circle for finishing the back of the hoop

β€” Tools Required

  • 01
    15 cm embroidery hoop (wood, plastic or bamboo)
  • 02
    Embroidery needles (suitable for cotton floss)
  • 03
    DMC embroidery threads in listed colors (666, BLANC, 700, 3841, 353, 352, 954, 702 etc.)
  • 04
    Scissors for hand embroidery
  • 05
    Marker or simple pen for transferring or marking
  • 06
    Carbon paper for transferring the pattern
  • 07
    Felt or craft cardboard for finishing the hoop
  • 08
    Pins for holding felt while finishing (optional)
  • 09
    Printed PDF pattern for transfer

Progress Tracker

0% Complete

β€” Materials :

Infos :

1. 15 cm hoop. (You can choose wood, plastic or bamboo hoop) I prefer to use wooden hoop because its natural and aesthetic.

Infos :

2. Needle for embroidery.

Infos :

3. Threads. I recommend you to choose 100% cotton threads. For this hoop I use DMC threads (Attention! This is just my recommendation; you can use any available colors).

Infos :

4. Fabric. I recommend you to choose natural fabrics 100 % Cotton or linen canvas. For this pattern I used cotton canvas. (I used two layers)

Infos :

5. Marker or simple pen for transferring the pattern.

Infos :

6. Felt or craft cardboard for finished the hoop. (I used to felt for my hoop.) But it`s not obligatory.

Infos :

7. Scissors for handmade. You can use any scissors that you have at home.

Infos :

8. Carbon Paper for transfer pattern

Infos :

9. And finally you need my PDF pattern.

β€” Pattern for printing :

Info :

Pattern for printing: use the provided circular transfer scheme to print and transfer motifs (holly, bauble, candy cane, leaves, woven wheels and stocking) to your fabric.

β€” Color and Stitch guide :

Infos :

Color and stitch guide labels (as shown in the image): Satin Stitch DMC 666. Satin Stitch DMC BLANC. Satin Stitch DMC 700. Chain Stitch DMC 3841. Back Stitch DMC 700. French Knot Stitch DMC BLANC. Woven wheel stitch DMC BLANC. Fishbone Stitch DMC 700. Satin Stitch DMC 666 (candy cane accents). Woven wheel stitch DMC 353. French knot Stitch DMC 352. Fishbone Stitch DMC 954. Fishbone Stitch DMC 702 (example for leaves). Use the color codes shown on the image to match each element to the correct DMC color.

β€” 1. Back Stitch :

Info :

Backstitch : The Backstitch is a simple stitch that can be used to create straight lines of any length or direction. Bring your needle up through the fabric. (1) Bring it down a small way behind this to create a small straight stitch (2). Bring your needle up with a gap ahead of the previous stitch taking it back down where the previous stitch started. Continue along the length of the line.

β€” 2. Satin Stitch :

Info :

Satin Stitch The satin stitch is a filler stitch that can be used to create a smooth surface and add large areas of color to your embroidery. Bring your needle up through the fabric at a point on the outer edge of the shape you wish to fill (1). Insert the needle again at the point opposite the entry point on the other side of the shape (2). Repeat this stitch again, this time bringing your needle up beside the first stitch. Continue this repetition until the shape is filled.

β€” 3. Fishbone Stitch :

Info :

The fishbone stitch, made up of slanted diagonal stitches, is a filling stitch that is often used for making leaves or feathers. One of the most classic embroidery stitches. Up from the back to start (1). Down on the opposite side to make a stitch. Up from the point (3) underside coming up next to the original starting point. Back down again (4) making another stitch and ready to continue in this fashion.

β€” 4. Chain Stitch :

Info :

1: Stitch up through the fabric where you want your chain to start – point A. 2: Stitch back down into the exact same hole you stitched up through. Do not pull your thread all the way through. 3: Stitch up at point B, making sure the needle goes through the loop. 4: Tighten the thread neatly, so that there`s no loose thread but so that the chain loop is still a loop. 5: Stitch down at point B, continuing the same stitch up and down through the same hole, catching each loop of thread process. The back of the work will be a line of straight stitches.

β€” 5. French Knot Stitch :

Info :

French knot Pull the needle up through the fabric. Wind the thread to make a knot. Wrap the thread around the needle two times and put the needle back at the same hole it just came through near. Pull through gently to form the knot on the surface.

β€” 6. Woven wheel embroidery stitch :

Info :

Draw a circle and make 5 straight stitches evenly spaced out around the circle. Come up through the fabric just to the side of where the stitches meet in the center. Begin weaving your needle and thread under and over the spokes of the stitches until you have filled in the entire circle. To end the stitch, simply bring your thread to the back and secure it.

β€” 7. And I use Woven wheel stitch + French Knot stitch for making flowers :

Info :

At first you need to print the scheme and transfer it to the fabric. You can do using carbon paper. Also you can transfer image using your window, smartphone or tablet. Just put the scheme onto your window and then put the fabric. It`ll be better if you fix it on the window with scotch tape. And then transfer the image with pen or pencil. And now you can start embroidery! Welcome to my embroidery world!

β€” Photographic Step-by-step Progress :

Info :

The pattern includes multiple reference photos showing: sketch transferred onto fabric, satin stitch filling for stocking and leaves, chain stitch sprigs, back stitch stems, French knots for berries, small filled circles using woven wheel and assembled flowers using woven wheel plus French knots for centers. Use these photos as a visual guide while stitching.

β€” How to Finish :

Info :

1. Cut a felt or craft cardboard circle according to the size of inner hoop. 2. Pin felt to gathered fabric. Overstitch the two fabrics together. Pass the needle through the gathered fabric. Then through the felt and back out. Bring the needle back to the top of the hoop. Leaving a small gap, pass the needle back through both layers of fabric. Bring the needle out. Repeat.

β€” Congratulations :

Info :

Congratulations! You have now finished your embroidery! Use the finishing tips to secure and trim any loose threads and enjoy your festive hoop.

Assembly Instructions

  • Transfer the printed pattern to your fabric using carbon paper, a window, or tablet; secure the printed design with tape for an accurate transfer.
  • Place the fabric tightly in the 15 cm hoop, centering the design and tightening the outer ring for a smooth working surface.
  • After stitching, cut a felt or craft cardboard circle to match the inner hoop, pin it to the gathered fabric and overstitch the two fabrics together around the edge to finish the back.
  • Pass the needle through the gathered fabric, then through the felt and back out; bring the needle back to the top of the hoop and repeat, leaving a small gap between stitches until the edge is secured.
  • Weave and secure thread ends neatly on the back and trim excess fabric as needed so the finished hoop looks tidy from the front.

Important Notes

  • πŸ’‘Use two layers of cotton canvas if recommended to prevent transfer marks showing and to provide a stable surface for dense stitches.
  • πŸ’‘Practice woven wheel and fishbone stitches on scrap fabric before working on the final piece to establish consistent stitch tension and direction.
  • πŸ’‘Transfer the design carefully using carbon paper or a backlit window and secure the pattern so the lines do not move while tracing.
  • πŸ’‘Keep even tension on satin and fishbone stitches to avoid puckering the fabric; loosen your grip if the fabric begins to ripple.

This festive hoop pattern brings cozy holiday charm to your home with textured stitches and delicate details. The combination of satin stitch, fishbone leaves, woven wheel flowers and tiny French knot berries creates a handmade focal point youre proud to display. Perfect for gifting or adding a handcrafted touch to your seasonal decor. πŸ§ΆπŸŽ„

You ask,

we answer.

FAQs

What size will the finished piece be?

The finished piece fits a 15 cm embroidery hoop, and the design is arranged to sit nicely within that diameter.

Can I use different thread brands or weights?

Yes, you can use other brands, but color codes and thickness may vary; I recommend 100% cotton stranded floss (DMC) and testing on scrap to achieve the desired look.

Do I need prior embroidery experience for this pattern?

This pattern is beginner friendly, with clear stitch descriptions and step-by-step photos, though practicing woven wheel and fishbone stitches on scrap fabric first is helpful.

How long does this project typically take to complete?

Most stitchers complete this project in 2-4 hours, depending on experience and how many motifs you choose to stitch.