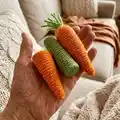
About This Carrot Lip Balm & Gift Holder Pattern
This pattern creates a petite carrot lip balm holder sized for standard lip balm tubes and small money gifts. The pieces are crocheted in continuous rounds for a smooth, seamless finish. Youll use basic single crochet stitches and simple shaping to form the tapered carrot body and a removable lid with green strand detail.
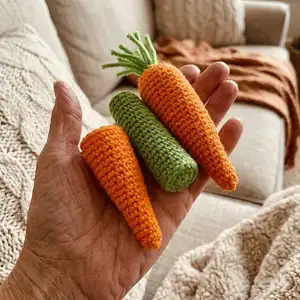
Easy to stitch and quick to finish, this little carrot is perfect for thoughtful handmade gifts and craft markets. It uses commonly available worsted weight yarn and a 3.75mm hook for a snug fit.
Why You'll Love This Carrot Lip Balm & Gift Holder Pattern
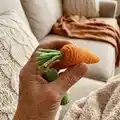
I absolutely love this pattern because it transforms simple stitches into a delightful tiny gift that everyone smiles at. I enjoy how quickly it works up—you can make a complete carrot in one relaxing crafting session. The pattern lets me experiment with colors and small finishing touches like embroidered lines or longer greens. It is perfect for using small amounts of leftover yarn and for making bundles of gifts in a short time. Seeing the finished carrot slip a lip balm inside always delights friends and family.
Switch Things Up
I love customizing this little carrot by changing colors to match holidays or themes; try pastel orange for spring or bright orange for Halloween.
I often make mini versions by switching to a lighter-weight yarn and a smaller hook to create keychain charms.
For a chunkier, cuddlier look I use bulky yarn and a larger hook to create a plush pocket-sized carrot that still holds small items.
I sometimes embroider simple lines or tiny freckles on the body to add texture and personality to each carrot.
Try lengthening the green strands or using variegated green yarn to create a more whimsical top that stands out.
To make the holder more secure, sew the top lid down lightly to the bottom at a few hidden points so it doesnt slip off during use.
Consider adding a tiny loop or a short chain at the top so the carrot can be attached to a bag or keyring for portability.
I also like to create matching sets using coordinating yarn colors and wrap them as mini gift bundles for parties or craft fairs.
If you want a more realistic carrot shape, decrease or increase rounds slightly to accentuate the taper more dramatically.
For baby-safe versions, avoid small attachments and use embroidered details with securely woven ends to keep the piece safe for little hands.
Common Mistakes & How to Fix Them
✗ Not closing the magic ring early can make the tip too loose and floppy; pull the magic ring closed after the first round and weave in the tail at the start so the tip sits neat and narrow.
✗ Skipping stitch counts during increases leads to uneven shaping and tapering; count stitches at the end of each increase round to confirm the correct stitch total.
✗ Working with inconsistent tension causes the lid to not fit snugly; maintain consistent tension and check your piece against a lip balm as you go to achieve the correct fit.
✗ Failing to weave in the starting tail can open the tip later; use a tapestry needle to securely weave in the beginning tail right after closing the magic ring.