🧢 Beautiful ✨ Detailed πŸ’ Adorable

Bunny Crochet Pattern #105 Amigurumi Pattern

Bunny Crochet Pattern #105 Amigurumi Pattern
4.1β˜… Rating
5-7 Hours Time Needed
3.8K Made This
βœ‚οΈ

Intermediate Level

Ideal for those with basic crochet experience, featuring slightly more advanced stitches and techniques to expand your skills.

⏱️

Weekend Treat

Takes 5-7 hours, making it an enjoyable project to finish over a couple of days.

🧸

Cute Companion

An adorable friend to cherish, handcrafted with love to bring comfort and joy for years to come.

About This Bunny Crochet Pattern #105 Amigurumi Pattern

This pattern creates a charming seated bunny approximately 20cm (8 inches) tall when made with the recommended sport-weight yarn. You will crochet the head, body, two arms, two legs, two ears and a small tail, then assemble and embroider the face. The instructions are written in rounds and include stitch counts at the end of each round for easy checking.

Bunny Crochet Pattern #105 Amigurumi Pattern crochet pattern - detailed view of completed project

Perfect as a gift or nursery companion, the bunny is soft and cuddly when stuffed moderately. Techniques used include working in continuous rounds, increases and decreases and simple embroidery for facial features.

Why You'll Love This Bunny Crochet Pattern #105 Amigurumi Pattern

I absolutely love this pattern because it balances simplicity with personality: the shaping is clear and produces a sweet, rounded head and plump limbs. I enjoy that the ears have a gentle curve which gives the bunny character and movement. The pattern is versatile β€” you can change yarn weight or hook size for different finished sizes. I also love the opportunity to personalise the face with different expressions using embroidery. It is satisfying to see the separate pieces come together into a single cuddly toy.

Bunny Crochet Pattern #105 Amigurumi Pattern step 1 - construction progress Bunny Crochet Pattern #105 Amigurumi Pattern step 2 - assembly progress Bunny Crochet Pattern #105 Amigurumi Pattern step 3 - details and accessories Bunny Crochet Pattern #105 Amigurumi Pattern step 4 - final assembly and finishing

Switch Things Up

I love how easy it is to customise this bunny β€” change the yarn color to create seasonal or themed bunnies like pastels for spring or bold shades for fun gifts.

You can make the bunny larger or smaller by switching yarn weight and adjusting your hook; bulky yarn plus a larger hook will make a chunky, squishy bunny, while fine yarn and a small hook yields a tiny pocket friend.

I sometimes add tiny crochet accessories like a scarf, bow, or little heart to personalise each bunny for the recipient β€” these small additions really elevate the finished toy.

Try embroidering different facial expressions; altering the position and angle of the eyes and mouth changes the personality from sleepy to playful.

For a poseable bunny, consider inserting thin craft wire into the limbs before sewing them closed and covering with stuffing; this makes arms and ears adjustable.

If you prefer a more plush look, use a soft plush or boucle yarn and larger hook β€” the shaping instructions still apply but the effect is super snuggly.

I also like to experiment with texture by working a few rounds in BLO or FLO to create subtle seams or decorative ridges on the body.

Make a family set by making multiple sizes: change hook and yarn and you can have a mama, papa and baby bunny collection to display together.

Want to gift it as a keyring or bag charm? Make a mini version using thinner yarn and a 1.75–2.25mm hook, and attach a keyring loop before closing the head.

I recommend trying felt or tiny safety eyes for toddlers and embroidering facial features for baby-safe toys β€” I always embroider for baby gifts to avoid choking hazards.

Common Mistakes & How to Fix Them

βœ— Forgetting to use a stitch marker will make it hard to find the start of each round; place a marker at the beginning of every round to keep your stitch counts accurate. βœ— Overstuffing limbs and head makes shaping awkward and parts look lumpy; stuff gradually and evenly, adding small amounts to keep a consistent shape. βœ— Skipping stitch counts at the end of rounds allows errors to accumulate; count your stitches often and compare to the pattern's counts to catch mistakes early. βœ— Closing rounds with a slip stitch when the pattern says continuous rounds will change the look; work in continuous spiral rounds unless an instruction specifically tells you to join. βœ— Pulling decreases too tightly can distort the shape and make sewing difficult; use a gentle tension for decreases and check the shape as you go.

Bunny Crochet Pattern #105 Amigurumi Pattern

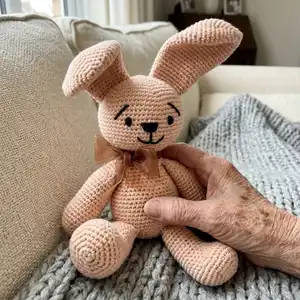
Make a sweet hand-crocheted bunny with this clear pattern that walks you through every piece step-by-step. You will create a cuddly 20cm (8in) sitting bunny using sport-weight yarn and small hooks. The pattern includes detailed rounds for head, body, arms, legs, ears, tail and finishing tips so you can assemble and personalise your bunny with confidence.

Intermediate 5-7 Hours

Materials Needed for Bunny Crochet Pattern #105 Amigurumi Pattern

β€” Main Fabric

  • 01
    Sport weight yarn (#2) cream color, approximately 240m (263 yds)
  • 02
    Black color yarn for facial details, approximately 1m (1.1 yds)
  • 03
    Alternative: pattern can be made with sport or worsted weight yarn (260-330m/100g)

β€” Tools Required

  • 01
    Crochet hook size 2.5 - 2.75mm (US size C)
  • 02
    Sewing needle
  • 03
    Scissors
  • 04
    Stitch markers
  • 05
    Yarn needle for sewing pieces
  • 06
    Polyester stuffing
  • 07
    Pins for assembly (optional)
  • 08
    Textile marker (optional for marking embroidery placement)

Progress Tracker

0% Complete

β€” Head :

Info :

Cream color yarn: ch2

Round 1 :

6sc in 2nd ch from hook (6)

Round 2 :

inc 6 times (12)

Round 3 :

(1sc, inc) 6 times (18)

Round 4 :

(2sc, inc) 6 times (24)

Round 5 :

(3sc, inc) 6 times (30)

Round 6 :

(4sc, inc) 6 times (36)

Round 7 :

(5sc, inc) 6 times (42)

Round 8 :

(6sc, inc) 6 times (48)

Round 9 :

(7sc, inc) 6 times (54)

Round 10 :

(8sc, inc) 6 times (60)

Round 11 :

(9sc, inc) 6 times (66)

Round 12-20 :

sc around (66)

Round 21 :

(sc2tog, 9sc) 6 times (60)

Round 22 :

(sc2tog, 8sc) 6 times (54)

Round 23 :

(sc2tog, 7sc) 6 times (48)

Round 24 :

(sc2tog, 6sc) 6 times (42)

Round 25 :

(sc2tog, 5sc) 6 times (36)

Round 26 :

(sc2tog, 4sc) 6 times (30)

Round 27 :

(sc2tog, 3sc) 6 times (24)

Round 28 :

(sc2tog, 2sc) 6 times (18)

Info :

Finish. Stuff the head (Pic.1). Place safety eyes between rounds 8-9, separated by 6 sc (if using safety eyes). Fasten off leaving a long tail to sew the head to the body.

β€” Body :

Info :

Cream color yarn: ch2

Round 1 :

6sc in 2nd ch from hook (6)

Round 2 :

inc 6 times (12)

Round 3 :

(1sc, inc) 6 times (18)

Round 4 :

(2sc, inc) 6 times (24)

Round 5 :

(3sc, inc) 6 times (30)

Round 6 :

(4sc, inc) 6 times (36)

Round 7-10 :

sc around (36)

Round 11 :

sc2tog 10 times (26)

Round 12-13 :

sc around (26)

Round 14 :

2sc, (sc2tog) 3 times, 18sc (23)

Round 15 :

sc around (23)

Round 16 :

1sc, (sc2tog) 3 times, 16sc (20) (Pic.4)

Round 17-20 :

sc around (20)

Round 21 :

(sc2tog, 8sc) 2 times (18)

Round 22-23 :

sc around (18)

Round 24 :

(sc2tog, 4sc) 3 times (30?) Wait clarification: as written: (sc2tog,4sc) 3 times;30sts

Round 25 :

sc around (30)

Info :

Finish and leave long end to sew head to the body. Stuff the body (Pic.2).

β€” Arms (make 2) :

Info :

Cream color yarn: ch2

Round 1 :

6sc in 2nd ch from hook (6)

Round 2 :

inc 6 times (12)

Round 3 :

(1sc, inc) 6 times (18)

Round 4 :

(2sc, inc) 6 times (24)

Round 5-9 :

sc around (24)

Round 10 :

(sc2tog, 4sc) 4 times (20)

Round 11-20 :

sc around (20)

Round 21 :

(sc2tog, 3sc) 4 times (16)

Info :

Start to stuff the arm lightly and keep adding stuffing after every few rounds.

Round 22 :

sc around (16) (Pic.3)

Round 23 :

(sc2tog, 6sc) 2 times (14)

Round 24 :

(sc2tog, 5sc) 2 times (12)

Round 25 :

(sc2tog, 2sc) 3 times (9)

Info :

Finish, leave long end to sew arms to the body.

β€” Legs (make 2) :

Info :

Cream color yarn: ch2

Round 1 :

6sc in 2nd ch from hook (6)

Round 2 :

inc 6 times (12)

Round 3 :

(1sc, inc) 6 times (18)

Round 4 :

(2sc, inc) 6 times (24)

Round 5 :

(3sc, inc) 6 times (30)

Round 6 :

(4sc, inc) 6 times (36)

Round 7-10 :

sc around (36)

Round 11 :

sc2tog 10 times (26)

Round 12-13 :

sc around (26)

Round 14 :

2sc, (sc2tog) 3 times, 18sc (23)

Round 15 :

sc around (23)

Round 16 :

1sc, (sc2tog) 3 times, 16sc (20) (Pic.4)

Info :

Start to stuff the leg lightly and keep adding stuffing after every few rounds.

Round 17-20 :

sc around (20)

Round 21 :

(sc2tog, 8sc) 2 times (18)

Round 22-23 :

sc around (18)

Round 24 :

(sc2tog, 4sc) 3 times (15)

Round 25 :

sc around (15)

Info :

Finish and leave long end to sew legs to the body. (Pic.5).

β€” Ears (make 2) :

Info :

Cream color yarn: ch2

Round 1 :

6sc in 2nd ch from hook (6)

Round 2 :

inc 6 times (12)

Round 3 :

(1sc, inc) 6 times (18)

Round 4 :

(2sc, inc) 6 times (24)

Round 5 :

(3sc, inc) 6 times (30)

Round 6 :

(4sc, inc) 6 times (36)

Round 7-11 :

sc around (36)

Round 12 :

(sc2tog, 4sc) 6 times (30)

Round 13-15 :

sc around (30)

Round 16 :

(sc2tog, 3sc) 6 times (24)

Round 17-22 :

sc around (24)

Round 23 :

(sc2tog, 4sc) 4 times (20)

Round 24-27 :

sc around (20)

Info :

Finish and leave long end to sew ear onto the head. Do not stuff (Pic.6).

β€” Tail (make 1) :

Info :

Cream color yarn: ch2

Round 1 :

6sc in 2nd ch from hook (6)

Round 2 :

inc 6 times (12)

Round 3 :

(1sc, inc) 6 times (18)

Round 4-6 :

sc around (18)

Round 7 :

(sc2tog, 1sc) 6 times (12)

Info :

Finish and leave long end to sew tail to the body. Stuff the tail (Pic.7).

β€” Finishing / Assembly :

Item Name (P1) :

Sew legs, arms and tail to the body as pictured, spacing legs evenly to allow the bunny to sit.

Item Name (P2) :

Sew head to the body using the long tail left from the head; position centrally on top of the body neck opening.

Item Name (P3) :

Sew ears onto the top of the head with pins for placement before securing; shape the ears to create the curved look and stitch in place.

Item Name (P4) :

Embroider eyes, nose and mouth areas with black yarn (mark placement beforehand with a textile marker if desired). Weave in and hide all ends.

Info :

Use stitch markers to keep track of rounds, stuff parts gradually, and pin parts before sewing to ensure correct placement and symmetry.

Assembly Instructions

  • Attach head to body by positioning the head opening over the top of the body neck and sewing securely with a whipstitch using the long tail left on the head; hide the seam and weave in the end.
  • Position and sew the legs to the bottom front of the body so the bunny can sit; space legs evenly and reinforce stitches to ensure stability.
  • Pin arms to the sides of the body at the same height, angle them slightly forward for a natural pose, then sew securely using the long tails and a yarn needle.
  • Sew ears to the top of the head using the long ends; shape each ear before final stitching and do not stuff the ears.
  • Sew the tail to the lower back of the body and secure firmly, tucking the end and weaving it in.
  • Embroider eyes, nose and mouth with black yarn; mark positions first with a textile marker if needed and stitch carefully for a neat facial expression.

Important Notes

  • πŸ’‘Work in continuous rounds and use a stitch marker to mark the beginning of each round for accurate shaping.
  • πŸ’‘Stuff parts gradually and evenly; overstuffing will distort shapes while understuffing gives a floppy look.
  • πŸ’‘Pin all pieces in position before sewing to ensure correct placement and symmetry.
  • πŸ’‘Weave in ends as you go to keep the finish neat and avoid a large finishing task at the end.

This cuddly Bunny Pattern #105 was created to bring a gentle handmade companion to life for babies and gift-giving. Whether you make one to cherish at home or as a heartfelt present, the little details and shaping will bring a smile. Happy crocheting and enjoy making something soft and special! 🧢🐰

You ask,

we answer.

FAQs

What size will the finished piece be?

The finished amigurumi measures approximately 20 cm (8 inches) tall when sitting using the recommended sport-weight yarn and 2.5-2.75mm hook.

Can I use different yarn weights for this pattern?

Yes, you can use different yarn weights but that will change the final size; use an appropriate hook for your yarn and adjust stuffing accordingly.

Do I need prior crochet experience for this pattern?

This pattern is rated intermediate β€” familiarity with single crochet, increases, decreases and working in continuous rounds is recommended.

How long does this project typically take to complete?

Most crocheters complete this project in 5-7 hours, depending on experience and the amount of detail work like embroidery and finishing.

Should I stuff the ears?

Do not stuff the ears; they are left flat and sewn to the head for a natural floppy look as shown in the pattern instructions.