🧢 Beautiful ✨ Detailed πŸ’ Adorable

Bobby the Bighorn Sheep Amigurumi Pattern

Bobby the Bighorn Sheep Amigurumi Pattern
4.3β˜… Rating
2-3 Hours Time Needed
2.1K Made This
βœ‚οΈ

Intermediate Level

Ideal for those with basic crochet experience, featuring slightly more advanced stitches and techniques to expand your skills.

⏱️

Bite-Sized Project

Finishes in 2-4 hoursβ€”perfect for an afternoon of creative relaxation.

πŸ₯

Charming Critter

Delightful animal designs with sweet details that capture the essence of your favorite woodland and farmyard friends.

About This Bobby the Bighorn Sheep Amigurumi Pattern

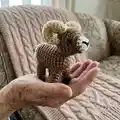
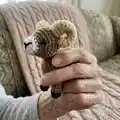
This pattern creates a small bighorn sheep amigurumi with curled horns and a slightly weighted body for stability. The design uses worsted weight yarn and simple single crochet shaping to form the head, body, legs, tail and horns. Youll finish with assembly steps that position legs, tail and horns for a balanced, realistic look. The pattern includes notes on stuffing, eye placement and adding a penny for weight.

Bobby the Bighorn Sheep Amigurumi Pattern crochet pattern - detailed view of completed project

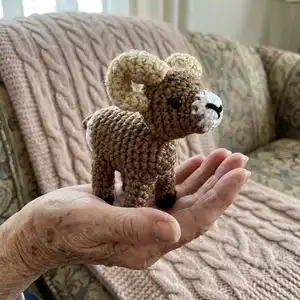
Detailed round-by-round instructions make it easy to follow even with small parts like hooves and horns. Photos and clear placement notes help you assemble the finished sheep with confidence.

Why You'll Love This Bobby the Bighorn Sheep Amigurumi Pattern

I absolutely love this pattern because it combines simple amigurumi shaping with a few charming details like curled horns and a weighted body. I enjoy how quickly the pieces come together yet still feel sculpted and full of character. The pattern lets me experiment with small color details and face stitching that really bring the sheep to life. Creating this little bighorn always feels rewarding because the finished toy stands up and looks like a tiny work of art.

Bobby the Bighorn Sheep Amigurumi Pattern step 1 - construction progress Bobby the Bighorn Sheep Amigurumi Pattern step 2 - assembly progress Bobby the Bighorn Sheep Amigurumi Pattern step 3 - details and accessories Bobby the Bighorn Sheep Amigurumi Pattern step 4 - final assembly and finishing

Switch Things Up

I love customizing this sheep by changing yarn colors; try cream, grey or patterned yarns for a different look.

I often make the horns larger or smaller by adding or skipping rounds to change the curl and overall personality.

I sometimes swap the main yarn to a sport or DK weight and use a smaller hook for a more delicate, miniature sheep.

I add embroidery or felt details around the nose for extra expression and contrast against the white muzzle.

I recommend experimenting with eye size; smaller eyes give a more delicate look while larger safety eyes create a cuter expression.

I also add a small felt saddle or tiny scarf to turn the sheep into a seasonal gift or themed decoration.

I sometimes skip the penny and instead add small glass beads sewn into the base for a quieter weight option.

I enjoy making matching sets in different colors to create a little flock; they make lovely gifts or shelf displays.

I occasionally use a boucle or textured yarn for the body while keeping smooth yarn for the face and legs to create realistic fleece contrast.

I like to embroider tiny tufts of fleece with white yarn on the body to add a woolly texture and extra character.

Common Mistakes & How to Fix Them

βœ— Skipping stitch markers during rounds with increases and decreases leads to uneven shaping; use a marker at the start of each round and move it as you work. βœ— Forgetting to change color exactly on the last stitch can create a visible seam; switch yarn on the final yarn over of the specified stitch to keep the color transition neat. βœ— Not stuffing gradually causes lumps and misshapen sections; stuff a little at a time and shape as you go, especially in the head and body. βœ— Placing safety eyes too late will make positioning difficult; set eyes between the recommended rows (rows 5 and 6) and check spacing before locking them. βœ— Pulling tension inconsistently makes the small parts either tight or floppy; maintain even, slightly firm tension for neat stitches that hold their shape.

Bobby the Bighorn Sheep Amigurumi Pattern

Make a tiny, charming bighorn sheep you can hold in your hand. This pattern guides you through crocheting the head, body, legs, tail and curled horns with clear rounds and notes. Youll learn simple shaping and assembly techniques to create a sturdy, weighted amigurumi. Perfect as a handmade gift or a collectible for your shelf.

Intermediate 2-3 Hours

Materials Needed for Bobby the Bighorn Sheep Amigurumi Pattern

β€” Main Fabric

  • 01
    Worsted weight yarn (#4) - Brown (main body) - small amount (approx. 30-40g)
  • 02
    Worsted weight yarn (#4) - Beige (horns) - small amount (approx. 15-25g)
  • 03
    Worsted weight yarn (#4) - White (nose and tail detail) - small amount (approx. 10-15g)
  • 04
    Worsted weight yarn (#4) - Black (hooves and mouth stitching) - small scrap
  • 05
    Fiber fill - small amount for stuffing head, body, legs, and horns (polyester stuffing)
  • 06
    Penny (optional) - one coin to place inside body to weigh it down (optional)

β€” Tools Required

  • 01
    Crochet hook size 3 mm (for horns only)
  • 02
    Crochet hook size 3.5 mm (main pieces)
  • 03
    6 mm black safety eyes (2 pieces)
  • 04
    Scissors
  • 05
    Sewing needle (for sewing parts and embroidery)
  • 06
    Stitch markers or stitch counter (if needed)
  • 07
    Yarn needle for weaving ends
  • 08
    Polyester stuffing (fiber fill)
  • 09
    Penny (optional) to weigh the body

Progress Tracker

0% Complete

β€” Head :

Info :

*Start using white yarn

Round 1 :

6 SC in MC (6)

Round 2 :

INC X 6 (12)

Info :

*on the last stitch change color to brown, the remainder of the head will be made using brown yarn.

Round 3 - 4 :

SC around (12)

Round 5 :

6 SC, 6 INC (18)

Round 6 :

SC around (18)

Round 7 :

(2SC, INC) X 6 (24)

Round 8 :

(3SC, INC) X 6 (30)

Info :

*Stop and put eyes in and using your needle stitch in the nose.

Round 9 :

SC around (30)

Round 10 :

(3SC, DEC) x 6 (24)

Round 11 :

(2SC, DEC) x 6 (18)

Info :

*stop and lightly stuff head

Round 12 :

(SC, DEC) x 6 (12)

Info :

*continue stuffing so head will stay nice and firm

Round 13 :

SC around (6)

Info :

*SL, close up hole and leave long tail of yarn for sewing onto body

Info :

**Eyes should be placed in between rows 5 & 6 and be 8 stiches apart. The top of the nose should start between rows 2 and 3 and the bottom should be in the middle of the original magic circle.

β€” Body :

Info :

*Use brown yarn

Round 1 :

6 SC in MC (6)

Round 2 :

INC X 6 (12)

Round 3 :

(SC, INC) X 6 (18)

Round 4 :

(2SC, INC) x 6 (24)

Round 5- 14 :

24 around (24)

Info :

*On last stitch change to white yarn. At this point you lightly stuff and add a penny inside to weigh it down.

Round 15 :

(2SC, DEC) x 6 (18)

Round 16 :

(SC, DEC) x 6 (12)

Info :

*stop and stuff generously so it will stay nice and firm

Round 17 :

DEC x 6 (6), SL and close up hole.

β€” Legs (Make 4) :

Info :

*Start off using black yarn

Round 1 :

5SC in MC (5)

Round 2 :

SC around in BLO (change to brown yarn in 5th stitch)

Round 3 :

INC, 4SC (6)

Round 4 :

SC around (6)

Round 5 :

(2 SC, INC) X 2 (8)

Round 6-7 :

SC around (8)

Info :

*SL, stuff with fiber fill and leave long tail for sewing onto body

β€” Tail :

Info :

*Use brown yarn

Round 1 :

Chain 4

Round 2 :

SC in 2nd chain from hook and next two stitches, SL in last stitch. Leave tail for sewing onto body.

β€” Horns (Make 2) :

Info :

*Use Beige Yarn & 3mm hook

Round 1 :

4SC in MC (4)

Round 2 :

3SC, INC (5)

Round 3 :

4SC, INC (6)

Round 4 :

6 around (6)

Round 5 :

(2 SC, INC) X 2 (8)

Round 6-7 :

SC around (8)

Round 8 :

(3SC, INC) X 2 (10)

Round 9 :

SC around (10)

Round 10 :

4SC, INC X 2 (12)

Round 11 :

12 around (12)

Round 12 :

(2 SC, DEC) X 3 (9)

Round 13 :

SC around (9)

Info :

*Finish off and leave a long tail for sewing onto head. Lightly stuff your horns.

β€” Assembly :

Step 1 :

Attach head to body between rows 4 and 5. Tail should be sewed on the back 2 rows up.

Step 2 :

Attach horns between rows 8 & 9 of the head. Looks pretty silly at this point. You will take the horns roll them backward and attach to head.

Step 3 :

Sew front legs between rows 4- 6. Back legs will go between rows 11- 13.

Info :

Now your little sheep should be all completed and standing on on it's own!

Assembly Instructions

  • Attach the head to the body between rows 4 and 5, matching the long tail left from the head to the seam and sew securely with a whipstitch.
  • Sew the tail onto the back, positioning it two rows up from the bottom edge and secure it with the tail left from closure.
  • Attach horns between rows 8 and 9 of the head; roll the horns backward into a curl and stitch them into place so they sit naturally above the eyes.
  • Sew front legs between rows 4 and 6 and position back legs between rows 11 and 13, spacing evenly and checking that the sheep stands upright before finishing.

Important Notes

  • πŸ’‘This pattern is made using US terms; follow the abbreviations list for clarity and consistency.
  • πŸ’‘The bighorn sheep can be made smaller by reducing the ply of yarn and using a smaller hook size.
  • πŸ’‘Crochet using a tight stitch and stuff generously so the piece keeps its shape and stands properly.
  • πŸ’‘Place safety eyes between rows 5 and 6 and space them about 8 stitches apart for the correct facial proportions.

Thank you for making Bobby the Bighorn Sheep β€” a tiny handcrafted friend to brighten your day! πŸ‘ This pattern is designed with clear rounds and helpful assembly notes so you can finish a charming miniature sheep. ✨ Happy crocheting and enjoy giving this little companion a loving home! 🧢

You ask,

we answer.

FAQs

What size will the finished piece be?

The finished amigurumi measures approximately 8-10 cm tall depending on your yarn and tension; using the recommended worsted weight yarn and hook sizes will give the sample size.

Can I use different yarn weights for this pattern?

Yes, you can use different yarn weights but this will change the final size; adjust hook size accordingly and expect differences in horn curl and body proportions.

Do I need prior crochet experience for this pattern?

This pattern is rated intermediate, so you should be comfortable with single crochet, increases, decreases and working in the round.

How long does this project typically take to complete?

Most crocheters finish this project in about 2-3 hours, though time will vary with experience level and how meticulous you are with stuffing and assembly.

Where should I place the safety eyes for best results?

Place eyes between rows 5 and 6 of the head and space them eight stitches apart for the correct facial placement.