🧢 Beautiful ✨ Detailed πŸ’ Adorable

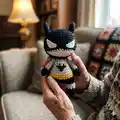
Batman Mini Amigurumi Pattern

Batman Mini Amigurumi Pattern
4.6β˜… Rating
5-7 Hours Time Needed
2.4K Made This
βœ‚οΈ

Intermediate Level

Ideal for those with basic crochet experience, featuring slightly more advanced stitches and techniques to expand your skills.

⏱️

Weekend Treat

Takes 5-7 hours, making it an enjoyable project to finish over a couple of days.

🧸

Cute Companion

An adorable friend to cherish, handcrafted with love to bring comfort and joy for years to come.

About This Batman Mini Amigurumi Pattern

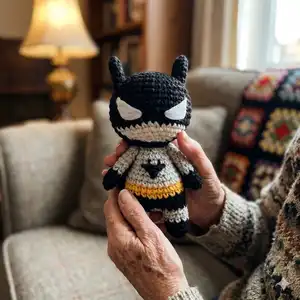
This pattern creates a small Batman-inspired amigurumi approximately 12 cm (4.7") tall using fine hook and Sport/Jeans weight yarn. The design includes detailed head shaping, color changes for the suit and a removable raincoat, plus embroidered eyes and logo. You will work continuously in spiral rounds and complete all sewing and finishing instructions for a neat final toy.

Batman Mini Amigurumi Pattern crochet pattern - detailed view of completed project

The pattern uses basic amigurumi techniques with intermediate shaping, invisible decreases and color changes. Full round-by-round instructions, materials and finishing steps are included for a smooth make.

Why You'll Love This Batman Mini Amigurumi Pattern

I absolutely love this pattern because it captures a beloved superhero in a tiny, huggable form that is both fun to make and display. I enjoyed designing the mask and eye embroidery β€” the details really bring the character to life. I appreciate that the pattern is compact yet includes interesting shaping and colorwork that keeps the project engaging. It is a satisfying weekend project that makes a wonderful handmade gift for fans and crafters alike.

Batman Mini Amigurumi Pattern step 1 - construction progress Batman Mini Amigurumi Pattern step 2 - assembly progress Batman Mini Amigurumi Pattern step 3 - details and accessories Batman Mini Amigurumi Pattern step 4 - final assembly and finishing

Switch Things Up

I love customizing this pattern by changing the suit colors to create different superhero variations; try red and blue, or pastel tones for a fun twist.

I sometimes use a thicker yarn and a larger hook to make a chunkier, cuddlier version that stands taller and feels plush.

For a mini keychain, I use a thinner yarn and a smaller hook, then attach a small keyring to the top of the head.

I often personalize the face by embroidering different eye shapes or adding tiny felt brows to change expression and personality.

Try adding wire inside the arms for posability, or make a tiny cape from felt instead of crocheting a raincoat for quicker finishing.

I sometimes applique a small felt logo in bright yellow for a bold chest detail instead of embroidering for speedier assembly.

Experiment with safety eyes instead of embroidery for a different look, remembering to install them before closing the head.

If you want a softer toy, use cotton-blend yarn and a slightly larger hook, then stuff more loosely for a squishier finish.

I like to add tiny accessories like a felt mask or mini felt utility belt to give each doll a unique personality.

Mix and match color stripes on the legs or body to create themed characters or match team colors for gift sets.

Common Mistakes & How to Fix Them

βœ— Skipping the stitch marker when working in continuous spiral will make it hard to track rounds; place a marker at the beginning of every round and move it as you go. βœ— Not stuffing gradually causes lumpy or misshapen limbs and head; stuff little by little, shaping as you crochet and add more stuffing when necessary. βœ— Changing colors incorrectly can leave loose loops or messy joins; carry yarn neatly or change colors by looping new yarn over hook and drawing through both loops to secure. βœ— Forgetting to count stitches after increases or decreases results in uneven shaping; count your stitches at the end of each round, especially after a shaping round, to ensure accuracy.

Batman Mini Amigurumi Pattern

Make a charming mini Batman amigurumi with this clear intermediate crochet pattern. You will create a 12 cm (4.7") tall handmade superhero using simple amigurumi construction, color changes, and small embroidered details. The pattern includes full rounds for legs, body, head, arms, ears, a raincoat and finishing steps so you can assemble a polished toy. Perfect as a gift or a shelf decoration, this pattern guides you through shaping and finishing with photos for reference.

Intermediate 5-7 Hours

Materials Needed for Batman Mini Amigurumi Pattern

β€” Main Fabric

  • 01
    YarnArt Jeans yarn (Sport/Light, 160 m / 50 g) - Colors: gray (main), yellow (accent), beige (face), black (mask, boots, gloves), white (eye embroidery) - small amounts of each (approx. 10-30 g per color depending on size)
  • 02
    Polyester toy stuffing - enough to firmly fill head, body and limbs (approx. 50-100 g)

β€” Tools Required

  • 01
    Crochet hook 2.00 mm (Clover Soft Touch suggested)
  • 02
    Scissors
  • 03
    Tapestry needle for sewing and weaving ends
  • 04
    Stitch markers
  • 05
    Pins for positioning parts
  • 06
    Optional: small safety eyes or embroidery thread for eyes

Progress Tracker

0% Complete

β€” Notes :

Info :

Crochet continuously in a spiral, unless otherwise specified. In order to not lose track of the number of worked stitches in each round, use a stitch marker to mark the beginning of each round β€” a thin thread of contrasting color.

Info :

Crochet tightly enough so the filler is not visible through the holes between loops. Tightly and gradually fill all the details of the toy in the process of crocheting. Size of the finished toy can vary depending on the materials used, the density of crocheting and filling, etc.

β€” Materials :

Info :

The hook suitable under your yarn. I have Clover Soft Touch 2.00 mm. Yarn: gray, yellow, beige, black and white colors. I used "YarnArt Jeans" yarn (160m in 50g, 55% cotton/45% polyacryl). Toys filler. Scissors. Tapestry needle. Pins. Stitch marker.

β€” Terms used :

Infos :

MR - magic ring. sc - single crochet. ch - chain stitch. sl st - slip stitch. blo - through back loops only. inc - increase (stitch 2 times into the next stitch). dec - invisible decrease (crochet 2 sc together using invisible method). dc - double crochet. hdc - half double crochet. (...)x n - repeat instructions in brackets n times. R - round. Change colors in crochet. Loop your new yarn color over your hook. Crochet your new yarn color back through the two loops on your hook.

β€” Legs :

Info :

*Stuff legs and body firmly, stuffing as you go.

Leg 1 :

Start working with black yarn. R1. 5 sc MR (5) R2. 5 inc (10) R3. – R5. 10 sc (10) Continue on with gray. R6. – R8. 10 sc (10) Close and break the yarn.

Leg 2 + body :

Start working with black yarn. R1. 5 sc MR (5) R2. 5 inc (10) R3. – R5. 10 sc (10) Continue on with gray. R6. – R8. 10 sc (10) Continue on with black. Crochet 2 sc. Move the marker to the last loop. Stuff the legs. Now we will start with the body. R9. 2 ch, 10 sc, 2 sc, 10 sc (24) *it means that we sew 2 ch and attach sc to the second leg, then crochet 9 sc in a circle, 2 sc into the loops of those 2 air loops and 10 sc along the circle of the second leg, total24 loops. R10. – R11. 24 sc (24) Continue on with yellow. R12. – R13. 24 sc (24) Continue on with gray. R14. – R15. 24 sc (24) Stuff the body. R16. (2 sc, dec)x6 (18) R17. – R19. 18 sc (18) R20. (1 sc, dec)x6 (12) R21. 12 sc (12) Stuff the body firmly. Close and break the yarn.

β€” Head :

Info :

Crochet with black yarn.

Round 1 :

6 sc MR (6)

Round 2 :

6 inc (12)

Round 3 :

(1 sc, inc)x6 (18)

Round 4 :

(2 sc, inc)x6 (24)

Round 5 :

(3 sc, inc)x6 (30)

Round 6 :

(4 sc, inc)x6 (36)

Round 7 :

(5 sc, inc)x6 (42)

Round 8 :

42 sc (42)

Round 9 :

42 sc (42)

Round 10 :

42 sc (42)

Round 11 :

42 sc (42)

Round 12 :

42 sc (42)

Round 13 :

42 sc (42)

Round 14 :

(5 sc, dec)x2, 2 sc, BEIGE 3 sc, dec, 5 sc, dec, 4 sc, BLACK 1 sc, dec, 5 sc, dec (36)

Round 15 :

(4 sc, dec)x2, 2 sc, BEIGE 2 sc, dec, 4 sc, dec,4 sc BLACK dec 4 sc, dec (30)

Round 16 :

(3 sc, dec)x2, 2 sc, BEIGE 1 sc, dec, 3 sc, dec,3 sc, BLACK dec, 3 sc, dec (24)

Round 17 :

(2 sc, dec)x2, 2 sc, BEIGE dec, 2 sc, dec, 2 sc, BLACK dec, 2 sc, dec (18)

Info :

Continue on with gray.

Round 18 :

(sc, dec)x6 (12) Add stuffing. Leave the thread for sewing.

β€” Arm x2 :

Info :

Crochet with black yarn.

Round 1 :

6 sc MR (6)

Round 2 :

– R4. 6 sc (6)

Info :

Continue on with gray.

Round 5 :

– R11. 6 sc (6)

Info :

Do not stuff off the arm. Close. Break the yarn and leave a long tail to sew arms to body.

β€” Ear x2 :

Info :

Crochet with black yarn.

Round 1 :

4 sc MR (4)

Round 2 :

4 inc (8)

Round 3 :

– R4. 8 sc (8)

Round 5 :

(1 sc, inc)x4 (12)

Round 6 :

12 sc (12)

Round 7 :

6 sc (12) Leave the thread for sewing.

β€” Raincoat :

Info :

Crochet with black yarn.

Round 1 :

16 ch, starting from second ch from hook, 15 sc (15)

Round 2 :

– R6. ch, turn, 15 hdc (15)

Round 7 :

ch, turn, dec, 11 hdc, dec (13)

Round 8 :

ch, turn, dec, 9 hdc, dec (11)

Round 9 :

ch, turn, dec, 7 hdc, dec (9)

Round 10 :

ch, turn, dec, 5 hdc, dec (7)

Info :

Using black, SC evenly around the raincoat. Crochet 12 ch to fix a raincoat on a neck. Close and break the yarn, leaving a little tail.

β€” Finishing :

Item :

1. Sew the head to the body.

Item :

2. Sew the arms to the body symmetrically.

Item :

3. Embroider the eyes with white thread.

Item :

4. Sew the ears to the head.

Item :

5. Embroider the Batman logo onto the chest with black thread or embroider the logo in yellow and black felt.

Item :

6. Sew the raincoat onto the back.

Assembly Instructions

  • Sew the head to the body using the tail left from the head, aligning the beige face round with the front of the body and securing with a neat whipstitch.
  • Position arms on either side of the body symmetrically, approximately level with the top of the yellow round; sew firmly with the long tail and secure with hidden stitches.
  • Sew the legs to the base of the body, spacing them evenly so the toy stands, and stuff legs firmly while attaching for good shape.
  • Pin the ears to the top of the head and sew in place with the thread left from the ears so they sit upright and symmetrical.
  • Embroider the white eyes with white thread following the photo guide, using pins to mark placement before securing stitches.
  • Attach the raincoat to the back by crocheting a 12 ch loop and sewing the raincoat to the neck opening, then secure edges with a few stitches.

Important Notes

  • πŸ’‘Work in continuous spiral rounds and use a stitch marker to mark the beginning of each round for accurate stitch counting.
  • πŸ’‘Stuff firmly but gradually; add small amounts of stuffing as you shape the head, body and limbs to avoid lumps.
  • πŸ’‘Change colors cleanly by looping the new yarn over your hook and drawing through both loops, then continue crocheting to avoid loose ends.
  • πŸ’‘Keep tension even and crochet tightly enough so stuffing does not show through the stitches for a neat finish.

This tiny Batman amigurumi pattern is a delightful weekend project that results in a charming handmade hero. Perfect for gifting or collecting, it combines simple shaping with playful colorwork and embroidered details. Make a set in different colors or craft one as a tiny keepsake to brighten any shelf. 🧢🧡

You ask,

we answer.

FAQs

What size will the finished piece be?

The finished amigurumi measures approximately 12 cm (4.7 inches) tall when using the recommended yarn and a 2.00 mm hook.

Can I use different yarn weights for this pattern?

Yes, you can use different yarn weights but the final size will change; use an appropriate hook for your chosen yarn and expect a larger or smaller finished toy.

Do I need prior crochet experience for this pattern?

This pattern is rated intermediate, so basic knowledge of single crochet, increases, decreases and working in the round is recommended for best results.

How long does this project typically take to complete?

Most crocheters complete this project in about 5-7 hours, depending on experience, finishing detail time, and how quickly you work through embroidery and assembly.