🧢 Beautiful ✨ Detailed πŸ’ Adorable

Basic Granny Square Pattern

Basic Granny Square Pattern
4.6β˜… Rating
1-2 Hours Time Needed
2.0K Made This
βœ‚οΈ

Beginner Friendly Level

Perfect for those just starting their crochet journey, with clear instructions and simple techniques

⏱️

Quick Make

Complete in under 2 hoursβ€”lightning fast fun for instant gratification and quick gifts.

πŸ€—

Soft Hug

Gentle, plush, and full of warmth, creating a sense of comfort and coziness wherever they find a home.

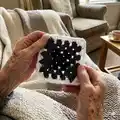
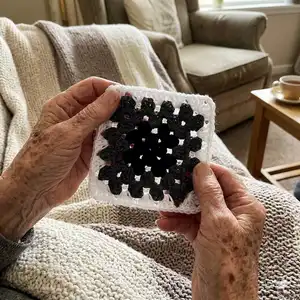
About This Basic Granny Square Pattern

This pattern creates a classic basic granny square you can use alone or join together for larger projects. It includes step-by-step rounds using US terminology and clear abbreviations. The design is flexible β€” continue rounds for a bigger square or change colours each round for a lively effect. Ideal for making blankets, cushions, shawls, and scarves.

Basic Granny Square Pattern crochet pattern - detailed view of completed project

Simple stitches and repeatable rounds make this pattern approachable for beginners. You can use any yarn and hook size to suit your project and style.

Why You'll Love This Basic Granny Square Pattern

I absolutely love this pattern because it is endlessly versatile and forgiving. I enjoy how quickly a square comes together β€” it gives a sense of progress and satisfaction in a short time. I love experimenting with colour combinations; each square becomes a tiny canvas for creativity. I also appreciate that the rounds are repetitive and calming, making it a perfect pattern for relaxed crafting. Finally, the finished squares join beautifully into larger projects, so I often make sets to create cosy throws or cushion covers.

Basic Granny Square Pattern step 1 - construction progress Basic Granny Square Pattern step 2 - assembly progress Basic Granny Square Pattern step 3 - details and accessories Basic Granny Square Pattern step 4 - final assembly and finishing

Switch Things Up

I love customizing this basic granny square by changing colours every round to create a striped or ombre effect.

You can make the square larger by simply adding more rounds following the same corner and side sequence.

Try using different yarn weights and a suitable hook to make mini keychain squares or large blanket squares.

I often add a contrasting border around joined squares to give the finished piece a polished look.

For a textured version, replace double crochet clusters with half-double or treble crochet clusters and adjust the stitch counts accordingly.

Make a motif with variegated yarn for an instant multi-coloured effect without switching yarns each round.

I sometimes embroider a small motif in the centre after completing the square for a personalized touch.

To create a softer, vintage look, use pastel shades and a slightly larger hook for looser, drapier squares.

You can join squares using different joining methodsβ€”whipstitch, mattress stitch, or join-as-you-goβ€”for varied finishes.

If you want a sturdier edge, add two or three rounds of single crochet around the joined project.

Experiment with placement of seam lines and rotate squares for alternate layout patterns like a mosaic or granny stripe blanket.

Common Mistakes & How to Fix Them

βœ— Not creating a neat centre ring can make the first round look loose and messy; form a tight slip-stitched ring before working the first round and adjust the loop to close the hole. βœ— Skipping the turning/tie off instructions can make corners pull or twist; follow the tie off and turning notes exactly to prevent corners from pulling left and avoid blocking. βœ— Failing to make clear corner spaces results in uneven corners when joining squares; always work the ch-2 corner spaces as written so corners remain square and consistent. βœ— Changing tension between rounds causes irregular square edges and mismatched sizes; maintain even tension and check stitch height frequently when changing colours or switching hooks. βœ— Forgetting to weave in ends after the final round leads to loose tails and unraveling; tie off securely and weave in all ends before joining squares together.

Basic Granny Square Pattern

Make classic granny squares with this simple, versatile pattern that you can use to create blankets, cushion covers, shawls, or scarves. You can work small motif squares or continue rounds to make larger squares, and mix any number of colours for beautiful combinations. The instructions use US terminology and are perfect for learners who want a reliable, repeatable technique. Follow the clear steps to make consistent squares every time.

Beginner Friendly 1-2 Hours

Materials Needed for Basic Granny Square Pattern

β€” Main Fabric

  • 01
    Yarn in desired colours (use any weight; small amounts per colour for motif squares)
  • 02
    Suggested: worsted weight yarn (#4) for typical square size, adjust as desired
  • 03
    Use more yarn for larger projects: plan for approximately 200-1000g depending on blanket size

β€” Tools Required

  • 01
    Crochet hook to match yarn (gauge is not important for this pattern)
  • 02
    Darning needle
  • 03
    Scissors (for cutting yarn)

Progress Tracker

0% Complete

β€” Basic Granny Square :

Info :

This pattern can be used for making little squares (or larger ones - simply continue the pattern for as many rounds as desired) to sew together for blankets, cushion covers, shawls, or scarves. Use any number of colours, in any number of combinations.

β€” Materials :

Infos :

yarn. crochet hook to match yarn (gauge is not important for this pattern). darning needle.

β€” Abbreviations :

Infos :

ch chain stitch. sl st slip stitch. dc double crochet. ** repeat instructions between asterisks as many times as directed.

β€” Pattern (US Terminology) :

Start :

make slip knot on hook with yarn, ch 4, join with sl st to first ch to form ring

Round 1 :

ch 2 (counts as dc), 2 dc in centre of ring, ch 2 (to make corner), *3 dc in centre of ring, ch 2*, repeat 2 more times, sl st to top of ch 2, tie off, turn work (prevents each corner of square from pulling left, so no blocking of work is needed at the end)

Round 2 :

with sl st, attach yarn to any corner space, ch 2 (counts as dc), 2 dc in same space, *ch 2, 3 dc in same space, ch 1, 3 dc in next space*, repeat 2 more times, ch 2, 3 dc in same space, ch 1, sl st to top of ch 2, tie off, turn work

Round 3 :

with sl st, attach yarn to any corner space, ch 2 (counts as dc), 2 dc in same space, *ch 2, 3 dc in same space, ch 1, 3 dc in next space, ch 1, 3 dc in next space*, repeat 2 more times, ch 2, 3 dc in same space, ch 1, 3 dc in next space, ch 1, sl st to top of ch 2, tie off, turn work

Round 4 :

with sl st, attach yarn to any corner space, ch 2 (counts as dc), 2 dc in same space, *ch 2, 3 dc in same space, ch 1, 3 dc in next space, ch 1, 3 dc in next space, ch 1, 3 dc in next space*, repeat 2 more times, ch 2, 3 dc in same space, ch 1, 3 dc in next space, ch 1, sl st to top of ch 2, tie off, and weave in all ends

Info :

* This is my pattern for a granny square; others may have slight variations in some of the steps, but the final product usually works out the same.

Assembly Instructions

  • Sew squares together by placing squares right sides facing and using whipstitch or mattress stitch, matching corners and joining through the back loops for a neat seam.
  • When joining into blankets or cushion covers, use a joining colour and keep seam tension consistent so the work lies flat and corners remain square.
  • Weave in all ends securely after finishing the final round for each square to prevent unraveling before joining.
  • Plan your layout before sewing squares together, arranging colours and pattern repeats on a flat surface for even distribution.
  • If adding a border after joining, work evenly around the joined piece to hide seams and provide a uniform edge.

Important Notes

  • πŸ’‘Gauge is not important for this pattern, so you can use any hook and yarn combination to achieve your desired size.
  • πŸ’‘Tie off and turn work as instructed to prevent each corner of the square from pulling left; this avoids the need for blocking.
  • πŸ’‘Weave in all ends after the final round to secure the stitches and prepare squares for joining.
  • πŸ’‘Use stitch markers or pins to keep squares aligned when planning and sewing them together for larger projects.

This simple Basic Granny Square pattern is perfect for building blankets, cushion covers, shawls, and scarves with endless colour options. Mix and match yarns and keep making squares until your project feels just right. Enjoy the relaxing repetition and the beautiful results you can create with just a few rounds. 🧢✨

You ask,

we answer.

FAQs

What size will the finished square be?

The finished square size will vary depending on your yarn weight and hook size; using worsted weight (#4) with a suitable hook typically yields a small motif approximately 10-12 cm across after 4 rounds.

Can I continue beyond Round 4 to make a larger square?

Yes, simply continue the pattern by repeating the corner and side sequence for as many rounds as desired to achieve a larger square; each new round adds one more side cluster before corners.

Do I need to block the squares before joining?

Blocking is generally not required because the tie-off and turning method helps prevent corner pulling, but you may block if you prefer perfectly flat shapes.

Is this pattern suitable for beginners?

Yes, this pattern is beginner friendly and uses basic stitches (chain, slip stitch, and double crochet) with clear repeatable rounds.