🧢 Beautiful ✨ Detailed πŸ’ Adorable

Basic Crochet Basket Pattern

Basic Crochet Basket Pattern
4.9β˜… Rating
2-3 Hours Time Needed
3.1K Made This
βœ‚οΈ

Beginner Friendly Level

Perfect for those just starting their crochet journey, with clear instructions and simple techniques

⏱️

Bite-Sized Project

Finishes in 2-4 hoursβ€”perfect for an afternoon of creative relaxation.

🏑

Cozy Accent

A warm touch for your space that transforms ordinary corners into inviting nooks filled with handmade charm.

About This Basic Crochet Basket Pattern

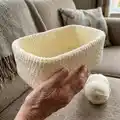
This pattern creates a rectangular crochet basket using aran weight yarn and large hook for a sturdy fabric. It features a simple htr base and dc sides worked in rounds for clean edges and easy construction. The design is adaptable β€” you can adjust base length or side height to suit your needs. Perfect for home organization, gifting, or as a useful handmade accessory.

Basic Crochet Basket Pattern crochet pattern - detailed view of completed project

The pattern includes exact stitch counts, gauge information, and finishing instructions so you get consistent results. No complex shaping or advanced stitches required β€” ideal for beginner crocheters wanting a satisfying, practical project.

Why You'll Love This Basic Crochet Basket Pattern

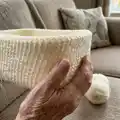
I absolutely love this pattern because it turns simple stitches into a highly functional finished piece that you will use every day. I enjoy how quickly the basket grows β€” you can see real progress in just a few rounds. The clean rectangular shape is versatile and works well in any room, from nursery to craft room. I also appreciate that it uses a chunky hook and aran yarn for a firm fabric, so the basket holds its shape beautifully.

Basic Crochet Basket Pattern step 1 - construction progress Basic Crochet Basket Pattern step 2 - assembly progress Basic Crochet Basket Pattern step 3 - details and accessories Basic Crochet Basket Pattern step 4 - final assembly and finishing

Switch Things Up

I love to change yarn weight and hook size to create different basket sizes; using bulkier yarn makes a chunkier, sturdier basket.

I often change colors or use striped colour combinations to match home decor and make the basket decorative as well as functional.

I sometimes add a fabric lining to give the basket more structure and a neat inside finish; sew or glue the lining in place.

I experiment with base dimensions by increasing or decreasing the starting chain to get a longer or shorter rectangle for different uses.

I like to add handles by working a row of chain spaces on two opposite sides before finishing the top edge for easy carrying.

I occasionally use a smaller hook for the top few rounds to create a firmer rim that helps the basket keep its shape.

I add macrame-style fringe or pom-pom decorations along the top edge for a playful touch when gifting the basket.

I sometimes reinforce the base with a thin piece of cardboard or plastic canvas cut to size and slipped under the lining for additional stability.

I enjoy combining textures by alternating htr and dc rows or adding a surface crochet braid around the middle for visual interest.

I recommend testing a small swatch when trying new yarns so you can adjust hook size and gauge before starting the full basket.

Common Mistakes & How to Fix Them

βœ— Skipping the second chain when starting the base can change the stitch count and shape; start with 'Chain 31, htr in 2nd chain from hook' to maintain correct width. βœ— Not measuring the base periodically causes it to be too short or too long; keep measuring and stop when the base measures 25cm to match the pattern. βœ— Working loosely on the sides will give a floppy basket; use even tension and the recommended 10mm hook to keep the sides firm and stable. βœ— Failing to leave a long tail when fastening off prevents neat assembly; fasten off leaving a long thread for sewing and secure the sides carefully.

Basic Crochet Basket Pattern

Make a simple, sturdy rectangular crochet basket perfect for organizing small items around your home. This pattern is quick to work up and uses basic stitches so you can finish a useful project in an afternoon. Follow clear instructions for the base, sides, and finishing to create a neat, professional-looking basket you will enjoy using or gifting.

Beginner Friendly 2-3 Hours

Materials Needed for Basic Crochet Basket Pattern

β€” Main Fabric

  • 01
    3 x 100g Paintbox Simply Aran in Cream (aran weight yarn; approximately 300g total)
  • 02
    Alternative: Aran weight/medium bulky yarn totaling approximately 250-350g depending on desired size

β€” Tools Required

  • 01
    10mm crochet hook
  • 02
    Tapestry needle
  • 03
    Scissors
  • 04
    Stitch marker (optional) for marking rounds or seam placement
  • 05
    Measuring tape or ruler

Progress Tracker

0% Complete

β€” Details :

Infos :

3 x 100g Paintbox simply aran in cream. 10mm hook. Tapestry needle. Dc - double crochet. Htr - half treble.

Infos :

Size: 30cm x 25cm x 14cm. Gauge: 10cm x 10cm = 10 htr and 7 rows.

β€” Base :

Round 1 :

Chain 31, htr in 2nd chain from hook. Htr to end (30 sts). Turn.

Round 2 :

Htr in each stitch to the end. Turn.

Round 3 :

Repeat until base measures 25cm.

β€” Sides (working in rounds) :

Round 1 :

Working along 1st short side, dc 18 sts evenly along the edge, dc 30 along long edge, dc 18 sts evenly along 2nd short side, 30 dc along long edge. (96 dc).

Round 2 :

Continue working in rounds until sides measure 28cm or double the required height.

Info :

Fasten off leaving a long thread to sew.

Item Name (P1) :

Fold sides in half and secure along the base where htr row and dc row meet.

Info :

Shape and enjoy!

Assembly Instructions

  • Continue working in rounds for the sides until they measure 28cm or double the required height, ensuring stitch count remains consistent.
  • Fasten off leaving a long thread to sew so you have enough yarn to secure seams and finish edges.
  • Fold sides in half and secure along the base where the htr row and dc row meet, aligning edges carefully before sewing.
  • Sew the folded sides to the base using a tapestry needle and the long tail left when fastening off, securing with tight stitches for durability.
  • Shape the basket after sewing to even out corners and edges, then weave in ends neatly.

Important Notes

  • πŸ’‘Measure the base frequently while working rows to stop when the base measures 25cm for correct proportions.
  • πŸ’‘Keep stitch tension consistent when working the sides in rounds so the basket walls stand upright.
  • πŸ’‘Fasten off with a long tail to allow neat sewing of sides to the base without needing extra yarn.
  • πŸ’‘Fold and pin the sides before sewing to ensure the fold and seam align with the htr and dc rows for a clean finish.

This Basic Crochet Basket Pattern makes a practical and attractive storage solution for any room. It is quick to make and wonderfully satisfying, turning simple stitches into functional decor. Perfect for gift-making or keeping your space tidy β€” happy crocheting! 🧢🏑

You ask,

we answer.

FAQs

What size will the finished basket be?

The finished basket measures approximately 30cm x 25cm x 14cm using the recommended yarn and 10mm hook.

Can I change the size of the basket?

Yes, change the starting chain length for a wider or narrower base and work the sides to your desired height; adjust yarn quantity accordingly.

What yarn and hook are recommended?

The pattern uses Paintbox Simply Aran (aran weight) in cream and a 10mm crochet hook for a firm fabric and quick make.

Is this pattern suitable for beginners?

Yes, this pattern is beginner friendly and uses basic stitches like half treble and double crochet with clear instructions.

How should I finish and secure the sides?

Fasten off leaving a long tail and fold sides in half, then sew along the base where the htr row and dc row meet to secure the shape.