Make a charming handmade baby doll with a matching stroller and tiny bunny using this detailed crochet pattern. You will enjoy step-by-step rounds, clear photos, and helpful assembly tips to finish a delightful set. Perfect for gifting or keeping as a cute collectible to brighten your day.
Progress Tracker
0% Complete
— Baby doll :
— Body :
Info :
Place row marker here.
Round 3 :
(1sc, inc) *6 (18)
Round 4 :
(2sc, inc) *6 (24)
Round 5 :
(3sc, inc) *6 (30)
Round 6 :
(4sc, inc) *6 (36)
Round 7-11 :
36sc (5 rounds) (36)
Round 12 :
Change color to Light Brown. BLO 36sc (36)
Round 13 :
(4sc, dec) *6 (30)
Round 15 :
(3sc, dec) *6 (24)
Round 16-17 :
24sc (2 rounds) (24)
Round 18 :
(2sc, dec) *6 (18)
Info :
Stuff with fiberfill in the process.
— Head :
Round 21 :
(1sc, inc) *18 (54)
Round 22 :
(8sc, inc) *6 (60)
Round 23-27 :
60sc (5 rounds) (60)
Round 28 :
18sc, (2sc, dec) *6, 18sc (54)
Round 29 :
(7sc, dec) *6 (48)
Round 30-34 :
48sc (5 rounds) (48)
Round 35 :
(6sc, dec) *6 (42)
Info :
Insert the eyes between rounds 29-30 at a distance of 12-14 sc.
Round 36 :
(5sc, dec) *6 (36)
Round 37 :
(4sc, dec) *6 (30)
Round 38 :
(3sc, dec) *6 (24)
Info :
Stuff the head with fiberfill.
Round 39 :
(2sc, dec) *6 (18)
Round 40 :
(1sc, dec) *6 (12)
Info :
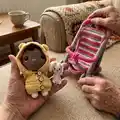
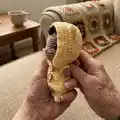
Fasten off, cut the yarn, weave in the ends. Embroider the nose with light brown yarn. Embroider the whites of the eyes with white thread. Embroider the upper eyelids with black thread. Embroider the mouth with black thread. Embroider the hair with black yarn (see photo for placement). Embroider the eyebrows with black thread. Paint pink pastel to draw cheeks and nose.
— Ears (make 2) :
Info :
With Light Brown yarn. 6sc in MR, leave a long tail for sewing.
Item Name (P1) :
Sew the ears to the head.
Item Name (P2) :
Curl. With Black yarn: Chain16, Start in the second chain from the hook: 15inc (30) leave a long tail for sewing. Sew the curl to the head (see photo).
— Arms (make 2) :
Info :
With Light Brown yarn.
Info :
Place row marker here.
Round 2-11 :
7sc (10 rounds) (7)
Info :
Stuff with fiberfill in the process. Fasten off, cut the yarn, weave in the ends. Fasten the arms with a thread mount. Attach the arms using a long needle and thread (look at the pictures in the pattern for thread mounting).
— Legs (make 2) :
Round 1 :
Chain 6. Start in the second chain from the hook: inc, 3sc, 3sc in the last chain, 4sc (12) Place row marker here.
Round 2 :
2inc, 3sc, 3inc, 3sc, inc (18)
Round 4 :
4sc, 6dec, 2sc (12)
Round 5 :
(2sc, dec) *3 (9)
Info :
Stuff with fiberfill in the process.
Round 7 :
Change color to Light Brown. BLO 9sc (9)
Round 8-11 :
9sc (4 rounds) (9)
Info :
Fasten off, cut the yarn, weave in the ends. Fasten the legs with a thread mount. Attach the legs using a long needle and thread (see placement diagram in pattern).
— Jumpsuit :
Info :
With Yellow yarn. Work in rows.
Row 1 :
Chain 31. From the second chain on the hook: 30sc, turn (30)
Row 2 :
ch1, 5sc, ch6 (skip 6sc, start from the next stitch), 8sc, ch6 (skip 6sc, start from the next stitch), 5sc, turn (30)
Row 3 :
ch1, (4sc, inc) *6 turn (36)
Row 4 :
ch1, 36sc, turn (36)
Row 5 :
ch1, (5sc, inc) *6 turn (42)
Row 6 :
ch1, 42sc, turn (42)
Row 7 :
ch1, (6sc, inc) *6 turn (48)
Row 8-14 :
ch1, 48sc, turn (7 rows) (48)
Row 15 :
ch1, (6sc, dec) *6, turn (42)
Row 16 :
ch1, 42sc, turn (42)
Row 17 :
ch1, (5sc, dec) *6 turn (36)
Row 18-19 :
ch1, 36sc, turn (2 rows) (36)
Info :
Cut the yarn. Fold the resulting piece of jumpsuit so that the cut is in the middle. Sew the middle part (between the legs). Sew the middle part in such a way that there are 14sc on each leg.
Item Name (Sleeve P1) :
Sleeve (make 2). Crochet the holes under the sleeves. Attach the yellow yarn to the bottom corner, work in rounds with turns. 1. ch1, 14sc, sl st, turn (14). 2.-4. ch1, 14sc, sl st, turn (3 rows) (14). Cut the yarn.
Info :
Sew buttons on one side of the "cut" at an equal distance (I got 3 pieces). Opposite the buttons, make loops, crochet with the edge of the "cut": Attach the yellow yarn: [4sl st on the edge, ch 8 (loops for buttons)]*3, 2sl st. Cut the yarn.
— Hood :
Info :
Return to round 1 of the jumpsuit and work in rows with Yellow yarn. Leave a long tail for sewing.
Row 1 :
ch2, 10dc, 10dc-inc, 10sc, turn (40)
Row 2 :
ch2, dc2tog, 36dc, dc2tog, turn (38)
Row 3 :
ch2, dc2tog, 34dc, dc2tog, turn (36)
Row 4 :
ch2, dc2tog, 32dc, dc2tog, turn (34)
Row 5-12 :
ch2, 34dc, turn (8 rows) (34)
Info :
Fold the hood in half and sew up the edges carefully.
Round :
Attach the Yellow yarn and crochet around: 50sc. Cut the yarn and fasten off.
Item Name (Ears on the hood) :
Ears on the hood (make 2) With Yellow yarn. 1. 6sc in MR Place row marker here. 2. 6inc (12). 3. (1sc, inc) *6 (18). 4. 18sl st, leave a long tail for sewing. Sew the ears to the hood, put a jumpsuit on the doll.
— Bunny :
Info :
Body. With White yarn.
Round 3 :
(1sc, inc) *6 (18)
Round 4 (paws and tail) :
Crochet the paws and the tail: 4sc on the body, the left paw: ch5, from the second chain on the hook: 3hdc in the last chain, 3sl st; 8sc on the body; the right paw: ch5, from the second chain on the hook: 3hdc in the last chain, 3sl st; 4sc on the body, the tail: 4-dc Bobble st, 1sc on the body (18)
Info :
Stuff with fiberfill in the process.
Round 6 :
(1sc, dec) *6 (12)
Round 8 :
Crochet the paws: 3sc on the body, the left paw: ch5, from the second chain on the hook: 4sl st; 5sc on the body; the right paw: ch5, from the second chain on the hook: 4sl st; 4sc on the body (12)
— Bunny Head :
Round 11 :
(1sc, inc) *6 (18)
Round 12-16 :
18sc (5 rounds) (18)
Round 17 :
(1sc, dec) *6 (12)
Round 18 :
Crochet the ears: 2dec on the head, the left ear: ch13, from the second chain on the hook: 2hdc, 6dc, 3hdc, sc; 2dec on the head; the right ear: ch13, from the second chain on the hook: 2hdc, 6dc, 3hdc, sc; 2dec on the head (6). Stuff with fiberfill. Fasten off, cut the yarn, weave in the ends. Embroider the nose with pink thread. Embroider the eyes, mouth and eyebrows with black thread.
— Baby Stroller :
Info :
Recommendations: Before starting crocheting, read the diagrams of the main parts of the stroller; The wire is inserted into all parts in advance; The parts are stuff with fiberfill in the process; The length of the wire is adjusted depending on the length of the resulting parts; The bends of the parts are corrected during the assembly process; Wrap the ends of the wire carefully with adhesive tape.
Section :
Base design and frame construction are shown in diagrams. Use plastic and wire as indicated. Insert wire into parts in advance and stuff with fiberfill while crocheting.
— Front part (stroller) :
Round 1 :
10sc in MR Place row marker here. In the process of crocheting, insert a wire into the part and stuff it evenly with fiberfill.
Round 2-43 :
10sc (42 rounds) (10)
Round 44-73 :
BLO 10sc (30 rounds) (10)
Round 74-115 :
10sc (42 rounds) (10)
Info :
Fasten off, cut the yarn, weave in the ends. Return to round 44 of the front part and work crocheting in a circle with Bright Pink yarn through back loops rnd 44-73: 300sc. Cut the yarn.
This sweet Baby on a Walk set includes a tiny amigurumi baby, matching bunny, and a wire-frame stroller that makes the scene extra special. Every detail from the embroidered face to the hooded jumpsuit is written step-by-step so you can recreate it with care. Make one for a new mom, a child, or to keep on your shelf as a handmade treasure. 🧶🧸