🧢 Beautiful ✨ Detailed πŸ’ Adorable

Amigurumi Holiday Lights Amigurumi Pattern

Amigurumi Holiday Lights Amigurumi Pattern
4.1β˜… Rating
2-3 Hours Time Needed
2.8K Made This
βœ‚οΈ

Beginner Friendly Level

Perfect for those just starting their crochet journey, with clear instructions and simple techniques

⏱️

Bite-Sized Project

Finishes in 2-4 hoursβ€”perfect for an afternoon of creative relaxation.

🎁

Tiny Treasure

Small, sweet, and gift-worthy creations that fit perfectly in the palm of your hand with detailed charm.

About This Amigurumi Holiday Lights Amigurumi Pattern

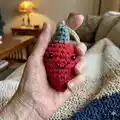
This pattern creates a charming set of small amigurumi holiday light bulbs that you can string into a garland. Each bulb is worked in the round with simple increases and decreases to form the tapered shape. The design includes an easy green cap at the top and optional facial features for a whimsical touch. You can make a whole strand in multiple colors for festive decor or gifts.

Amigurumi Holiday Lights Amigurumi Pattern crochet pattern - detailed view of completed project

Worked in worsted weight yarn with a G hook, these bulbs are small and quick to make. The pattern is beginner friendly and includes instructions for stuffing, eye placement, and stringing the bulbs together.

Why You'll Love This Amigurumi Holiday Lights Amigurumi Pattern

I absolutely love this pattern because it turns simple stitches into a playful holiday garland that brings instant cheer. I enjoy how quickly each bulb comes together, making it easy to assemble a whole strand in an afternoon. The pattern is flexible, so I often switch up colors and faces to create different personalities for each bulb. It feels great to make something festive and handmade that you can gift or display with pride.

Amigurumi Holiday Lights Amigurumi Pattern step 1 - construction progress Amigurumi Holiday Lights Amigurumi Pattern step 2 - assembly progress Amigurumi Holiday Lights Amigurumi Pattern step 3 - details and accessories Amigurumi Holiday Lights Amigurumi Pattern step 4 - final assembly and finishing

Switch Things Up

I love customizing these bulbs by changing color palettes; try pastels for a soft look or neon brights for a modern twist.

I often change the yarn weight and hook to make minis for keychains or larger chunky bulbs for a bold garland.

I like to add embroidered faces or tiny felt accessories to give each bulb a unique personality and story.

Try switching the green cap color or making striped bulbs by alternating colors every few rounds for playful patterns.

I sometimes add a small loop at the top with a longer tail to make hanging them individually easier for ornaments.

For a spiced-up version, I add metallic or sparkly yarn for a festive shimmer that looks great on a mantelpiece.

If I want posability, I thread a thin wire through the string and secure bulbs so they can be posed slightly for display.

I recommend experimenting with safety eyes, embroidering different eye shapes, or using French knots for cute facial expressions.

To create a full scene, I make sets in coordinated colors and mix in crocheted stars or tiny trees between bulbs on the same chain.

Don't be afraid to combine techniques like surface crochet or beading to embellish a few special bulbs and make the garland really stand out.

Common Mistakes & How to Fix Them

βœ— Skipping the magic ring step will create a hole at the tip of the bulb; always start with a 3-stitch magic ring to close the tip neatly. βœ— Not counting stitches after increases and decreases causes uneven shaping and mismatch later; count stitches after each round to ensure you stay on track. βœ— Stuffing too much or too little will distort the bulb shape and make sewing difficult; stuff gradually and evenly, shaping as you go to maintain a smooth profile. βœ— Forgetting to attach or secure safety eyes before stuffing can make placement awkward or impossible later; attach safety eyes at the recommended round and secure tightly before continuing. βœ— Weaving in ends after finishing without leaving a long tail can make sewing caps and stringing difficult; leave a long tail for sewing and weave in ends securely when finished.

Amigurumi Holiday Lights Amigurumi Pattern

Brighten your home with a handmade strand of amigurumi holiday lights you can crochet in an afternoon. This pattern guides you through simple rounds to make small bulb-shaped lights that look adorable strung together. Perfect for gifting or seasonal decor, you can customize colors and faces to match your style. The pattern is quick, approachable, and great for practicing basic amigurumi shaping.

Beginner Friendly 2-3 Hours

Materials Needed for Amigurumi Holiday Lights Amigurumi Pattern

β€” Main Fabric

  • 01
    Worsted weight yarn (#4) in desired colors (small amounts for each bulb, use multiple colors for variety)
  • 02
    Green worsted weight yarn (#4) for bulb caps (small amount)
  • 03
    Polyfil stuffing for filling bulbs
  • 04
    Black embroidery thread (optional for mouth and facial details)

β€” Tools Required

  • 01
    Crochet hook size G (4.0 mm)
  • 02
    Polyfil stuffing
  • 03
    Needle for sewing and weaving ends
  • 04
    Safety Eyes (optional)
  • 05
    Black embroidery thread (optional)

Progress Tracker

0% Complete

β€” Bulb :

Info :

Make a 3 stitch magic ring

Round 1 :

Inc around (6)

Round 2 :

*sc 2, inc 1. Repeat from * (8)

Round 3 :

*sc 1, inc 1. Repeat from * (12)

Round 4 :

*sc 2, inc 1. Repeat from * (16)

Round 5 :

*sc 3, inc 1. Repeat from * (20)

Round 6-8 :

sc around (20)

Round 9 :

*sc 3, dec 1. Repeat from * (16)

Round 10 :

*sc 2, dec 1. Repeat from * (12)

Info :

Attach safety eyes if desired. Stuff with Polyfil.

Round 11 :

dec around (6)

Round 12 :

switch to green yarn, sc around (6)

Round 13 :

sc around (6)

Info :

Break off yarn, weave in ends. Embroider eyes and mouth if desired.

Info :

To string together bulbs, begin a chain with desired color and chain through the top of a bulb every 10 inches or spaced however far apart you wish.

Assembly Instructions

  • Attach safety eyes between the rounds indicated (after Round 10) before stuffing, then stuff the bulb firmly with Polyfil to shape.
  • Sew the green cap to the top opening after working Round 13 and weave in the yarn tail securely to close any gaps.
  • String bulbs by beginning a chain with your chosen color and threading through the top of each bulb every 10 inches or to your desired spacing.
  • Embroider eyes and mouth with black embroidery thread if desired, stitching before final weave-in so threads are secure and neat.
  • Weave in all ends and trim excess yarn, then gently shape each bulb so they sit nicely on the string when hung.

Important Notes

  • πŸ’‘Attach safety eyes before stuffing to ensure correct placement and a secure hold on the fibers.
  • πŸ’‘Stuff bulbs gradually and evenly to avoid lumps and maintain the tapered shape of the bulb.
  • πŸ’‘Weave in ends securely and leave a long tail when sewing caps or stringing to make assembly easier.
  • πŸ’‘Switch colors cleanly at Round 12 to create a neat green cap for the top of the bulb.

Make a cheerful strand of handmade amigurumi holiday lights to brighten any room this season. These tiny bulbs are quick to crochet and wonderful for gifting or decorating your home. Mix and match colors, add cute faces, and hang them up for instant festive charm. πŸ§Άβœ¨πŸŽ„

You ask,

we answer.

FAQs

What size will the finished piece be?

Each finished bulb measures approximately 2-3 inches tall when using worsted weight yarn and a G (4.0 mm) hook, though size may vary slightly with tension.

Can I use different yarn weights for this pattern?

Yes, you can use different yarn weights, but this will affect the final size; use an appropriate hook for your chosen yarn and adjust stuffing and spacing accordingly.

Do I need prior crochet experience for this pattern?

This pattern is rated beginner friendly, so basic knowledge of single crochet, increases, decreases, and working in the round is helpful for best results.

How long does this project typically take to complete?

Most crocheters complete a small strand or several bulbs in about 2-3 hours total, depending on how many bulbs you make and how detailed the faces or decorations are.