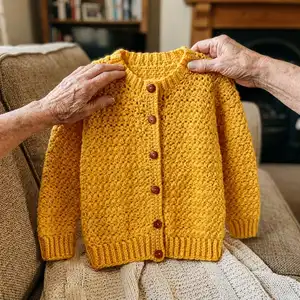
Create a cozy, textured crew neck cardigan designed for adult sizes with clear shaping and finishing instructions. This pattern features a simple two-row pattern repeat, comfortable fit, and practical button band for everyday wear. Youll enjoy working up a wearable wardrobe staple that layers beautifully over tees and sweaters.
Progress Tracker
0% Complete
— BACK :
1st row :
(RS). 1 sc in 2nd ch from hook. 1 sc in each ch to end of chain. Turn. 9 sc.
2nd row :
Ch 1. 1 sctbl in each st to end of row. Turn.
Info :
Rep last row until Ribbing (when slightly stretched) measures 18½ (20¼-22¼-24½-27½-31½)" [47 (51.5-56.5-62-70-80) cm], ending on a WS row. Do not fasten off. Do not turn.
Next row :
(WS). Ch 1. Work 61 (67-73-81-91-103) sc evenly across long edge of Ribbing. Turn.
Proceed :
Proceed in pat as follows:
1st row :
(RS). Ch 1. 1 sc in first st. *1 dc in next st. 1 sc in next st. Rep from * to end of row. Turn.
2nd row :
Ch 3 (counts as dc). *1 sc in next dc. 1 dc in next sc. Rep from * to end of row. Turn.
3rd row :
Ch 1. 1 sc in first dc. *1 dc in next sc. 1 sc in next dc. Rep from * to end of row, working last sc in top of ch 3. Turn.
Info :
Rep last 2 rows for pat until work from lower edge measures 16 (16-16-16½-16½-16½)" [40.5 (40.5-40.5-42-42-42) cm] for Her Version or 17 (17-17-17½-17½-17½)" [43 (43-43-44.5-44.5-44.5) cm] for His Version, ending on a WS row. Fasten off.
Shape armholes: Next row :
(RS). Skip first 6 (8-10-12-14-18) sts. Join yarn with sl st to next dc. Ch 1. 1 sc in same sp as last sl st. Pat across next 48 (50-52-56-62-66) sts. Turn. Leave rem 6 (8-10-12-14-18) sts unworked.
Cont :
Cont even in pat over 49 (51-53-57-63-67) sts until armhole measures 8½ (9-9½-10-10½-11)" [22.5 (23-23-24.5-25.5-27) cm], ending on a WS row. Fasten off.
Shape neck: 1st row :
(RS). Ch 1. Pat across 19 (19-20-21-24-24) sts (neck edge). Turn. Leave rem 6 (6-7-8-7-9) sts unworked.
2nd row :
Ch 1. Sc2tog. Pat to end of row. Turn.
3rd row :
Ch 1. Pat to last 2 sts. Sc2tog. Turn.
Info :
Rep last 2 rows twice more. 13 (13-14-15-18-18) sts rem. Work 1 row even in pat. Fasten off.
Shape left shoulder: Next row :
(RS). Skip first 6 (6-8-8-10-10) sts. Join yarn with sl st to next dc. Ch 1. 1 sc in same sp as last sl st. Pat to end of row. Fasten off.
— LEFT FRONT :
1st row :
(RS). 1 sc in 2nd ch from hook. 1 sc in each ch to end of chain. Turn. 9 sc.
2nd row :
Ch 1. 1 sctbl in each st to end of row. Turn.
Info :
Rep last row until Ribbing (when slightly stretched) measures 9 (10-11-12-13½-15½)" [23 (25.5-28-30.5-34.5-39) cm], ending on a WS row. Do not fasten off. Do not turn.
Next row :
(WS). Ch 1. Work 31 (31-33-33-35-37) sc evenly across long edge of Ribbing. Turn.
Proceed :
Proceed in pat as follows:
1st row :
(RS). Ch 1. 1 sc in first st. *1 dc in next st. 1 sc in next st. Rep from * to end of row. Turn.
2nd row :
Ch 3 (counts as dc). *1 sc in next dc. 1 dc in next sc. Rep from * to end of row. Turn.
3rd row :
Ch 1. 1 sc in first dc. *1 dc in next sc. 1 sc in next dc. Rep from * to end of row, working last sc in top of ch 3. Turn.
Info :
Rep last 2 rows for pat until work from lower edge measures 16 (16-16-16½-16½-16½)" [40.5 (40.5-40.5-42-42-42) cm] for Her Version or 17 (17-17-17½-17½-17½)" [43 (43-43-44.5-44.5-44.5) cm] for His Version, ending on a WS row.
Shape shoulders: Next row :
(RS). Pat across next 36 (38-36-40-42-46) sts. Fasten off. Turn. Leave rem 6 (6-8-8-10-10) sts unworked.
Next row :
(WS). Ch 1. Work 31 (33-33-35-37-41) sc evenly across long edge of Ribbing. Turn.
Proceed in pat :
Proceed in pat as follows for Right Front and remaining shaping (see RIGHT FRONT section for mirrored shaping and armhole instructions).
— RIGHT FRONT :
Work from :
Work from ** to ** as given for Left Front. Do not fasten off.
Shape armhole: Next row :
(RS). Skip first 6 (6-8-8-10-10) sts. Join yarn with sl st to next dc. Ch 1. 1 sc in same sp as last sl st. Pat to end of row. Turn. Leave rem 6 (8-10-12-14-18) sts unworked.
Cont :
Cont even in pat over 25 (25-27-29-31-33) sts until armhole measures 8 rows less than Back to shoulder, ending on a WS row. Fasten off.
Shape neck :
With RS facing, skip first 6 (6-7-8-7-9) sts. Join yarn with sl st to next st and pat to end of row. Next row: Ch 3. Pat to last 2 sts. Sc2tog. Turn. Next row: Ch 1. Sc2tog. Pat to end of row. Turn. Rep last 2 rows twice more. 13 (13-14-15-18-18) sts rem. Work 1 row even in pat. Fasten off.
— SLEEVES :
1st row :
(RS). 1 sc in 2nd ch from hook. 1 sc in each ch to end of chain. Turn. 9 sc.
2nd row :
Ch 1. 1 sctbl in each st to end of row. Turn.
Info :
Rep last row until Ribbing (when slightly stretched) measures 9½ (9½-10-10-10½-10½)" [24.5 (24.5-25.5-25.5-26.5-26.5) cm], ending on a WS row. Do not fasten off. Do not turn.
Next row :
(WS). Ch 1. Work 31 (31-33-33-35-37) sc evenly across long edge of Ribbing. Turn.
Proceed :
Proceed in pat as follows:
1st row :
(RS). Ch 1. 1 sc in first st. *1 dc in next st. 1 sc in next st. Rep from * to end of row. Turn.
2nd row :
Ch 3 (counts as dc). *1 sc in next dc. 1 dc in next sc. Rep from * to end of row. Turn.
3rd row :
Ch 1. 1 sc in first dc. *1 dc in next sc. 1 sc in next dc. Rep from * to end of row, working last sc in top of ch 3. Turn.
Increase rows :
4th row (inc row): Ch 1. (1 sc. 1 dc) in first sc. *1 sc in next dc. 1 dc in next sc. Rep from * to last 2 sts. 1 sc in next dc. (1 dc. 1 sc) in last sc. Turn.
5th row :
Ch 3 (counts as dc). *1 sc in next dc. 1 dc in next sc. Rep from * to end of row. Turn.
6th row (inc row) :
Ch 3 (counts as dc). 1 sc in first dc. *1 dc in next sc. 1 sc in next dc. Rep from * to last 2 sts. 1 dc in next sc. (1 sc. 1 dc) in top of ch 3. Turn.
Info :
Rep 3rd to 6th rows 2 (3-3-4-6-7) times more. 43 (47-49-53-63-69) sts.
Sizes note :
Sizes XS/S, M, L, XL and 2/3XL only: Next row: (RS). Ch 1. 1 sc in first dc. *1 dc in next sc. 1 sc in next dc. Rep from * to end of row, working last sc in top of ch 3. Turn.
Cont even :
Cont even in pat over 25 (25-27-29-31-33) sts until armhole measures 8 rows less than Back to shoulder, ending on a WS row. Fasten off.
— FINISHING :
Finishing :
Sew shoulder seams.
1st row :
(RS). 1 sc in 2nd ch from hook. 1 sc in each ch to end of chain. Turn. 6 sc.
2nd row :
Ch 1. 1 sctbl in each st to end of row. Turn.
Info :
Rep last row until Neckband (when slightly stretched) measures length to fit along neck edge, sewing in place as you work, taking care to allow stretch in seam.
Button Band: 1st row :
(RS). Join yarn with sl st and work 71 (73-73-77-77-81) sc for Her Version up Left Front edge to top of neckband or 75 (77-77-81-81-85) sc for His Version down Right Front to lower edge. Turn.
2nd to 5th rows :
Ch 1. 1 sc in each sc to end of row. Turn.
Info :
Place markers on band for 7 buttons, having bottom button ½" [1 cm] above lower edge, top button in center of neckband and rem 5 buttons spaced evenly between.
Buttonhole Band: 1st row :
(RS). Join yarn with sl st and work 71 (73-73-77-77-81) sc for Her Version down Right Front edge to lower edge or 75 (77-77-81-81-85) sc up Left Front edge to top of neckband for His Version. Turn.
2nd row :
Ch 1. 1 sc in each sc to end of row. Turn.
3rd row :
Ch 1. *1 sc in each sc to next button marker. Ch 2. Skip next 2 sc. Rep from * 6 times more. 1 sc in each sc to end of row. Turn.
4th row :
Ch 1. 1 sc in each sc and 2 sc in each ch-2 sp to end of row. Turn.
5th row :
Ch 1. 1 sc in each sc to end of row. Fasten off.
Sew :
Sew in sleeves, placing rows above markers along unworked sts of Front and Back to form square armholes. Sew side and sleeve seams.
This cozy crew neck cardigan is a lovely addition to your handmade wardrobe, combining simple stitch patterns with thoughtful shaping for a polished look. It comes together beautifully whether you choose Caron Simply Soft Heathers or Solids, and the button band gives it a classic finish. Make one for yourself or a friend and enjoy layering comfort and style all season long. 🧶 👕