🧢 Beautiful ✨ Detailed πŸ’ Adorable

Adrian Pants Pattern

Adrian Pants Pattern
4.3β˜… Rating
5-7 Hours Time Needed
2.5K Made This
βœ‚οΈ

Intermediate Level

Ideal for those with basic crochet experience, featuring slightly more advanced stitches and techniques to expand your skills.

⏱️

Weekend Treat

Takes 5-7 hours, making it an enjoyable project to finish over a couple of days.

πŸ‘•

Casual Chic

Relaxed style with a modern twist, perfect for everyday wear while maintaining that handcrafted uniqueness.

About This Adrian Pants Pattern

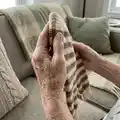
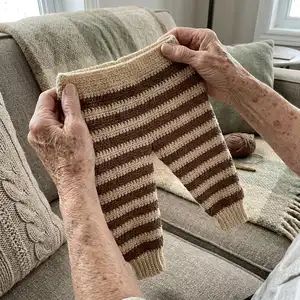
Adrian Pants are simple, striped toddler pants knitted top-down with a smart gusset and short-row shaping for a comfortable fit. The pattern features a knitted hem with a channel for elastic, a 7-row stripe repeat, and clear instructions for multiple child sizes. You can use sport weight yarn to create a soft, flexible garment that wears well and is easy to care for.

Adrian Pants Pattern crochet pattern - detailed view of completed project

Includes instructions for sizes 6-12 months up to 7-8 years, with yardage estimates for two colors. Suggested needle sizes and gauge are provided so you can match the fit and adjust easily.

Why You'll Love This Adrian Pants Pattern

I absolutely love this pattern because the top-down construction makes it easy to try on as you go and guarantee a great fit. The striped design is classic and playful, perfect for everyday wear and layering. I enjoy the little details like the knitted hem that hides the elastic β€” it gives the pants a neat professional finish. The short-row shaping and gusset create real comfort for little ones, and I love how adaptable the pattern is to different colors and yarns.

Adrian Pants Pattern step 1 - construction progress Adrian Pants Pattern step 2 - assembly progress Adrian Pants Pattern step 3 - details and accessories Adrian Pants Pattern step 4 - final assembly and finishing

Switch Things Up

I love changing up the stripe colors to create different moodsβ€”try pastel shades for a soft baby set or high-contrast colors for a bold, playful look.

You can easily make a mini or jumbo version by switching yarn weight and adjusting needle size; thicker yarn with larger needles creates a chunky, cozy pair.

I sometimes add contrasting cuffs or a rolled hem instead of the knitted hem to change the finish and make laundering easier.

For a more fitted waist, try smaller elastic or add an optional tie by knitting a small i-cord and threading it through the hem gap.

I recommend knitting one leg longer for taller kids or adding length in the leg before the cuff if you want more bootcut or ankle coverage.

Try substituting the short-row method with wrap-and-turn if you're more comfortable with that technique; the fit will be similar with careful execution.

I enjoy adding little embroidered details on the knees or a tiny pocket on the back for extra charm and personalization.

Want a seamless set? Make a matching hat and mittens using the same stripe repeat to create a coordinated outfit.

If you like rib variation, switch to a 2x2 rib for the cuff for a chunkier, textured finish that still keeps elasticity.

I often block the pieces lightly to even out the stitches and then insert elastic for a professional finished look; blocking can really change the drape and fit.

Common Mistakes & How to Fix Them

βœ— Skipping the provisional purled round before knitting the hem can make it impossible to neatly pick up cast-on edge; follow the hem instructions carefully and fold the work at the purled round when instructed. βœ— Forgetting to leave a small gap when knitting the hem down will prevent you from threading the elastic later; leave a small unworked opening in the hem before finishing. βœ— Not working the german short rows correctly can create gaps or uneven shaping; follow the german short rows instructions step-by-step and work the DS as one stitch. βœ— Failing to place or respect markers at M and PM will cause misplaced center front or gusset increases; place markers exactly as instructed and keep them in position while working.

Adrian Pants Pattern

Make cozy, striped toddler pants worked top-down with a fitted gusset and a neat knitted hem that hides elastic. This pattern gives clear shaping with short rows for a better fit at the back and a playful stripe pattern you can customize. Suitable for knitters familiar with circular knitting and simple shaping, these pants become a wardrobe favorite.

Intermediate 5-7 Hours

Materials Needed for Adrian Pants Pattern

β€” Main Fabric

  • 01
    Sport weight yarn (recommended): Color A: 190 (220) 260 (300) 350 meters / 210 (250) 290 (330) 390 yards
  • 02
    Sport weight yarn (recommended): Color B: 140 (160) 180 (200) 220 meters / 160 (180) 200 (220) 240 yards
  • 03
    Model yarn: Wool4You Capella color 260 and 264 (used for 18 mo-2 yrs sample)
  • 04
    30 mm elastic approx. length 46 (49) 52 (55) 58 cm / 18 (19.5) 20.5 (21.25) 22.75 inches

β€” Tools Required

  • 01
    3 mm / US 2.5 circular needle 40 cm / 16 inches and DPNs
  • 02
    3.5 mm / US 4 circular needle 40 and 60 cm / 16 and 24 inches, and DPNs
  • 03
    Stitch markers (place marker M, and PM center front)
  • 04
    Stitch holder or spare ndl
  • 05
    Tapestry/yarn needle for weaving in ends
  • 06
    Scissors
  • 07
    30 mm elastic for waistband
  • 08
    Measuring tape

Progress Tracker

0% Complete

β€” Body :

Info :

With ndl 3 mm / US 2.5 and color A, CO 112 (119) 126 (133) 140 sts.

Info :

PM, join to work in the rnd.

Round 1 :

Work stst in the rnd until your work measures 3 (3) 3.5 (3.5) 3.5 cm / 1.25 (1.25) 1.5 (1.5) 1.5 inches.

Round 2 :

Next rnd: P all sts.

Round 3 :

Then work sts in the rnd for another 3 (3) 3.5 (3.5) 3.5 cm / 1.25 (1.25) 1.5 (1.5) 1.5 inches.

Info :

Knit the hem down: The following rnd, fold your work at the purled rnd and knit the cast on edge together with the live sts, by working your ndl knitwise into the live st then into the associated CO st, and pull your yarn through both sts. Remember to leave a small gap to thread the elastic.

Info :

Tip: If you find this too complicated, you can knit this rnd, and sew down the hem later. But knitting it down gives it a neater look, so give it a try!

Round 4 :

Next rnd: With ndl 3.5 mm / US 4 work one rnd while inc as follows: *K7, INC1*. Repeat *-* to end of rnd. You have 128 (136) 144 (152) 160 sts on your ndl.

Info :

Short row shaping for the back: Working short rows, you will add fabric in the back of the piece, to allow for better fit. Use the german short rows as described in the box below, or use your preferred short row technique.

Row 1 :

row (RS): K6 sts past M, turn work.

Row 2 :

row (WS): gsr, P6 sts past M, turn work.

Row 3 :

row (RS): gsr, K6 sts past last TP, turn work.

Row 4 :

row (WS): gsr, P6 sts past last TP, turn work.

Info :

Repeat row 3 and 4 until you've turned a total of seven times on each side of the M in the back.

Info :

Next, start the stripe pattern: 7 rnds of each color. Continue in the rnd with the stripe pattern until your work measures approx. 15 (16) 17 (18) 19 cm / 6 (6.25) 6.75 (7) 7.5 inches center front. PM center front.

β€” Gusset :

You will now inc on each side of M both in front and back to create a gusset. Inc at both M as follows:

Round 1 :

M1R, K1, SM, K1, M1L.

Round 2 :

no inc. K all sts.

Round 3 :

M1R, K2, SM, K2, M1L.

Round 4 :

no inc. K all sts.

Round 5 :

M1R, K3, SM, K3, M1L.

Round 6 :

no inc. K all sts.

Round 7 :

M1R, K4, SM, K4, M1L.

Info :

You have 144 (152) 160 (168) 176 sts on your ndl.

Info :

The pattern continues on the next page.

β€” German short rows :

Info :

When you've turned your work: wyif slip 1 st purlwise. Bring working yarn over the ndl to the back, pull tightly until the st falls to the back of the work and the 2 legs are on the ndl. These two legs are now referred to as a double st (DS) and are counted as one st.

Info :

If the next st is a purl st, bring working yarn under the right hand needle and get ready to purl as usual. If the next st is a knit st, keep working yarn on the back of work and k the next st as usual. When you get to the point of working the DS you either k or p it, depending on whether you're on the RS or WS. Remember that the DS is just 1 st, you work both legs at the same time.

β€” Legs :

Info :

Slip half of the sts, from M to M, on a st holder. You have 72 (76) 80 (84) 88 sts on your ndl.

Info :

PM and join to work the remaining sts in the rnd while you continue the stripe pattern.

Info :

Leg dec: ssk, SM, k1, k2tog.

Info :

Work the leg dec every 2 (2) 2.5 (3) 3 cm / 0.75 (0.75) 1 (1.25) 1.25 inches, a total of 10 (11) 12 (13) 14 times.

Info :

This should leave you with 52 (54) 56 (58) 60 sts on your ndl.

Info :

Continue working in the rnd until the leg measures 22 (27) 33 (39) 45 cm / 8.75 (10.75) 13 (15.5) 17.75 inches.

β€” Cuff :

Info :

With ndl 3 mm / US 2.5 and color A, K one rnd.

Round 1 :

Work 1x1 rib, i.e., K1, P1, until the rib measures approx. 6-10 cm / 2.5-4 inches.

Info :

Bind off in pattern.

Info :

Knit the other leg the same way and weave in all ends.

Assembly Instructions

  • Leave a small gap when knitting the hem down so you can thread the elastic through the hem channel after finishing.
  • After completing gusset increases and shaping, slip half the sts from M to M onto a stitch holder and work one leg at a time in the round, rejoining to continue the stripe pattern.
  • Sew or weave in all loose ends and check the stripes align where legs join; block gently if desired to even the fabric.
  • Thread the elastic through the hem channel, overlap the elastic to fit the waist, stitch ends securely, and close the gap in the hem.
  • Knit the second leg following the same decreases and cuff instructions to ensure both legs match in length and shaping.

Important Notes

  • πŸ’‘Remember to leave a small gap in the hem when knitting it down so you can insert the elastic later.
  • πŸ’‘Use the german short rows described if you want the exact fit in the back, or substitute your preferred short-row technique.
  • πŸ’‘Place markers (M and PM) where instructed to track center front and gusset placement for accurate shaping.
  • πŸ’‘Weave in ends and block gently if necessary to even the stitch pattern before inserting elastic.

These Adrian Pants are designed to be a practical, stylish everyday staple for little ones, with a neat knitted hem that hides elastic and comfortable short-row shaping. Try bold or soft stripes to match your wardrobe and make a set with the matching hat and mittens for a complete outfit. Enjoy knitting a cozy, handmade piece that will be loved and worn often. 🧢✨

You ask,

we answer.

FAQs

What size will the finished piece be?

The pattern includes sizes 6-12 months, 18 months-2 years, 3-4 years, 5-6 years and 7-8 years; hip circumferences and center front lengths are listed in the size chart in the pattern.

Can I use different yarn weights for this pattern?

Yes, but changing yarn weight will affect gauge and finished size; adjust needle sizes and re-check gauge (24 sts = 10 cm / 4 inches) to match the measurements.

Do I need prior knitting experience for this pattern?

This pattern is rated intermediate because it uses circular knitting, short rows, gusset increases, and knitted hem techniques, so basic circular knitting and short-row experience is recommended.

How long does this project typically take to complete?

Most knitters finish this project in about 5-7 hours, depending on experience and the size you're making.